In this post, we will see how to program drones using ROS2. Perhaps you have programmed drones using ROS1, found that programming drones using ROS2 is not as straightforward, and have been wondering, “how the heck do you program drones using ROS2?” You have come to the right place!
Step 1: Grab the required source code
You can program drones using ROS2 on your local PC by following the instructions in this repository step by step. However if you use the rosject you copied below, we have already done most of the heavy lifting for you and you just need to run a few commands to get your drone flying!
Click here to get your own copy of the project (PS: If you don’t have an account on the ROS Development Studio, you would need to create one. Once you create an account or log in, we will copy the project to your workspace).
That done, open the project using the Run button. This might take a few moments, please be patient.
Step 2: Understand the basic components
The ros2 drone system used in this post consists of three main parts:
A ros2 simulation containing the simulation and the plugin that connects to the rest of the system.
cd ~/ros2_ws
source install/setup.bash
ros2 launch ls2n_drone_simulation single_drone_trajectory_sitl.launch.py
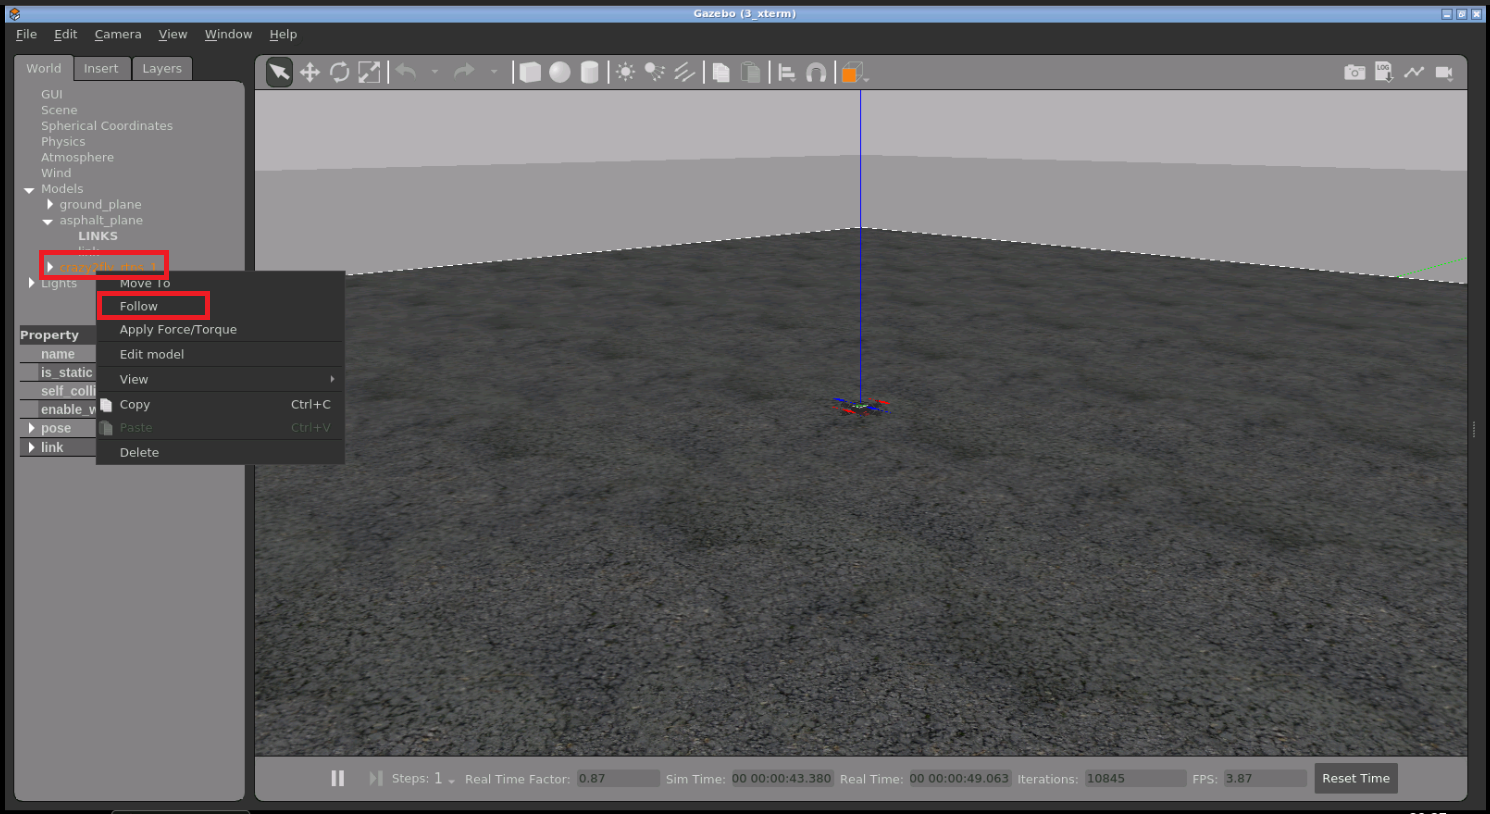
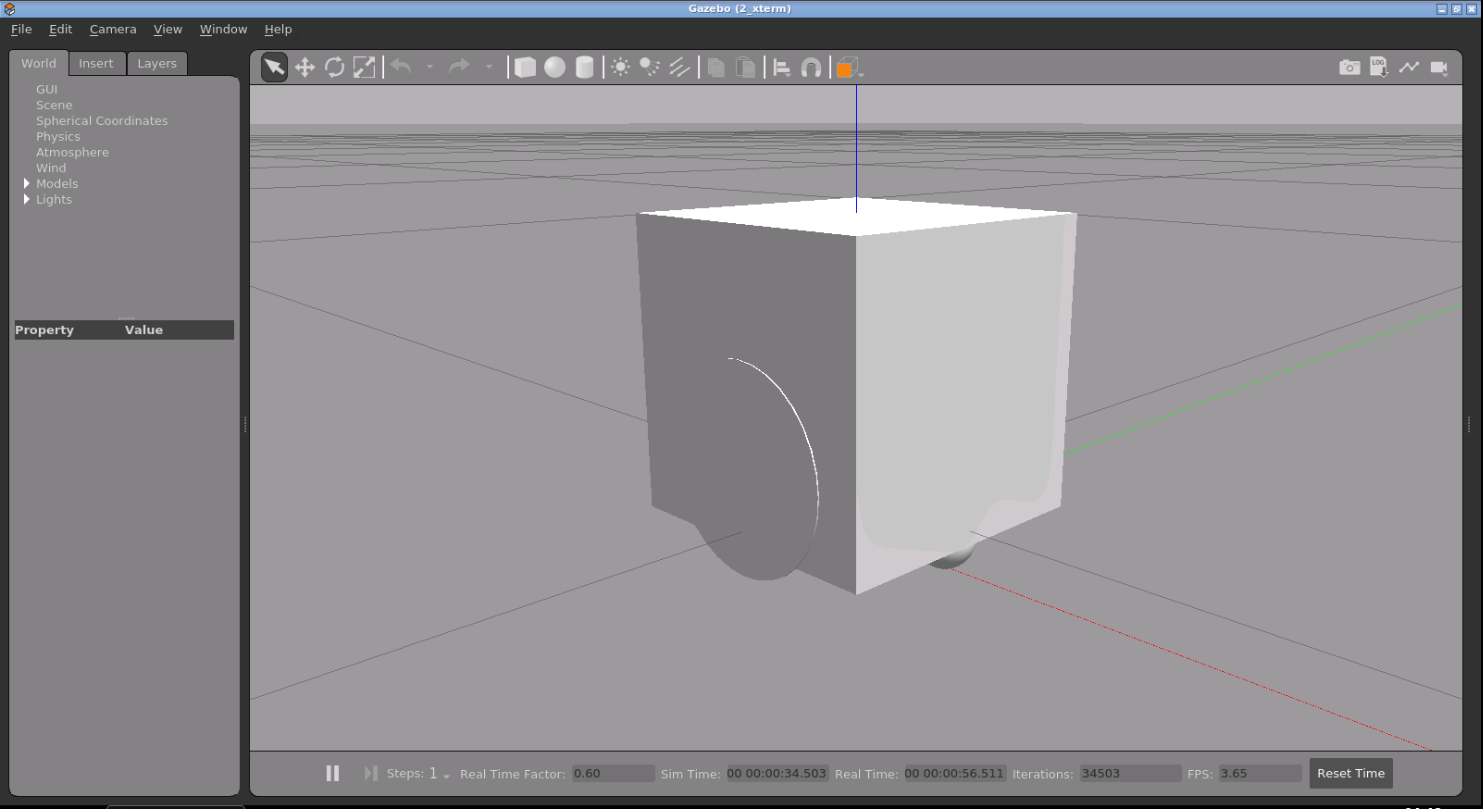
By this time, you should have the simulation running. Open the Gazebo app (if not opened automatically) to see it. Right click on the drone model on the left pane and select “Follow” to keep seeing the drone when it takes off.
Now, open another web shell and start the PX-4 system:
cd ~
cd px4-autopilot/Tools/
./gazebo_sitl_multiple_run_only_px4.sh
Finally, start the ground control system in another web shell:
user:~$ cd squashfs-root/
user:~/squashfs-root$ ./AppRun
The ground control GUI should load shortly. Open the Graphical Tools app to see it, if not opened automatically:
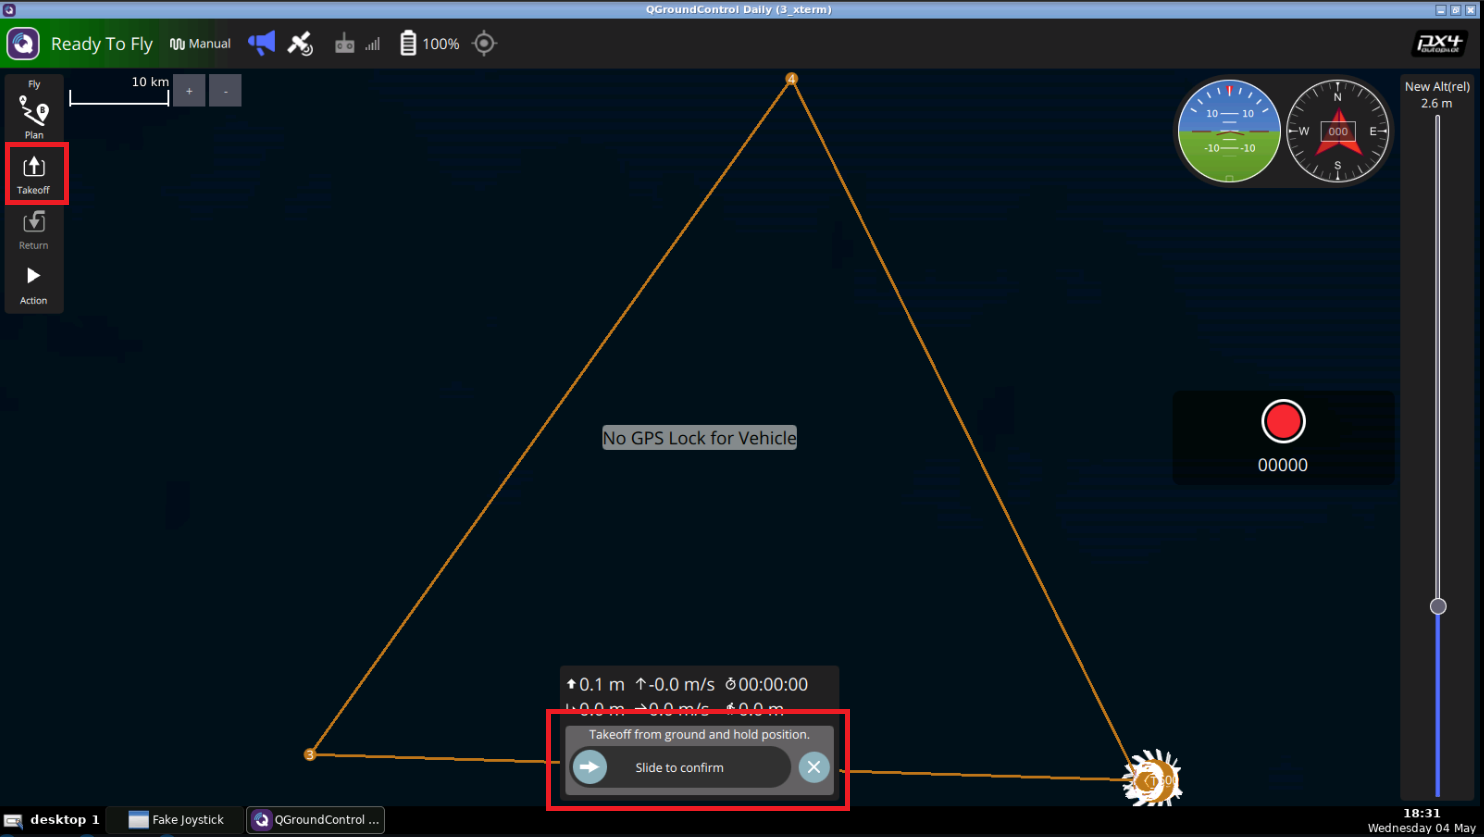
Time to take off the drone!
Ensure the top-left corner of the controller says “Ready to Fly” in a green background.
Click the Takeoff button on the top left.
In the bottom middle, drag the slider to the right to confirm takeoff. You should see something similar to the image below.
If the takeoff does not work, repeat 2 & 3.
After takeoff, the button changes to “Land”. Use it to land the drone.
Step 4: Consolidate your learning
Do you understand how to program drones using ROS2 after watching the video? If not, please review the material again and perhaps go over the video again. Let us know any problems you are seeing in the comments.
Extra Step: Watch the video for the sights and sounds version of how to program drones using ROS2
Did you like this post? Do you have any questions about the explanations? Whatever the case, please leave a comment on the comments section below, so we can interact and learn from each other. If you want to learn about other ROS2 topics, please let us know in the comments area and we will do a video or post about it.
PS: If you don’t have an account on the ROS Development Studio, you would need to create one. Once you create an account or log in, you will be able to follow the steps to setup MoveIt! for a Robot Arm. You will also get access to the robot arm in our remote real robot lab, among other features.
You might also want to try this on a local PC if you have ROS installed. However, please note that we cannot support local PCs and you will have to fix any errors you run into on your own.
Step 2: Watch the video to understand how to setup MoveIt! for a Robot Arm
Main point: you just need to have the URDF file for the robot arm and you feed that into MoveIt!
Here you go:
Step 3: Consolidate your learning
Do you understand how to setup MoveIt! for a Robot Arm? If not, have you gone over the video again? If you have any problems with setting up MoveIt! for the arm, please let us know in the comments.
Did you like this post? Do you have any questions about how to setup MoveIt! for a Robot Arm? Whatever the case, please leave a comment on the comments section below, so we can interact and learn from each other.
If you want to learn about other ROS topics, please let us know in the comments area and we will do a video or post about it.
In this post, we will see how to get an RGB camera working in ROS2 and RVIZ2. You might already be used to doing this in ROS1 and RVIZ1, and it’s easy-peasy. In ROS2 however, it’s a bit tricky and you are about to learn how to break the codes.
Step 1: Grab a copy of the ROS Project containing the code
Click here to get your own copy of the project (PS: If you don’t have an account on the ROS Development Studio, you would need to create one. Once you create an account or log in, we will copy the project to your workspace).
That done, open the project using the Run button. This might take a few moments, please be patient.
You should now see a notebook with detailed instructions. This post includes a summary of these instructions and some other tips.
Step 2: Explore the source code using the IDE
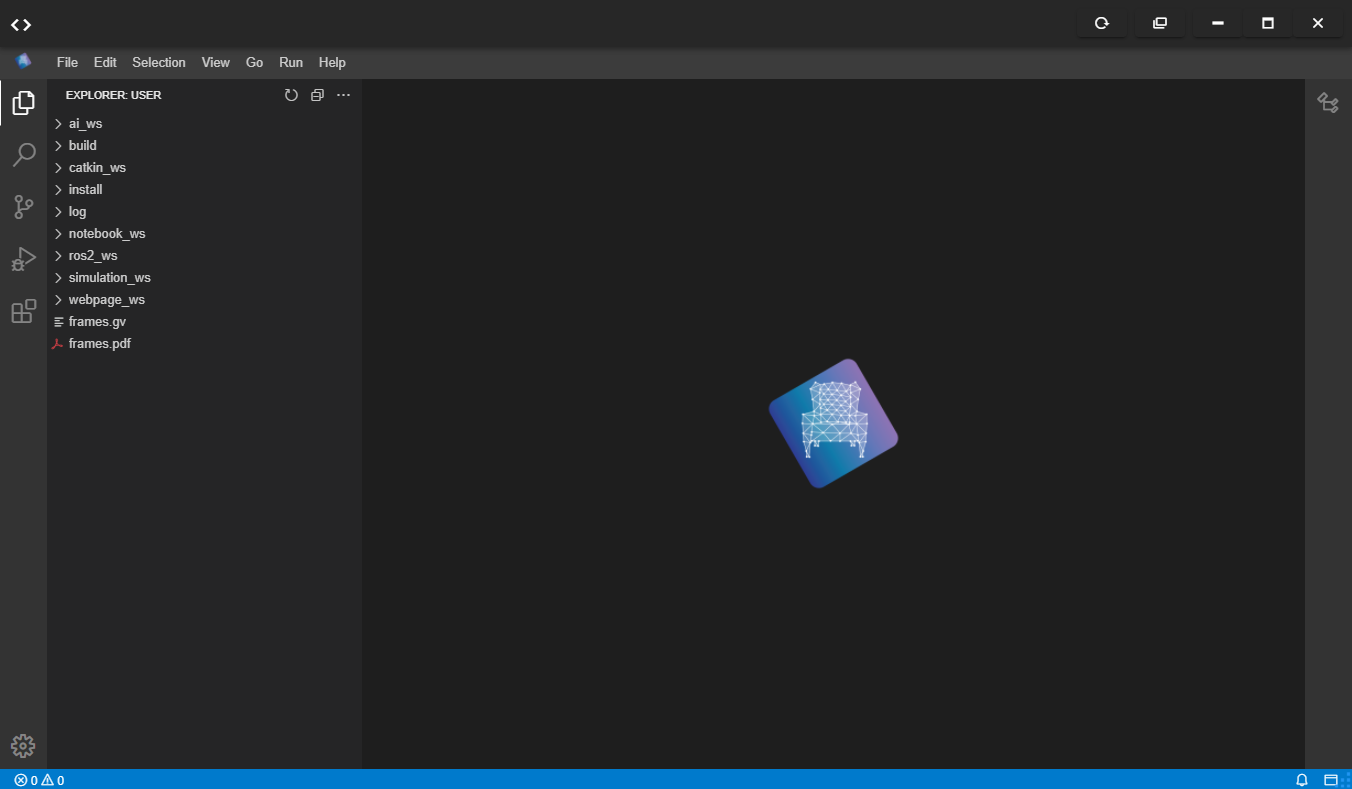
Open the IDE by clicking on the icon as shown above. You should now see something similar to the image below:
All the files used in the simulation are in the ros2_ws/src directory. Explore the files. Double-click to open a file in the editor. You will refer back to some of the files later on.
Step 3: Study the main files needed to get an RGB camera working in ROS2 and RVIZ2
There are two main things you need to do to get this working:
Add the camera to the URDF file (and launch the URDF file) so we can have the camera in Gazebo
Create a robot state publisher node for the robot so we can visualize it in Rviz2
Let’s see these steps in details.
All the code for the simulation is in ros2_ws/src/box_bot/. Let’s examine the main files related to launching the camera, so you can understand how to implement yours.
#!/usr/bin/python3
# -*- coding: utf-8 -*-
import os  from ament_index_python.packages import get_package_share_directory
from launch import LaunchDescription
from launch.actions import DeclareLaunchArgument
from launch.actions import IncludeLaunchDescription
from launch.conditions import IfCondition
from launch.launch_description_sources import PythonLaunchDescriptionSource
from launch.substitutions import LaunchConfiguration
from launch_ros.actions import Node


def generate_launch_description():

    pkg_box_bot_gazebo = get_package_share_directory('box_bot_gazebo')
    pkg_box_bot_description = get_package_share_directory('box_bot_description')

    # Start World
    start_world = IncludeLaunchDescription(
        PythonLaunchDescriptionSource(
            os.path.join(pkg_box_bot_gazebo, 'launch', 'start_world_launch.py'),
        )
    )
    # Spawn the robot
    spawn_robot_world = IncludeLaunchDescription(
        PythonLaunchDescriptionSource(
            os.path.join(pkg_box_bot_description, 'launch', 'spawn_robot_launch_v3.launch.py'),
        )
    )

    return LaunchDescription([
        start_world,
        spawn_robot_world
    ])
The launch file above does two things:
Spawns the world, by calling the launch file that spawns the world.
Spawns the robot, by calling the launch file that spawn the robot. This is where our interest lies. Let’s see how this is done, in the launch file ros2_ws/src/box_bot/box_bot_description/launch/spawn_robot_launch_v3.launch.py.
import os
from ament_index_python.packages import get_package_share_directory
from launch import LaunchDescription
from launch.actions import DeclareLaunchArgument
from launch.substitutions import LaunchConfiguration
from launch_ros.actions import Node

def generate_launch_description():

    use_sim_time = LaunchConfiguration('use_sim_time', default='true')

    # Get the path to the URDF file
    urdf = os.path.join(get_package_share_directory('box_bot_description'), 'robot/', 'box_bot.urdf')
    assert os.path.exists(urdf), "Thebox_bot.urdf doesnt exist in "+str(urdf)

    # Open the URDF file
    with open(urdf, 'r') as infp:
        robot_desc = infp.read()

    return LaunchDescription([
        DeclareLaunchArgument(
            'use_sim_time',
            default_value='false',
            description='Use simulation (Gazebo) clock if true'),
        Node(package='box_bot_description', executable='spawn_box_bot.py', arguments=[urdf], output='screen'),
        Node(
            package='robot_state_publisher',
            executable='robot_state_publisher',
            name='robot_state_publisher',
            output='screen',
            parameters=[{'use_sim_time': use_sim_time, 'robot_description': robot_desc}],
            arguments=[urdf]),
    ])
The launch file above does two things:
Creates a node that that spawns the box bot with the camera, taking the path to the URDF file as the argument. The node is implemented in the file spawn_bot_bot.py file. We’ll look at this file next.
Creates a node that publishes the robot state. It takes the URDF file string as a parameter. This will be used by Rviz2.
#!/usr/bin/python3
# -*- coding: utf-8 -*-
import os
import sys
import rclpy
from gazebo_msgs.srv import SpawnEntity

def main(args=None):
    rclpy.init(args=args)
    node = rclpy.create_node('minimal_client')
    cli = node.create_client(SpawnEntity, '/spawn_entity')

    content = ""
    if sys.argv[1] is not None:
        with open(sys.argv[1], 'r') as content_file:
            content = content_file.read()

    req = SpawnEntity.Request()
    req.name = "box_bot"
    req.xml = content
    req.robot_namespace = ""
    req.reference_frame = "world"

    while not cli.wait_for_service(timeout_sec=1.0):
        node.get_logger().info('service not available, waiting again...')

    future = cli.call_async(req)
    rclpy.spin_until_future_complete(node, future)

    if future.result() is not None:
        node.get_logger().info(
            'Result ' + str(future.result().success) + " " + future.result().status_message)
    else:
        node.get_logger().info('Service call failed %r' % (future.exception(),))

    node.destroy_node()
    rclpy.shutdown()


if __name__ == '__main__':
    main()
The file simply takes the URDF file passed to it and spawns the robot.
Now, let’s see the URDF file itself. The part that adds the camera is labelled Camera, somewhere in the middle of the file. Locate the file in the IDE:
Step 4: Launch the Simulation and Rviz2 to see the RGB camera
Open a web shell and run the following command:
user:~$ cd ~/ros2_wsuser:~/ros2_ws$ source install/setup.bash
user:~/ros2_ws$ ros2 launch box_bot_gazebo box_bot_launch.py
Open the Gazebo app (if it does not open automatically). You should see a simulation similar to this one:
Next, let’s launch Rviz2 to see the camera. In another web shell, type:
rviz2
Now open the graphical tools app (if it does not open automatically).
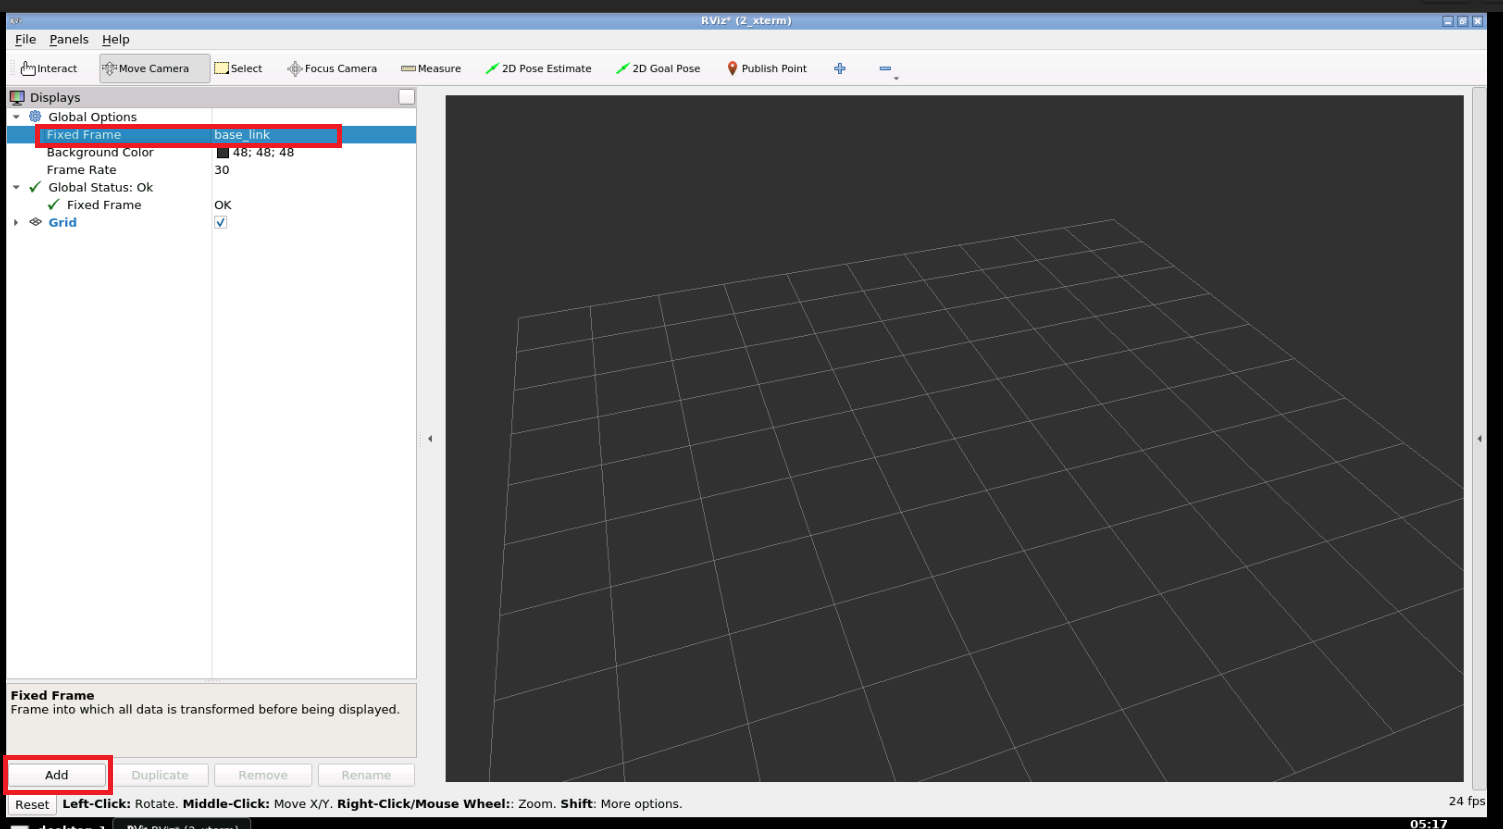
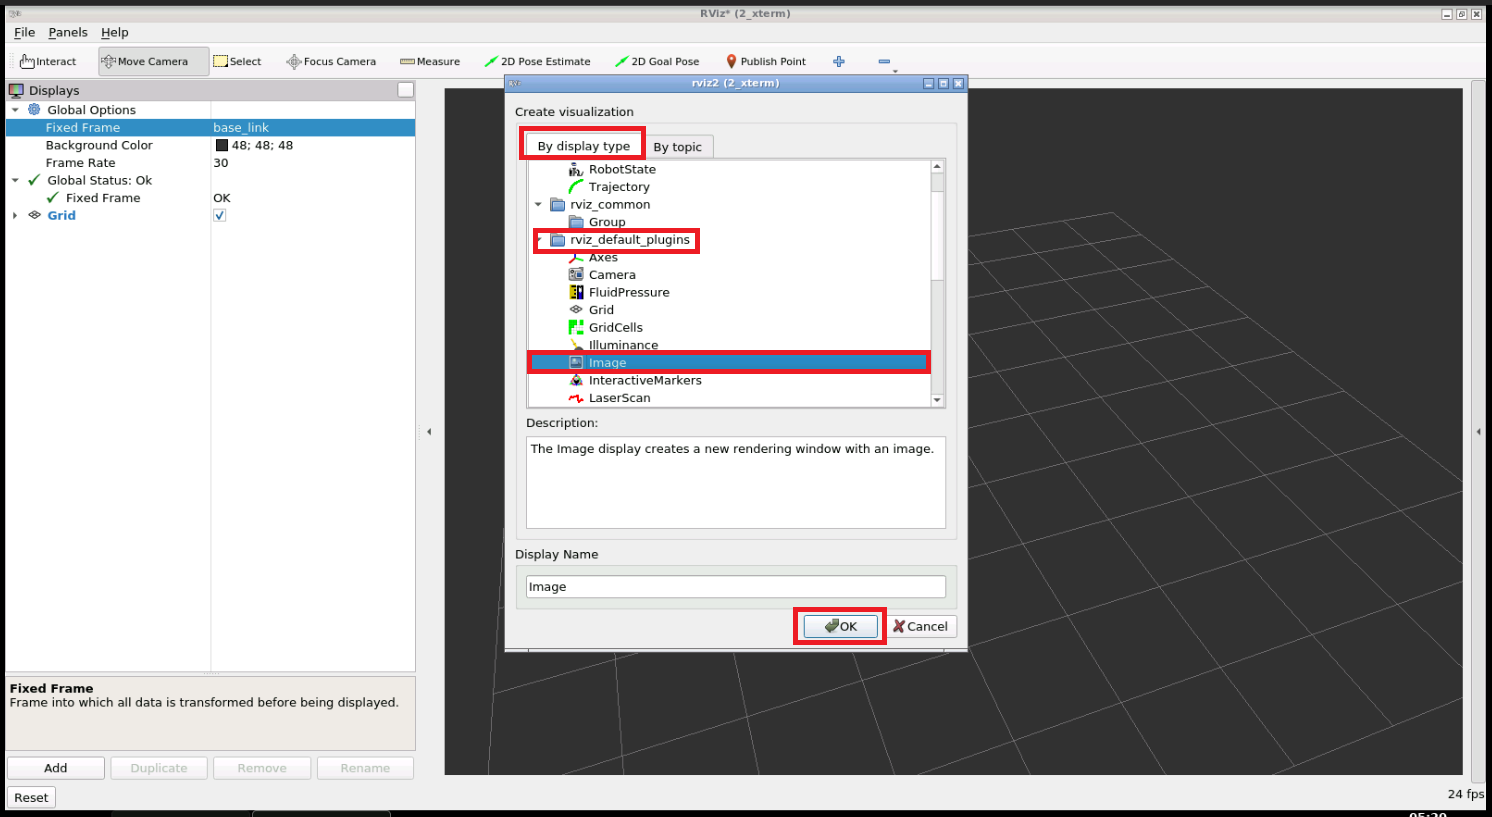
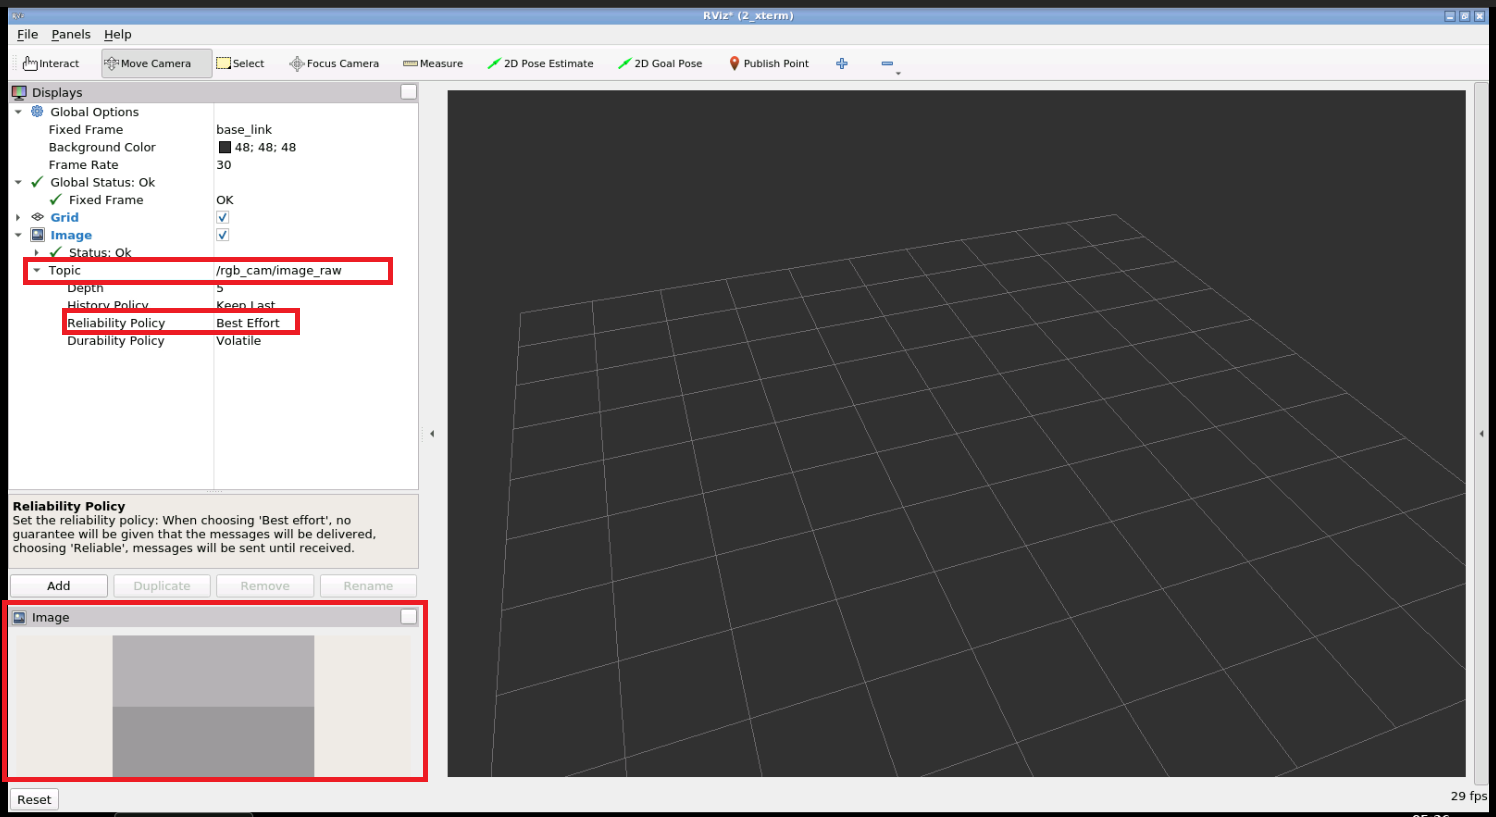
You should now see the Rviv2 window. Set the Fixed Frame to base_link and click Add to add an Image display.
Expand the Image display, then expand the Topic property. Select the /rgb_cam/image_raw topic and set the Reliability to Best Effort. There you go!
Step 5: Consolidate your learning
Do you understand how to get an RGB camera working in ROS2 and RVIZ2? Are you able to implement a camera in your own simulation? If not, please go over the post again and maybe watch the video below? Let us know what worked for you in the comments.
Extra Step: Watch the video to see the sights and sounds version how to get an RGB camera working in ROS2 and RVIZ2
Did you like this post? Do you have any questions about the explanations? Whatever the case, please leave a comment on the comments section below, so we can interact and learn from each other.
If you want to learn about other ROS2 topics, please let us know in the comments area and we will do a video or post about it.
Have a ROS1 project that you want to migrate to ROS2
Already ported your nodes in ROS2
Want to migrate your launch file using the XML launch format in ROS
then, this post is definitely for you.
Opening the rosject
In order to learn how to migrate XML launch files format from ROS1 to ROS2, we need to have ROS installed in our system, and it is also useful to have some simulations. We already prepared a rosject with a simulation for that: https://app.theconstructsim.com/#/l/48df0c95/.
You can download the rosject on your own computer if you want to work locally, but just by copying the rosject (clicking the link), you will have a setup already prepared for you.
After the rosject has been successfully copied to your own area, you should see a Run button. Just click that button to launch the rosject (below you have a rosject example).
Learn ROS2 – Run rosject
After pressing the Run button, you should have the rosject loaded. Let’s now head to the next section to really get some real practice.
An example of a ROS1 Launch file
Let’s start by checking an example of an XML launch file in ROS1 format, which is NOT included in the rosject we provided above, but will be used as reference for the rosject we are going to create:
You can easily check that file using the Code Editor:
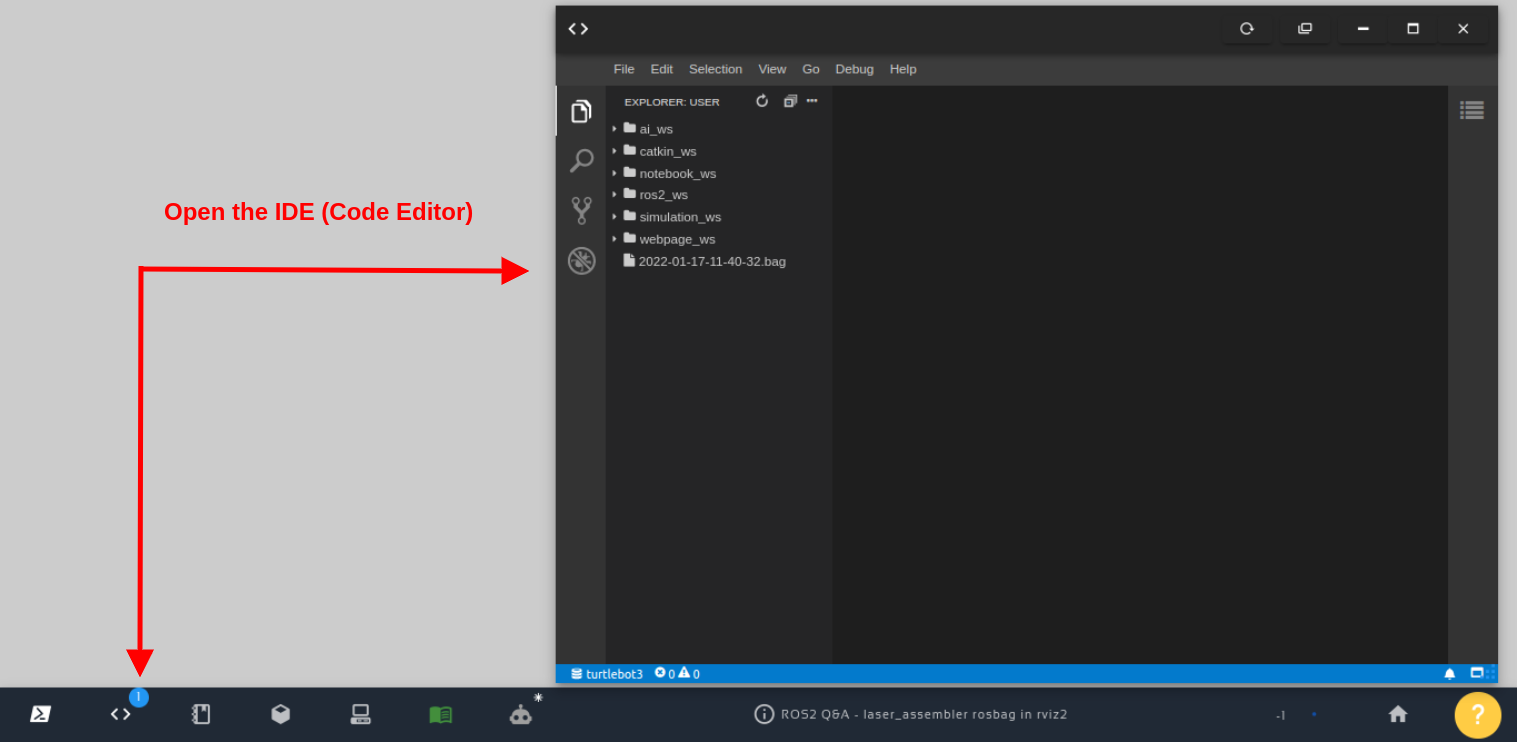
Open the IDE – Code Editor
Now, assuming you want to understand that step-by-step procedure, let’s suppose you do not have that launch_project.launch.xml file (or you create a new file for learning purposes). The new launch file can start with the following content from the original ROS1 launch file. Nothing changed in the definition of XML and <launch> tags:
Ok, so far so good. Nothing really changed. Things will start changing now. We are now going to start changing the code part used to include a simulation. The original code in ROS1 format is:
To port it to ros2, we initially have to replace find with find-pkg-share. In addition to that, we have to add the .py extension to the launch file we are including, because this is the name of our file in ROS2. In the end, the code would become:
To make it ROS2-compatible, instead of arg we use let when defining the arg named rviz_config, and when passing that value to the rviz node, instead of arg we use var. Of course, we also have to replace type with exec in the <node> definition when indicating the name of the executable file. We have to be aware also that in ROS2, rviz is named rviz2. In the end, after the changes, the code would be:
Turns out that in ROS2 we do not have a Parameter Server like in ROS1. In ROS2, the parameters are “restricted” to each node individually. The parameters above, in ROS1, were used by the Obstacle Avoidance node, which was defined as follows in ROS1:
Since the parameters are “private” to each node, the parameters in ROS2 are passed to the node inside the <node> definition. They have to be nested to the node tag. Therefore, for the Obstacle Avoidance example, the ROS2-compatible code would be as follows, after also replacing type with exec:
I’m assuming that replacing type with exec is already fresh in your mind when running nodes. What you may not know is that for namespaces in ROS2 we use a group tag, and the namespace is defined inside a push-ros-namespace tag. The namespace example in ROS2 would be:
All right. We have been checking piece by piece, but we all agree that it is time to see the complete launch file in ROS2. The path, if you do not remember is:
Assuming everything went well, you should have get logs similar to the following:
[INFO] [launch]: All log files can be found below /home/user/.ros/log/2022-04-25-21-55-21-371627-2_xterm-8807
[INFO] [launch]: Default logging verbosity is set to INFO
[INFO] [gzserver-1]: process started with pid [8817]
[INFO] [gzclient   -2]: process started with pid [8819]
[INFO] [static_transform_publisher-3]: process started with pid [8821]
[INFO] [rviz2-4]: process started with pid [8825]
[INFO] [obstacle_avoidance-5]: process started with pid [8827]
[INFO] [rviz_marker_pub-6]: process started with pid [8829]
[gzclient   -2] ++ ls /usr/bin/gzclient-11.9.0
[gzclient   -2] + gzclient_path=/usr/bin/gzclient-11.9.0
[gzclient   -2] + DISPLAY=:2
[gzclient   -2] + /usr/bin/gzclient-11.9.0
[static_transform_publisher-3] [INFO] [1650923728.301492664] [map_odom]: Spinning until killed publishing transform from 'map' to 'odom'
[rviz2-4] QStandardPaths: XDG_RUNTIME_DIR not set, defaulting to '/tmp/runtime-user'
[rviz2-4] [INFO] [1650923754.405249391] [rviz2]: Stereo is NOT SUPPORTED
[rviz2-4] [INFO] [1650923754.405480560] [rviz2]: OpenGl version: 3.1 (GLSL 1.4)
[rviz2-4] [INFO] [1650923754.478336976] [rviz2]: Stereo is NOT SUPPORTED
And a simulation should pop up, and you should also be able to see RViz, something like in the image below:
Migrating ROS1 XML Launch Files to ROS2
Youtube video
So this is the post for today. Remember that we have the live version of this post on YouTube. If you liked the content, please consider subscribing to our youtube channel. We are publishing new content ~every day.
Keep pushing your ROS Learning.
Related Courses & Training
If you want to learn more about ROS and ROS2, we recommend the following courses:
In order to learn how to work with turtlesim using ros2, we need to have ros2 installed.
You can use rosject we provide ( https://app.theconstructsim.com/#/l/4623f16e/) or you can create your own rosject. We are going to use The Construct (https://www.theconstruct.ai/) for this tutorial, but if you have ROS2 installed on your own computer, you should be able to do ~everything on your own computer, except this creating a rosject part.
Let’s start by opening The Construct (https://www.theconstruct.ai/) and logging in. You can easily create a free account if you still don’t have one.
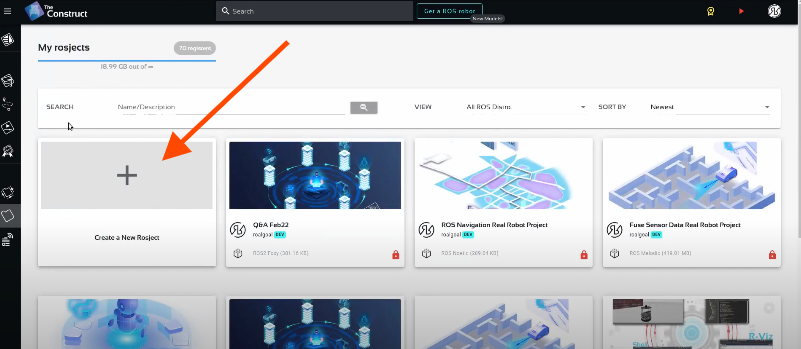
Once inside, let’s create My Rosjects and then, Create a new rosject if you decide for this step instead of using the rosject already provided (https://app.theconstructsim.com/#/l/4623f16e/) :
My Rosjects
Create a new rosject
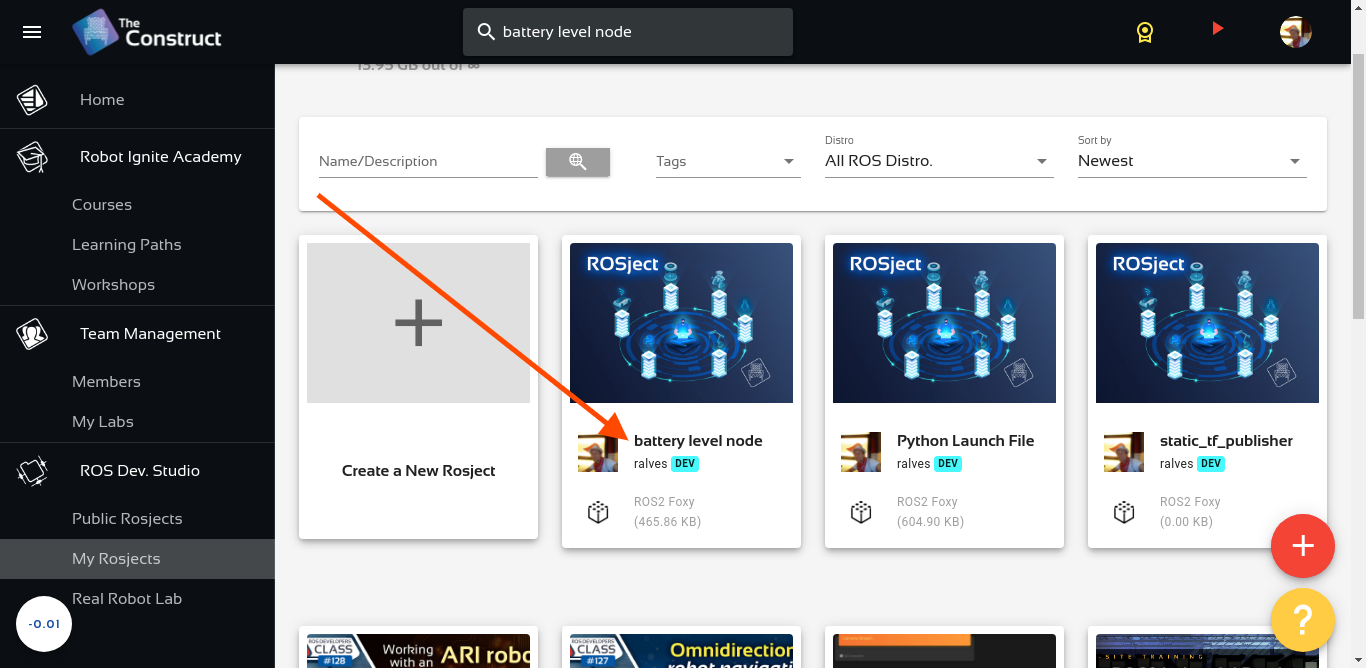
For the rosject, let’s select ROS2 Foxyfor the ROS Distro, let’s name the rosject as Turtlesim. You can leave the rosject public. You should see your rosject just as in the example below (although in the picture the name is different)
Battery Level Node – Conditional Publisher in ROS2
If you mouse over the recently created rosject, you should see a Run button. Just click that button to launch the rosject.
Launching the turtlesim node using ros2
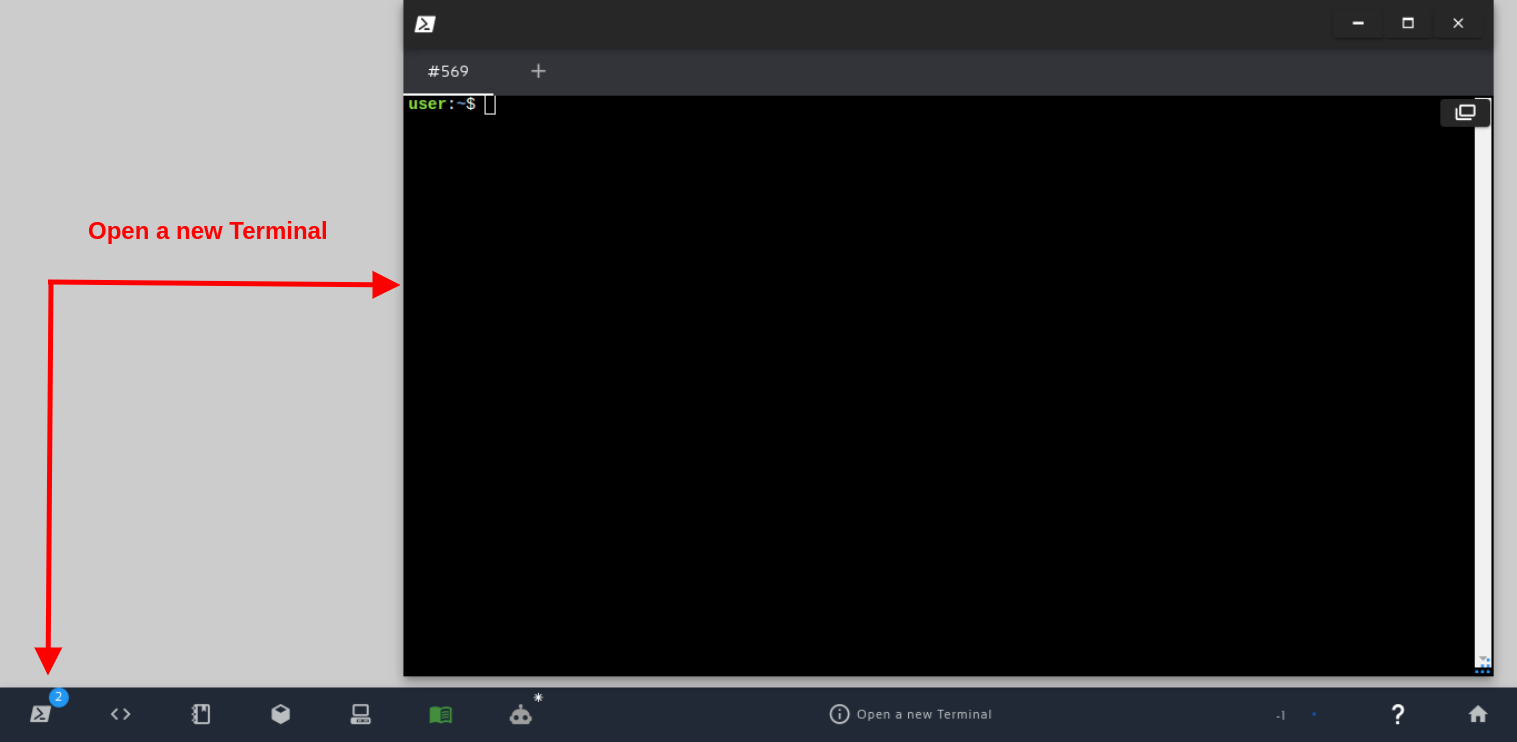
Now, assuming that you have opened the rosject by clicking the Run button that appears when you hover the mouse on the rosject, we can now open a terminal.
Open a new Terminal
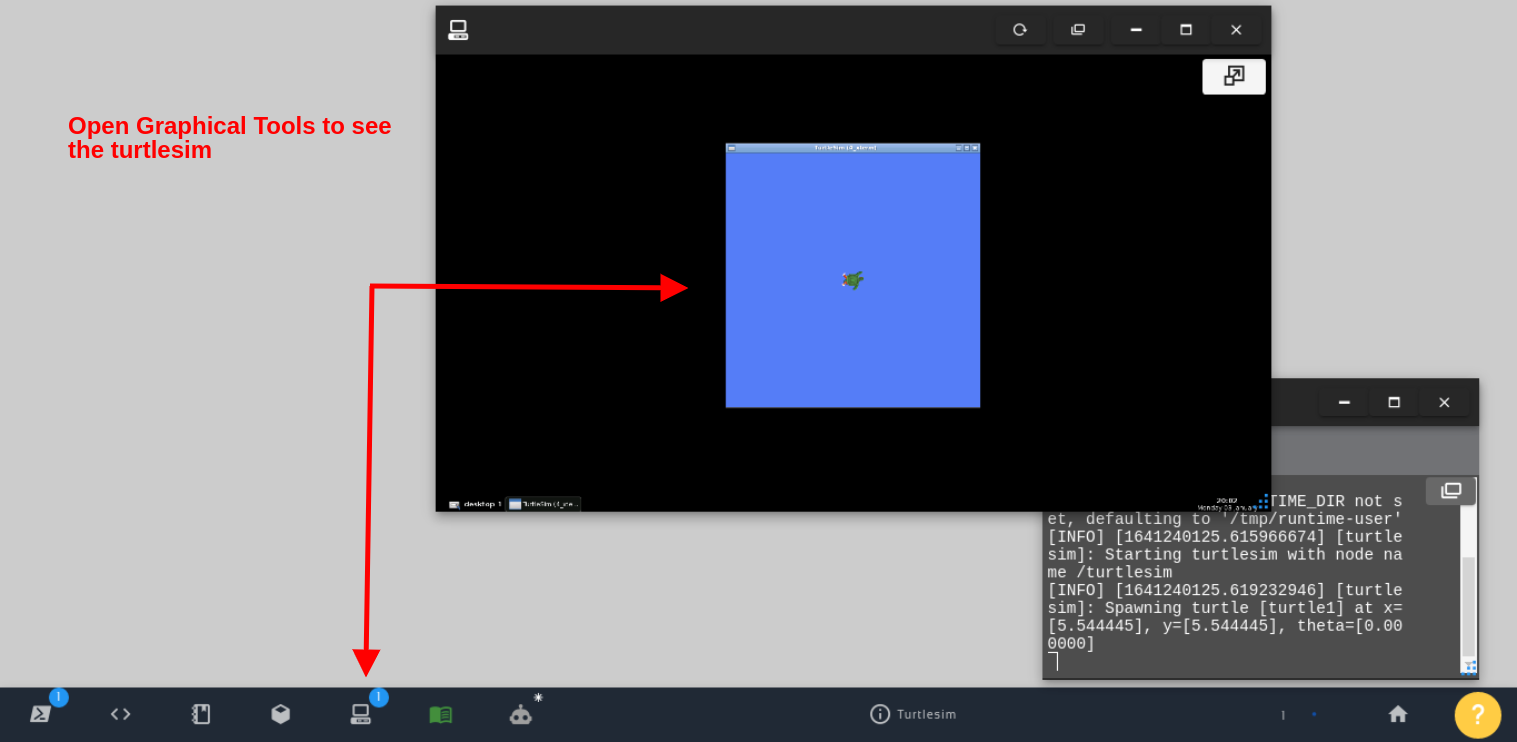
After opening the terminal, we can run the turtlesim just by running the following command:
ros2 run turtlesim turtlesim_node
.The logs you see should be similar to the following:
QStandardPaths: XDG_RUNTIME_DIR not set, defaulting to '/tmp/runtime-user'
[INFO] [1641240027.604446440] [turtlesim]: Starting turtlesim with node name /turtlesim
[INFO] [1641240027.609126169] [turtlesim]: Spawning turtle [turtle1] at x=[5.544445], y=[5.544445], theta=[0.000000]
If we now open the Graphical Tools, we should be able to see the turtlesim.
Open Graphical Tools to see the turtlesim
Moving the turtlesim around with ros2
Now that the simulation is up and running, we should be able to easily move the robot. However, before doing that, we have to list the topics to identify the topic that turtlesim listens to in order to move the robot.
Let’s list the topic by running the following command in a second terminal.
The important topis here for the purpose of moving the robot is the /turtle1/cmd_vel one.
If you are used to moving robots with ROS, you may know that by default, the teleop nodes normally publish to the topic named /cmd_vel, but in this case, the robot is listening to a topic with a different name: /turtle1/cmd_vel
How do we solve that then? By mapping /cmd_vel to /turtle1/cmd_vel when launching the teleop node. We can achieve that with the following command, where we specify that we want to the topic:
ros2 run teleop_twist_keyboard teleop_twist_keyboard --ros-args --remap /cmd_vel:=/turtle1/cmd_vel
We should now see the instructions to move the robot around:
This node takes keypresses from the keyboard and publishes them
as Twist messages. It works best with a US keyboard layout.
---------------------------
Moving around:
   u    i    o
   j    k    l
   m    ,    .
For Holonomic mode (strafing), hold down the shift key:
---------------------------
   U    I    O
   J    K    L
   M    <    >
t : up (+z)
b : down (-z)
anything else : stop

q/z : increase/decrease max speeds by 10%
w/x : increase/decrease only linear speed by 10%
e/c : increase/decrease only angular speed by 10%

CTRL-C to quit

currently:      speed 0.5       turn 1.0
If we now press u, i or o, for example, we should be able to see the robot moving.
With turtlesim you can do a lot of testing for mobile robots, where you don’t need to worry about x and y velocities, you can also spawn more turtles to simulate more robots.
We hope this little post is helpful for your ROS Learning journey.
Youtube video
So this is the post for today. Remember that we have the live version of this post on YouTube. If you liked the content, please consider subscribing to our youtube channel. We are publishing new content ~every day.
In order to learn how to get the robot position using transforms in ROS, let’s start by creating a rosject (ROS project). We are going to use The Construct (https://www.theconstruct.ai/) for this tutorial, but if you have ROS2 installed on your own computer, you should be able to do ~everything on your own computer, except this creating a rosject part.
Let’s start by opening The Construct (https://www.theconstruct.ai/) and logging in. You can easily create a free account if you still don’t have one.
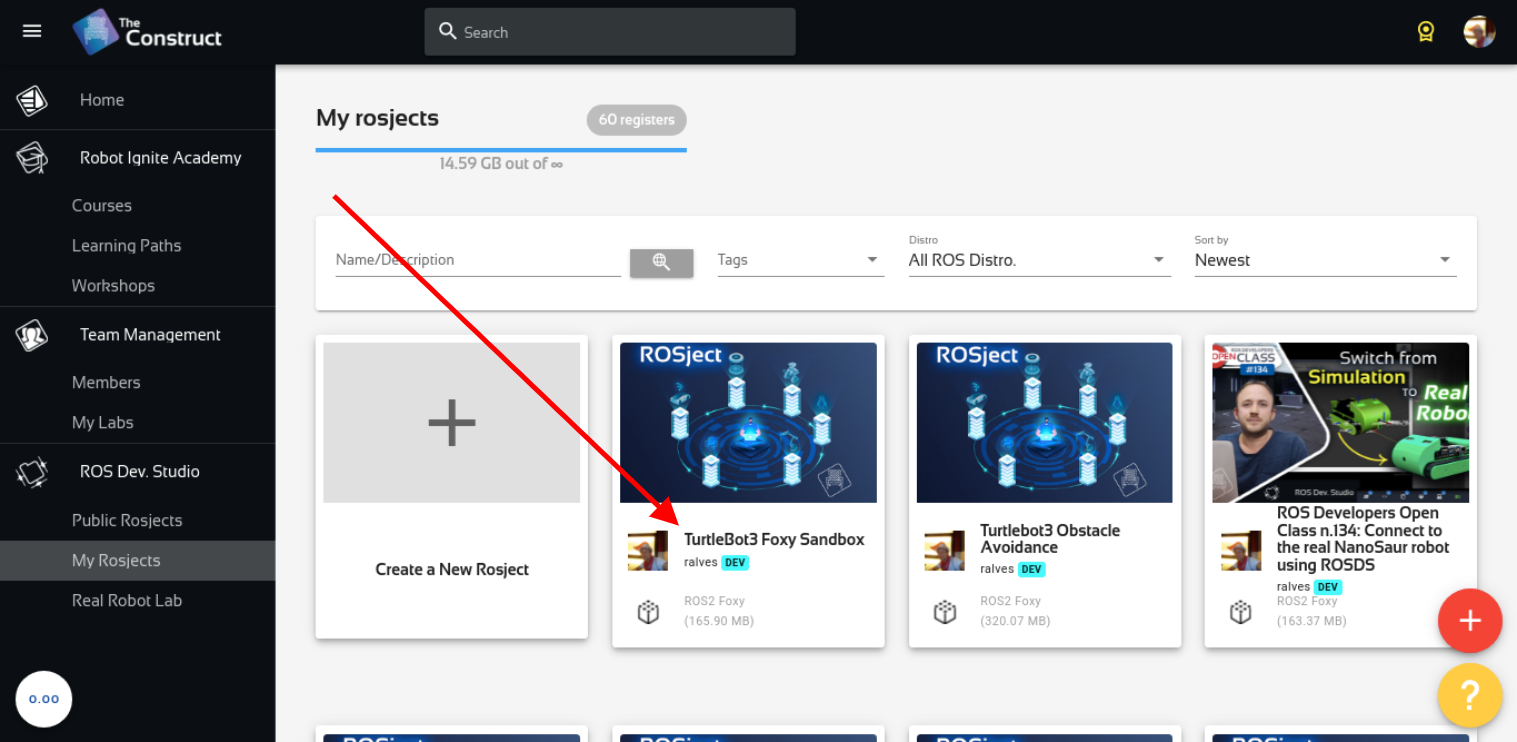
Once inside, let’s create My Rosjects and then, Create a new rosject:
My Rosjects
Create a new rosject
For the rosject, let’s select ROS2 Foxyfor the ROS Distro, let’s name the rosject as Turtlebot3 Foxy Sandbox. You can leave the rosject public.
Turtlebot3 Foxy Sandbox – How to get robot position using transforms in ROS2
If you mouse over the recently created rosject, you should see a Run button. Just click that button to launch the rosject.
Cloning the required repositories with the simulations
After we have created our rosject and opened it, let’s now open a terminal as we can see in the image below:
Open a new Terminal
After that, let’s enter into the ~/ros2_ws/src directory and clone three repositories there with the following commands:
When this error happens, is just because of a lack of memory or CPU. Normally, after running colcon build again the package gets compiled.
Launching the Turtlebot3 Simulation with ROS2
So far we have created a rosject, cloned the repositories that contain the turtlebot3 simulations, and we have also compiled the packages. The time has come now to finally launch our simulation.
Let’s start by sourcing the workspace that we just compiled:
source install/setup.bash
Let’s also modify the ~/.bashrc so that it exports the variable GAZEBO_MODEL_PATH so that gazebo can find turtlebot models, and also export TURTLEBOT3_MODEL variable so that the package turtlebot3_gazebo knows which turtlebot to launch:
If we now check the ~/.bashrc file, which is saved when your rosject gets saved, we can see that the variables we are interested in are set in this file. (You can check it with the tail ~/.bashrc command).
# Note from The Construct
# -----------------------------------------------------
# This file will be saved together with your rosject.
# Add your custom exports at the end of this file. E.g.:
# export MY_SETTING=value
# export GAZEBO_RESOURCE_PATH=$GAZEBO_RESOURCE_PATH:/home/user/simulation_ws/src/my_package
# -----------------------------------------------------

export GAZEBO_MODEL_PATH=$GAZEBO_MODEL_PATH:~/ros2_ws/src/turtlebot3_simulations/turtlebot3_gazebo/models
export TURTLEBOT3_MODEL=burger
Now, let’s source that file so that our variables get exported in the terminal that is already open. It is worth mentioning that when you open new terminals, the variables will be automatically exported since bash automatically sources ~/.bashrc for new terminals.
source ~/.bashrc
We should now be able to launch the simulation. Let’s use the following command for this purpose:
Assuming that everything went as expected, the expected output is similar to the following:
[INFO] [launch]: All log files can be found below /home/user/.ros/log/2022-01-03-18-04-58-484869-4_xterm-7991
[INFO] [launch]: Default logging verbosity is set to INFO
urdf_file_name : turtlebot3_burger.urdf
[INFO] [gzserver-1]: process started with pid [8011]
[INFO] [gzclient   -2]: process started with pid [8013]
[INFO] [robot_state_publisher-3]: process started with pid [8015]
[gzclient   -2] ++ ls /usr/bin/gzclient-11.5.1
[gzclient   -2] + gzclient_path=/usr/bin/gzclient-11.5.1
[gzclient   -2] + DISPLAY=:2
[gzclient   -2] + /usr/bin/gzclient-11.5.1
[robot_state_publisher-3] [WARN] [1641233102.776304734] [robot_state_publisher]: No robot_description parameter, but command-line argument available.  Assuming argument is name of URDF file.  This backwards compatibility fallback will be removed in the future.
[robot_state_publisher-3] Parsing robot urdf xml string.
[robot_state_publisher-3] Link base_link had 5 children
[robot_state_publisher-3] Link caster_back_link had 0 children
[robot_state_publisher-3] Link imu_link had 0 children
[robot_state_publisher-3] Link base_scan had 0 children
[robot_state_publisher-3] Link wheel_left_link had 0 children
[robot_state_publisher-3] Link wheel_right_link had 0 children
[robot_state_publisher-3] [INFO] [1641233102.786920419] [robot_state_publisher]: got segment base_footprint
[robot_state_publisher-3] [INFO] [1641233102.786951740] [robot_state_publisher]: got segment base_link
[robot_state_publisher-3] [INFO] [1641233102.786960417] [robot_state_publisher]: got segment base_scan
[robot_state_publisher-3] [INFO] [1641233102.786967879] [robot_state_publisher]: got segment caster_back_link
[robot_state_publisher-3] [INFO] [1641233102.786975239] [robot_state_publisher]: got segment imu_link
[robot_state_publisher-3] [INFO] [1641233102.786982406] [robot_state_publisher]: got segment wheel_left_link
[robot_state_publisher-3] [INFO] [1641233102.786989655] [robot_state_publisher]: got segment wheel_right_link
[gzserver-1] [INFO] [1641233113.680311324] [turtlebot3_imu]: <initial_orientation_as_reference> is unset, using default value of false to comply with REP 145 (world as orientation reference)
[gzserver-1] [INFO] [1641233114.186860606] [turtlebot3_diff_drive]: Wheel pair 1 separation set to [0.160000m]
[gzserver-1] [INFO] [1641233114.186930065] [turtlebot3_diff_drive]: Wheel pair 1 diameter set to [0.066000m]
[gzserver-1] [INFO] [1641233114.188655864] [turtlebot3_diff_drive]: Subscribed to [/cmd_vel]
[gzserver-1] [INFO] [1641233114.191645383] [turtlebot3_diff_drive]: Advertise odometry on [/odom]
[gzserver-1] [INFO] [1641233114.193357059] [turtlebot3_diff_drive]: Publishing odom transforms between [odom] and [base_footprint]
[gzserver-1] [INFO] [1641233114.210184212] [turtlebot3_joint_state]: Going to publish joint [wheel_left_joint]
[gzserver-1] [INFO] [1641233114.210260508] [turtlebot3_joint_state]: Going to publish joint [wheel_right_joint]
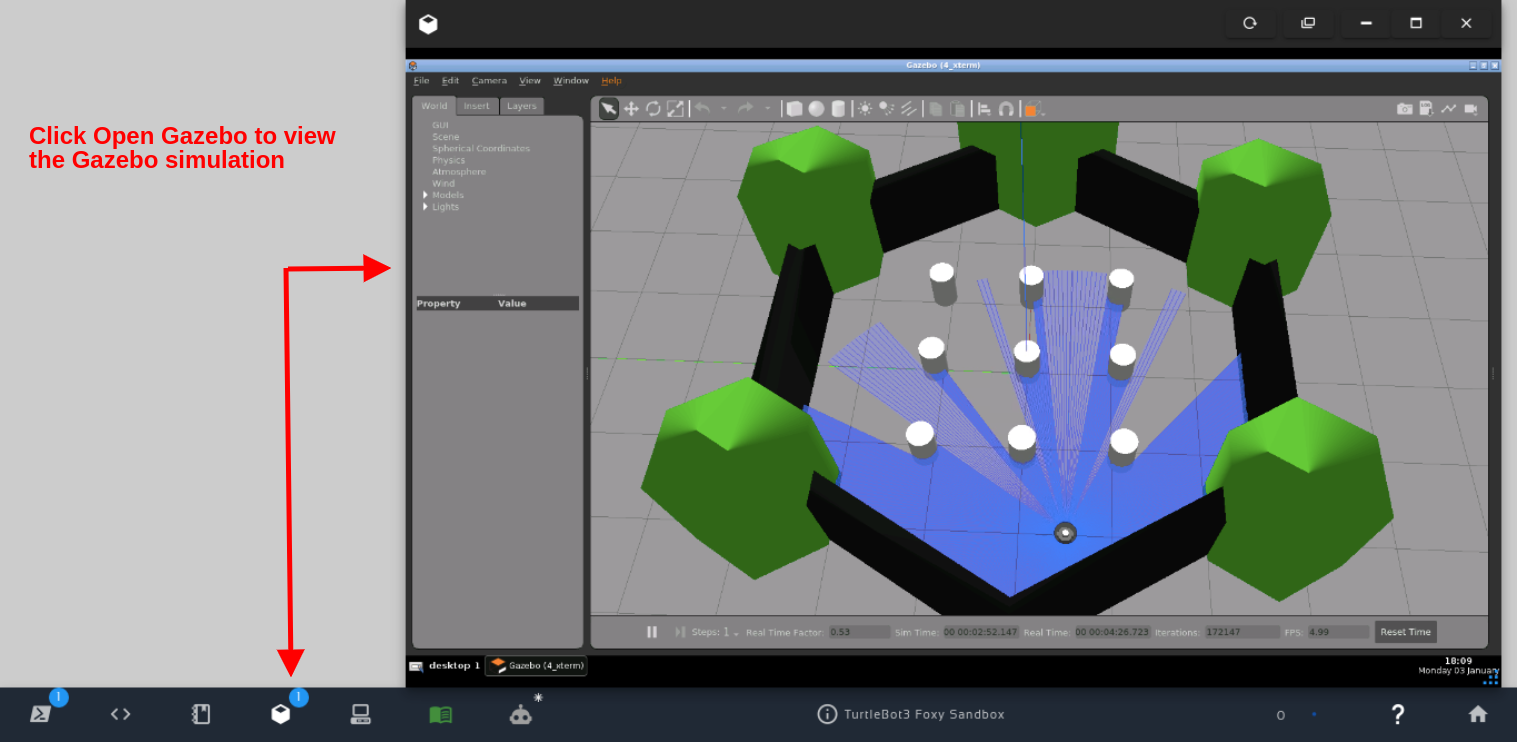
If we now open Gazebo by clicking the Open Gazebo button that appears after we hover the mouse over the Gazebo icon, we should be able to see the simulation:
Click Open Gazebo to view the Gazebo simulation
Let’s now open a second terminal and launch rviz2 with:
rviz2
The expected output is similar to the following:
QStandardPaths: XDG_RUNTIME_DIR not set, defaulting to '/tmp/runtime-user'
[INFO] [1641234625.339611435] [rviz2]: Stereo is NOT SUPPORTED
[INFO] [1641234625.339811208] [rviz2]: OpenGl version: 3.1 (GLSL 1.4)
[INFO] [1641234625.775585724] [rviz2]: Stereo is NOT SUPPORTED
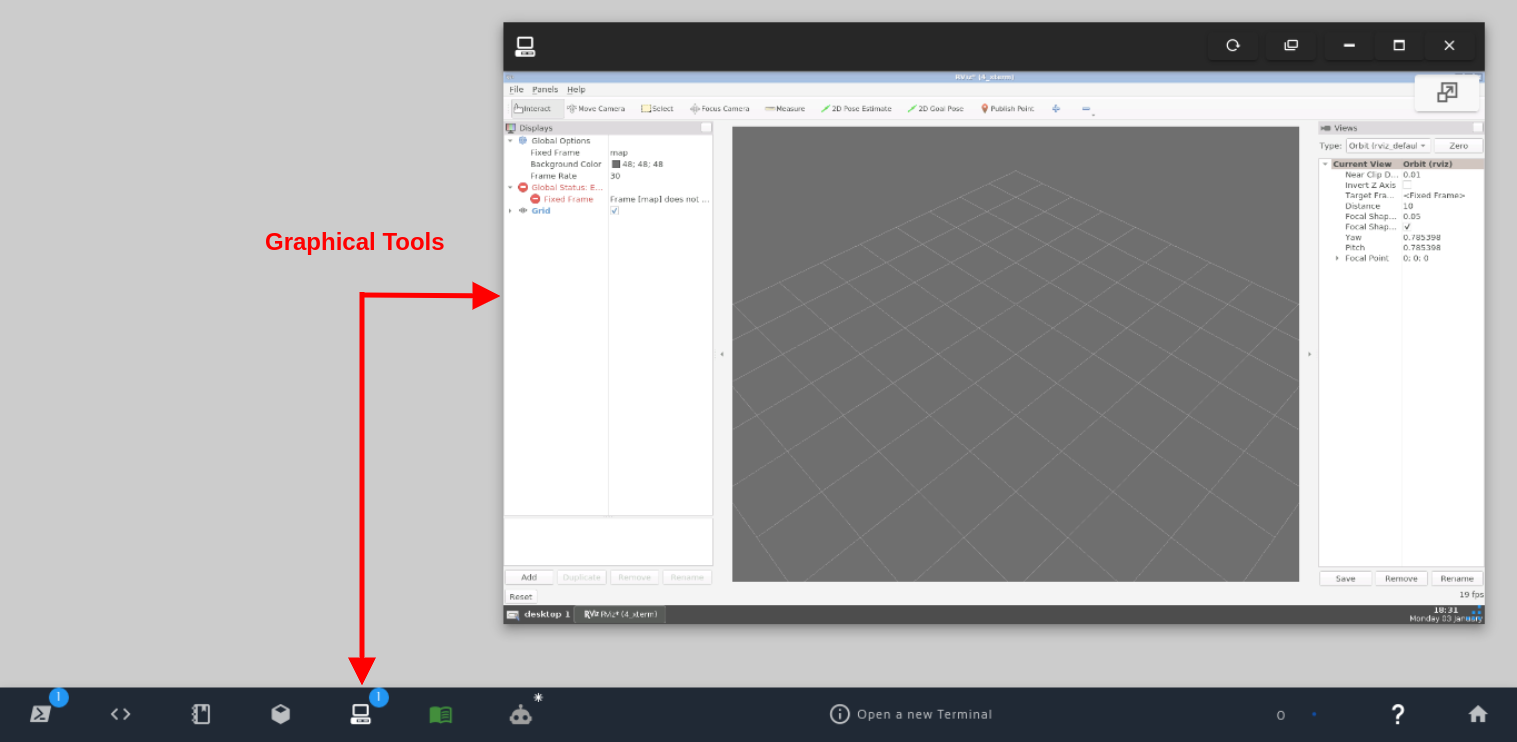
Now, in order to see the rviz window, we have to open the Graphical Tools:
Open Graphical Tools / rviz
If we now look at the left side of the rviz window, we can see a red error message saying:
Frame [map] does not exist
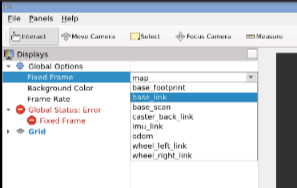
Let’s change that fixed frame from map to base_link to get rid of this error message:
Select base_link as the fixed frame
After having selected base_link for the Fixed Frame, let’s now click the Add button available on the bottom left corner of rviz, and select TF.
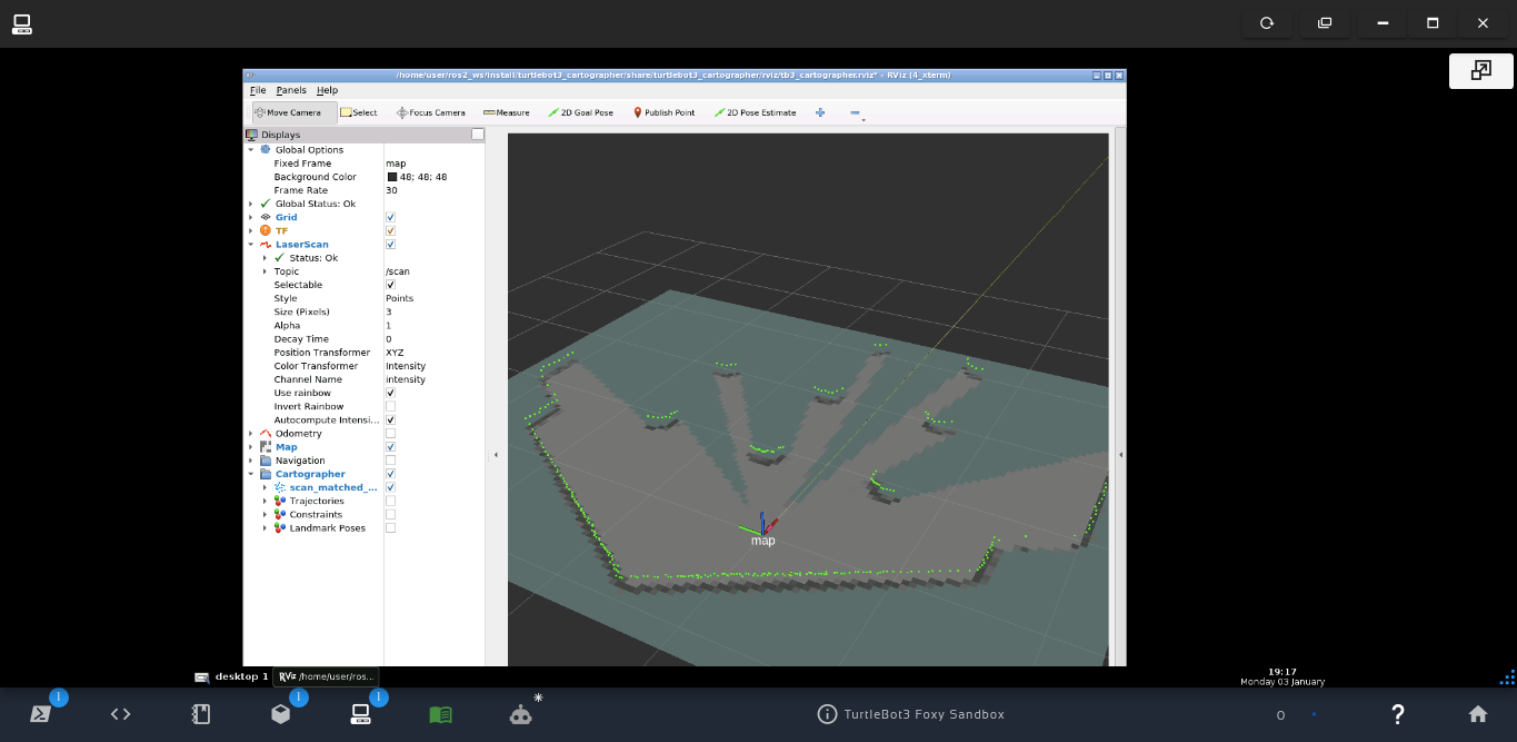
After adding TF, we should see the transforms in RViz.
RViz – TF base_link and base_footprint to odom
The group with more frames is the robot, and the one with fewer frames is the odometry.
Launching the cartographer node
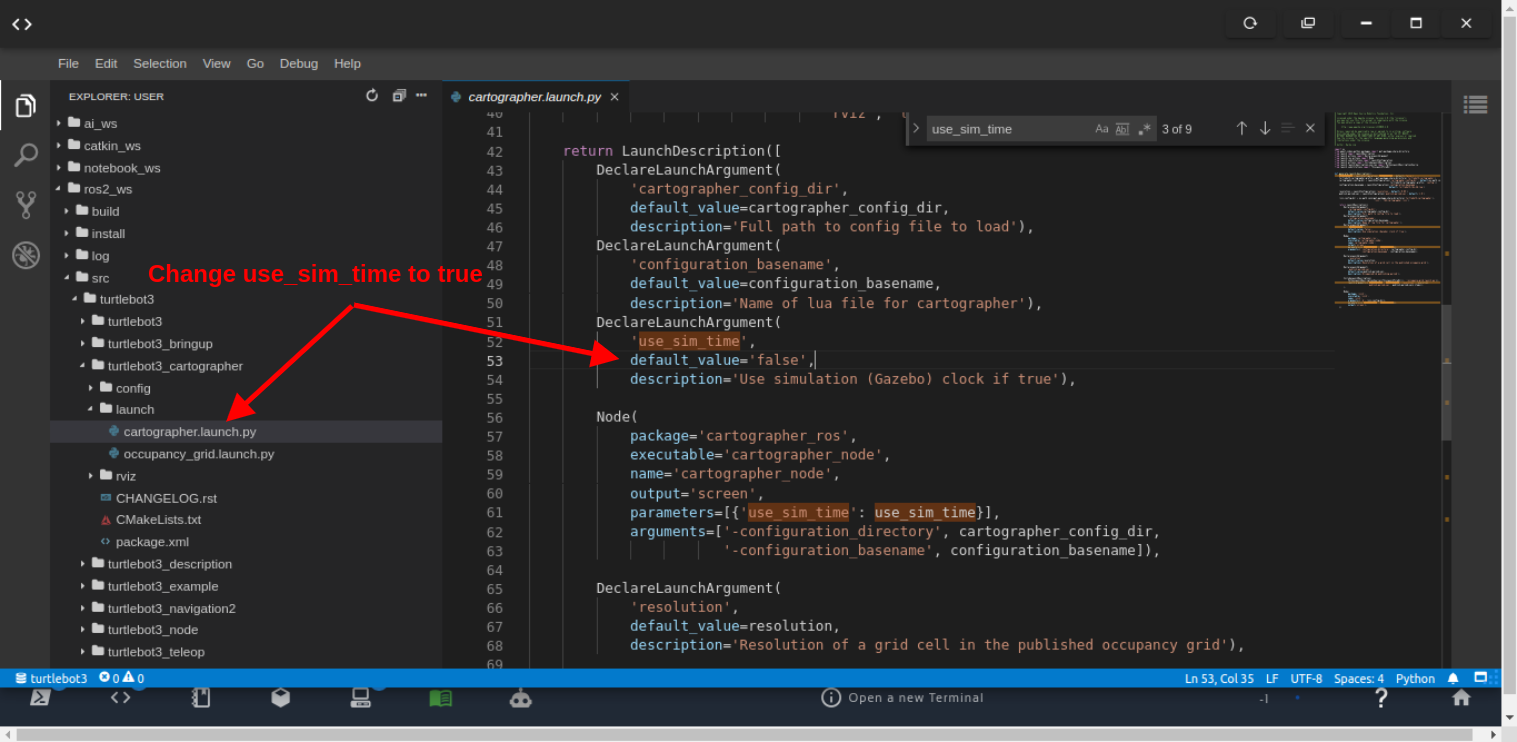
We need to launch the cartographer node to get the map frame published, but before that, let’s change the ~/ros2_ws/src/turtlebot3/turtlebot3_cartographer/launch/cartographer.launch.py (around line 53) and set use_sim_time to true. It is false by default because the code is ready for the real robot, but since we are using simulation, we have to change the variable.
Set use_sim_time to true
Let’s now kill the rviz2 process by pressing CTRL+C in the terminal where it was launched, because the launch file we are going to launch now will start rviz2 anyway.
Make sure the command you ran in the first terminal is still running (do not rerun it if it is still running):
The cartographer node is the one publishing the tf for the map.
We should now to able to move the robot using the keyboard so that the map is more accurate. For that, let’s launch the teleop_keyboard node with the following commands in a third terminal:
source ros2_ws/install/setup.bash

ros2 run turtlebot3_teleop teleop_keyboard
That command should give us the instructions how to move the robot around:
Control Your TurtleBot3!
---------------------------
Moving around:
        w
   a    s    d
        x

w/x : increase/decrease linear velocity (Burger : ~ 0.22, Waffle and Waffle Pi : ~ 0.26)
a/d : increase/decrease angular velocity (Burger : ~ 2.84, Waffle and Waffle Pi : ~ 1.82)

space key, s : force stop

CTRL-C to quit
You can now press any of the keys a w s d x to move the robot.
If you check the graphical tools again, you should see a more accurate map.
Getting the position of Turtlebot3 using transforms
We are almost there. We have already compiled the simulation, launched it, and launched the cartographer node.
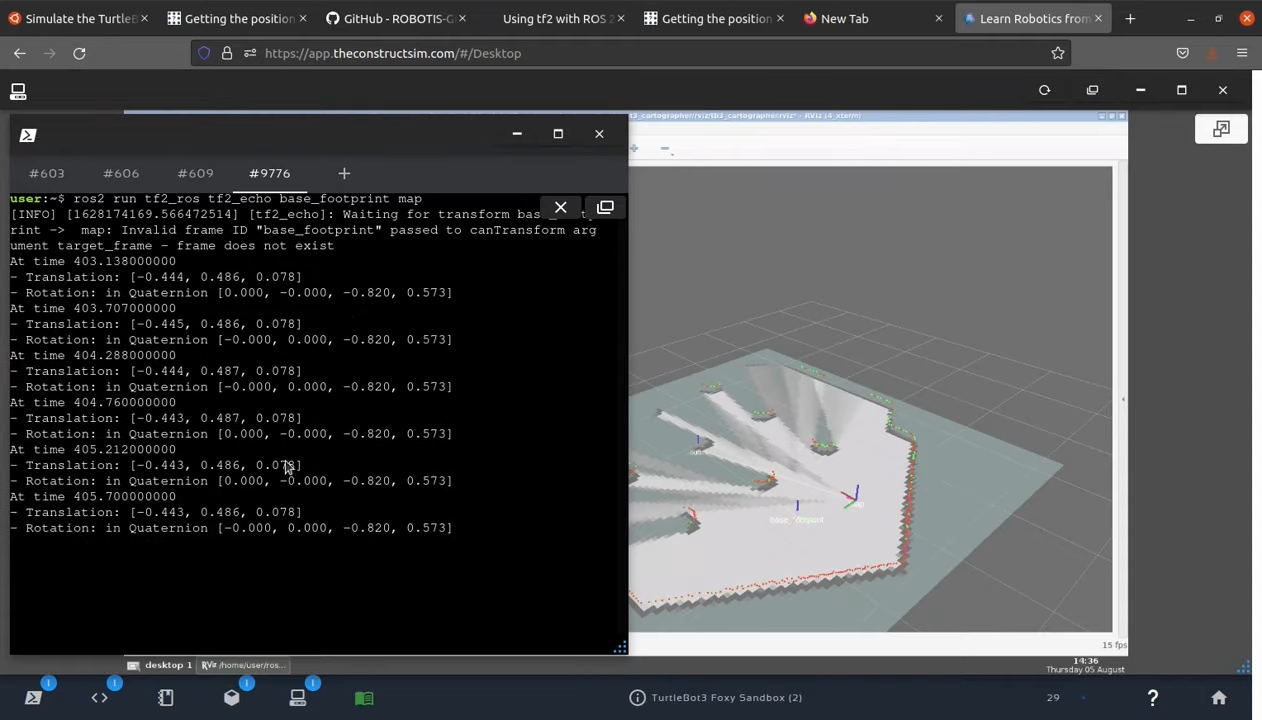
Now, in order to get the position, we just need to do an echo between the frames to figure out the position.
Let’s echo the frames with the following commands in a fourth terminal:
ros2 run tf2_ros tf2_echo base_footprint map
If everything went well, you should now see the position of the robot on the map:
Position of the robot in the map
It is worth mentioning that you could also see how the position changed since the start by checking the /odom topic:
So this is the post for today. Remember that we have the live version of this post on YouTube. If you liked the content, please consider subscribing to our youtube channel. We are publishing new content ~every day.


![[ROS2 Q&A] 226 – Work with ROS2 turtlesim / How to move it around](https://www.theconstruct.ai/wp-content/uploads/2022/01/ROS2-QA-226-Work-with-ROS2-turtlesim.jpeg)
![[ROS2 Q&A] 223 – How to get robot position using transforms in ROS2](https://www.theconstruct.ai/wp-content/uploads/2022/01/223-How-to-get-robot-position-using-transforms-in-ROS2.jpeg)