Could your next robotics project win you $1,000 — and get your hardware for free? That’s exactly what’s on the table with the Robotics Dream Keeper (RDK) Challenge, an exciting new contest in partnership between The Construct Robotics Institute and D-Robotics — two powerhouses in the robotics education and hardware spaces.
Whether you’re a curious beginner who’s never touched a robot before, or an experienced builder looking for your next challenge, this program is designed with you in mind.
What Is the RDK Challenge?
The Robotics Dream Keeper Challenge is a structured, guided competition that invites makers, students, hobbyists, and developers to build their own intelligent robots using the RDK X5 — a powerful edge AI development board created by D-Robotics.
The challenge spans roughly 35 to 45 days and is split into three progressive stages, each designed to level up your skills without overwhelming you. You won’t just be building a robot — you’ll be learning how to deploy real AI at the edge, work with ROS (Robot Operating System), and create something genuinely impressive.
This isn’t a throwaway contest. It’s a full learning journey backed by expert support, live demos, and a community of builders working alongside you.
Who’s Behind It? The Construct × D-Robotics Partnership
The RDK Challenge is the result of a collaboration between two organisations with deep roots in robotics:
D-Robotics is the company behind the RDK X5 development board. They build AI-native hardware designed to bring intelligent robotics to developers and makers everywhere, with a strong focus on edge computing and ROS integration.
The Construct Robotics Institute is a globally recognised robotics education platform based in Barcelona, renowned for its ROS courses, online robot simulations, and hands-on learning programmes. They’ve helped thousands of engineers and developers launch careers in robotics.
The Star of the Show: The RDK X5 Dev Board
At the heart of the challenge is the D-Robotics RDK X5, a compact but formidable development board built for real-world AI robotics. Here’s what makes it stand out:
10 TOPS NPU powered by the Sunrise 5 intelligent computing chip — capable of running advanced AI models like Transformers, RWKV, and Stereo Perception directly on the edge, no cloud required
Octa-core Cortex A55 CPU for smooth, high-performance operation
Up to 8GB RAM with full Ubuntu support
Wi-Fi 6 and Bluetooth 5.4 for fast, reliable wireless connectivity
CAN FD interface and Power over Ethernet (PoE) for industrial-grade integration
Dual MIPI camera inputs for stereo vision and deep learning-based perception
ROS-ready out of the box, with a full-stack robot development platform included
Past RDK X5 builds have included a reinforcement-learning bipedal robot, an Arc Reactor that syncs with heartbeat data, and an interactive companion robot with vision, sound, and touch reactions — proof that the board is as creative as it is capable.
The Three-Stage Challenge Structure
The challenge unfolds over roughly 35 to 45 days, broken into three levels that progressively build your skills:
Stage 1 — Power On Your Robot’s Brain This is your starting point. You’ll unbox the RDK X5, flash the board, activate sensors, and run your first AI demo. If you’ve ever set up a Raspberry Pi, you’ll feel right at home.
Stage 2 — Build Your Intelligence With the hardware running, you’ll begin integrating AI capabilities — deploying models, enabling perception, and building the core functionality of your robot.
Stage 3 — Bring It to Life The final stage is about polish, creativity, and completion. You’ll finish your robot project, document it, and submit it for judging.
Each stage is designed to be achievable, and participants have access to a free built-in online bootcamp with official D-Robotics technical guidance throughout the process.
What Can You Win?
The prizes are seriously worth going for:
🏆 $1,000 grand prize for the most outstanding completed project
💰 $500 bonus for top community advocates who share their journey and inspire others
🎁 Full hardware rebate — complete all three challenge stages and receive a full cash rebate on your RDK X5 purchase, meaning you essentially get the board for free
Yes, you read that right. Finish the challenge, and your development board costs you nothing.
Who Should Enter?
The RDK Challenge is explicitly designed to be newbie-friendly. You don’t need to be a robotics engineer or AI researcher. If you’re any of the following, this challenge is for you:
Makers and hobbyists curious about AI robotics
Students looking to build practical, portfolio-worthy projects
Developers wanting to explore edge AI and ROS
Experienced robotics builders looking for a structured creative challenge
How to Get Started
To join the Robotics Dream Keeper Challenge, you’ll need to purchase the RDK X5 through an official D-Robotics partner channel. Once you have your board, you register for the challenge and begin your 45-day journey.
The RDK X5 has been featured in live demos on the Make: YouTube channel, and is available through authorised resellers including DFRobot and Waveshare, among others.
For full details and to sign up, visit the GitHub contest page or the official D-Robotics RDK X5 page.
Join the RDK Challenge Discord Community: https://discord.gg/7wX9XkNKXv
Final Thoughts
The RDK Challenge is more than a competition — it’s a structured, supported pathway into the world of AI robotics. With The Construct’s educational expertise and D-Robotics’ hardware know-how behind it, participants get rare access to real guidance, real tools, and real prizes.
If you’ve been waiting for the right moment to dive into robotics, this might just be it. Your dream robot is 45 days away — and it might even pay for itself.
If you’re starting to explore Embodied AI or humanoid robotics, you’ll quickly encounter these tools.
They’re all part of NVIDIA’s robotics simulation ecosystem, but they serve different roles in the development pipeline.
Here’s a quick overview.
🌐 Omniverse
An open platform for building virtual worlds and digital twins.
• Built on USD (Universal Scene Description), enabling interoperability across tools like Blender and Maya
• Provides high-quality rendering and real-time physics simulation
• It serves as the foundational platform for tools like Isaac Sim, providing the underlying simulation and rendering capabilities.
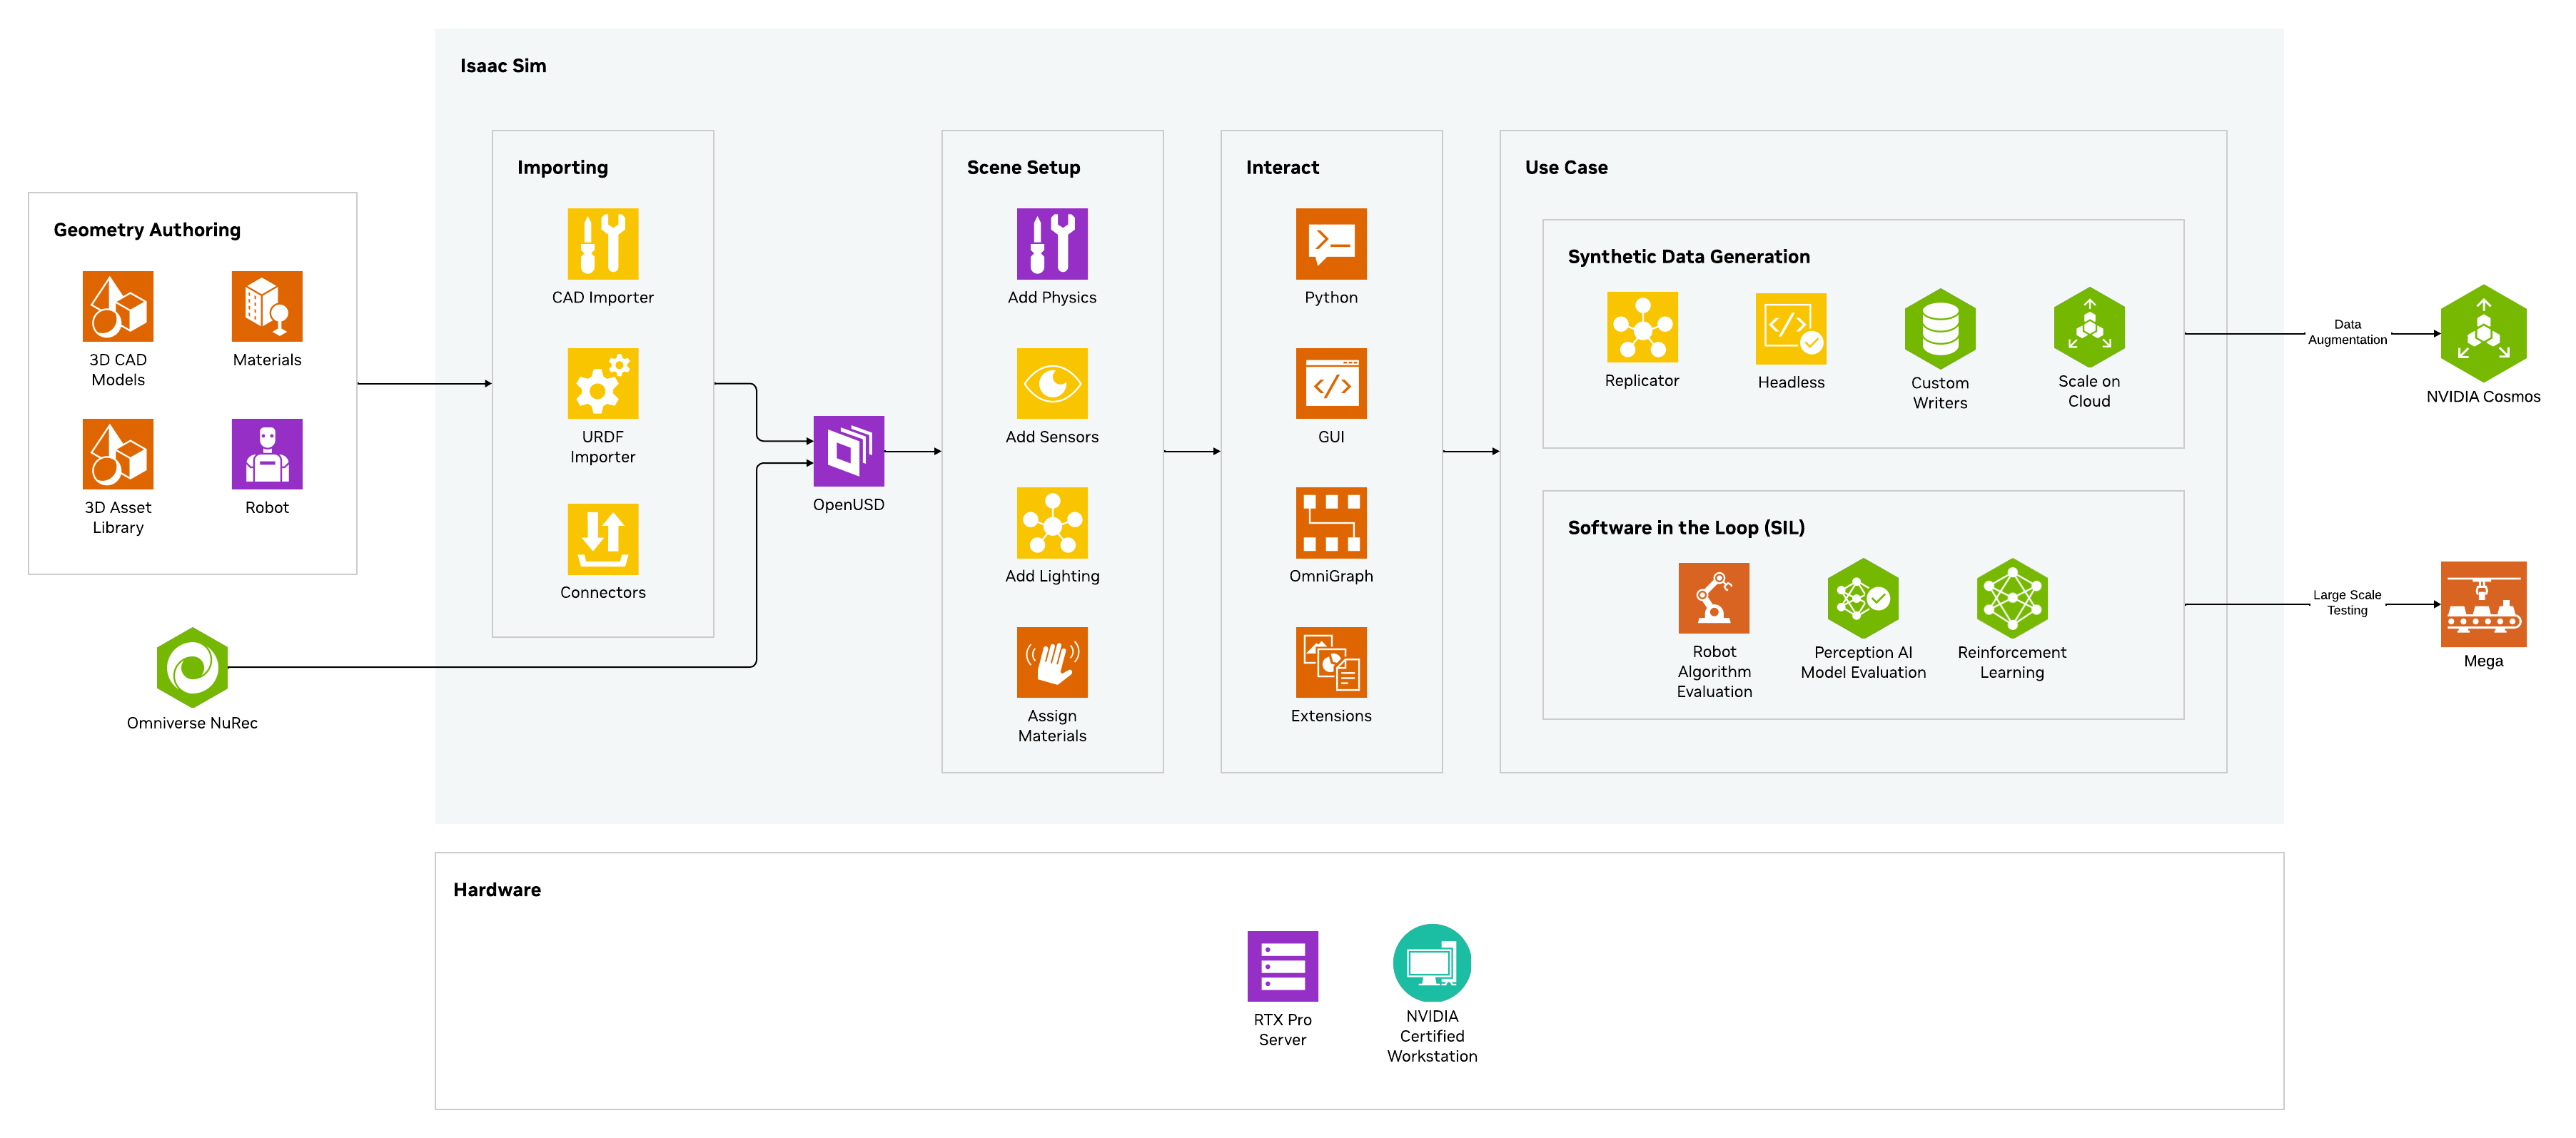
🤖 Isaac Sim
A robotics simulation platform built on Omniverse for building and testing robotic systems.
• High-fidelity physics simulation (robot dynamics + sensors)
• Integration with ROS / ROS2
• Highly extensible for robotics workflows
This is where you simulate robots and their environments.
🔵 Isaac Lab
A lightweight toolkit for robot learning and AI development, built on top of Isaac Sim’s simulation capabilities. Primarily used for training robot policies. And it is open-source.
• Prebuilt robot models and task environments
• Support for Reinforcement Learning (RL) and Imitation Learning (IL)
• Works with multiple robot types (mobile robots, manipulators, humanoids)
Isaac Lab is where robot policies are trained.
🌀 Isaac Gym
A GPU-accelerated simulator designed for large-scale reinforcement learning.
• Supports algorithms like PPO and SAC
• No high-fidelity rendering
• Limited interaction modeling
It has largely been replaced by Isaac Lab and is no longer actively maintained, but remains easy to use.
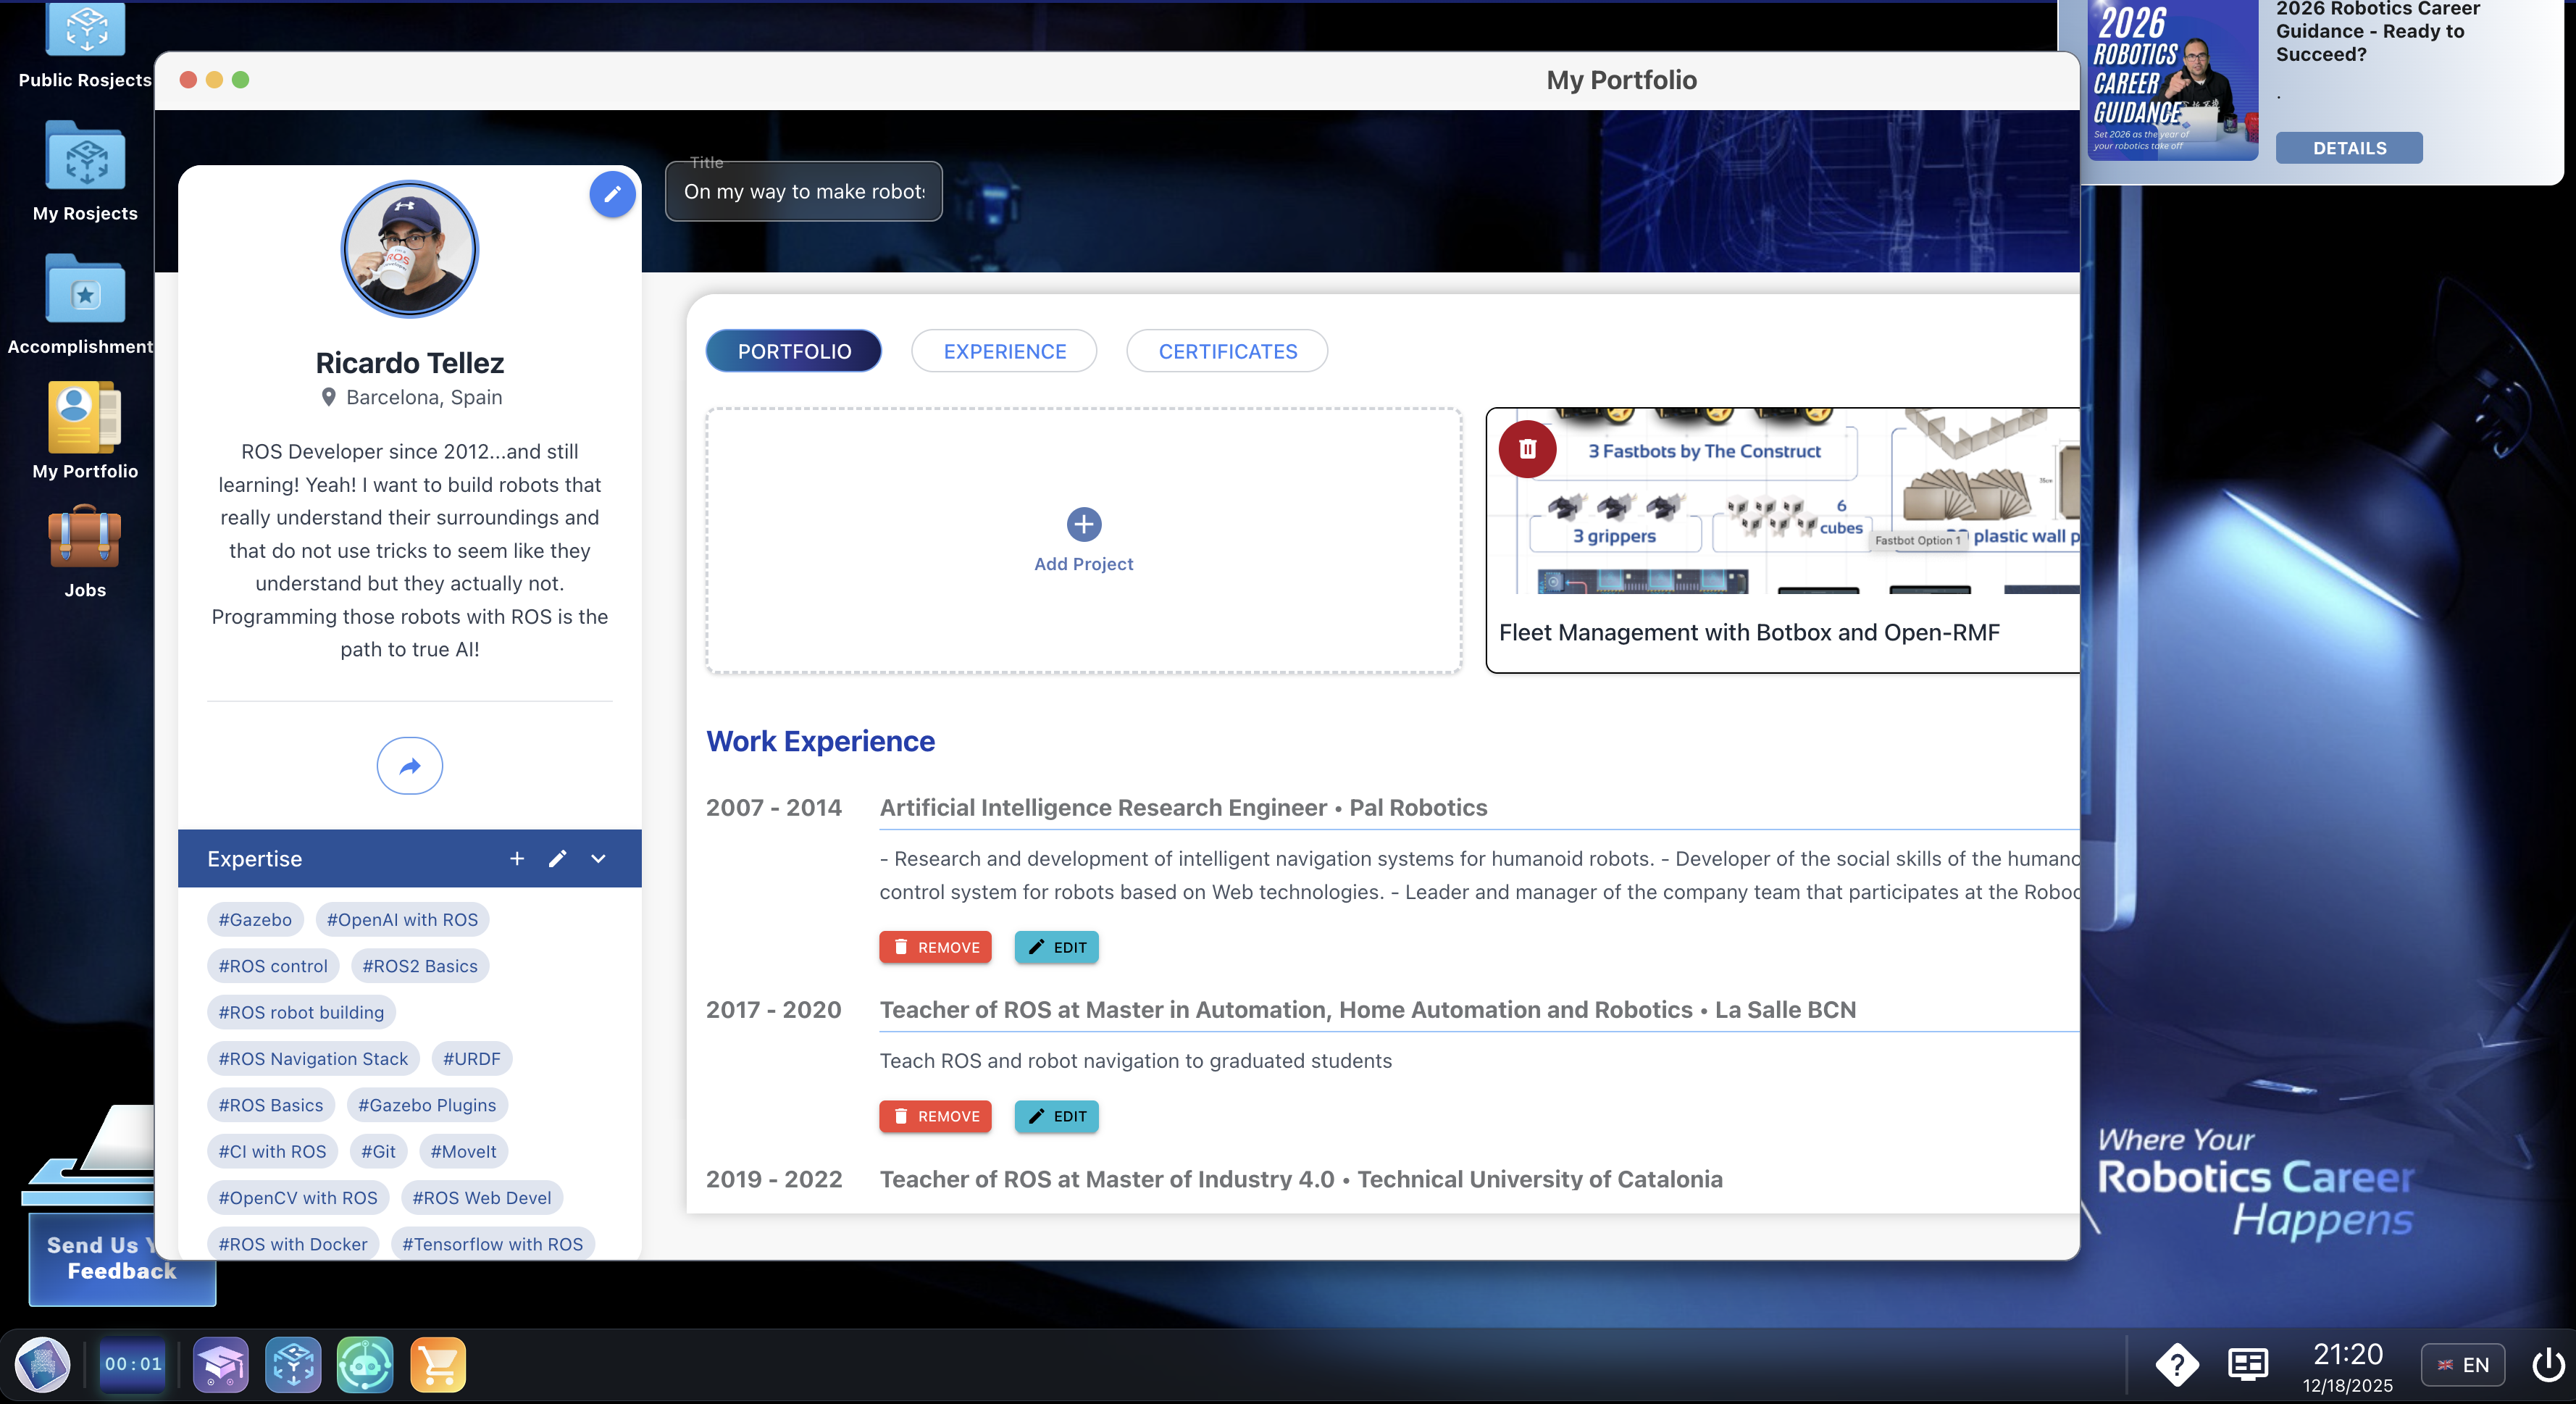
Your robotics portfolio is where you really demonstrate your robotics level.
As we evolve, recruiters are focusing more on roboticists that show their portfolio rather than their CV.
Forget about diplomas. Forget about certificates. Show your portfolio!
What is a portfolio?
Your portfolio should be a dedicated website listing the main robotics projects you have developed.
You can host it wherever you want: your personal website, within GitHub, inside The Construct platform… The hosting location doesn’t matter as long as it is available worldwide.
Here some advices about how to build a professional portfolio:
1. Focus on quality over quantity
Recruiters don’t have time to wade through twenty mediocre projects. Focus your efforts on 3 to 5 truly impressive, well-documented projects that show a wide range of skills.
In robotics, the kind of projects that you can show are:
Project Type
What it Demonstrates
Examples
Hardware Integration
Ability to work with sensors, actuators, wiring, and real-world constraints.
Building a custom PCB for a mobile robot, creating a PID controller for a motor or even building full robots
Complex Software/Algorithms
Proficiency in high-level programming, math, and specific robotics concepts.
A SLAM implementation using LIDAR data, a path planning algorithm for a drone.
Open-Source Contribution
Collaboration, code review, familiarity with Git/GitHub, and industry standards.
Fixing a critical bug in the ROS 2 navigation stack, adding a feature to a major robotics library.
Of course, you can have hybrid projects where you mix the types above demonstrating that you have a wider range of knowledge, but that is not a must. Some employers are looking for multidisciplinary engineers while others are looking for specialized ones. So, don’t worry if you don’t master all the subjects or you are too shallow on most subjects.
2. Document everything
This is the most crucial step. A portfolio project isn’t just a GitHub link. It’s a comprehensive story that answers:
The Problem (The “Why”): What real-world challenge were you trying to solve? (e.g., “We needed an autonomous system to inspect agricultural fields.”)
The Solution (The “What”): What did you build? (e.g., “A custom-built, four-wheeled mobile robot running ROS 2 and utilizing a camera for vision.”)
The Technical Details (The “How”): Which tools, languages, and concepts did you use? Be specific! Mention Python, C++, ROS 2, Docker, Git, OpenCV, the specific sensors, etc.
(Optional) Testing Proficiency: If you used unit tests or functional tests, mention it! This shows you build robust, reliable code.
The Results (The “Proof”): What was the outcome? Did it work? Include performance metrics, graphs, or videos.
The Lessons Learned (The “Growth”): What went wrong? What would you do differently? This shows self-awareness and a learning mindset.
3. Visuals are a must
You need to prove the robot moves and the code works. For that, include the following:
Clear Videos: Record a short, clear video (30-60 seconds) for every project showing it in action. Upload it to YouTube and embed it directly on your project page. A working demo is 10x better than a static image.
Clear Images: Use clean photos of the physical hardware, diagrams of your system architecture, and screenshots of data output or simulation results (like RViz).
Clean Code Presentation: Link directly to the GitHub repository, and ensure the README file is professional, organized, and follows the structure outlined in point #2.
4. If possible, include hints to your “soft” skills
Use this opportunity to show that you have also other skills required for the job, beside the technical ones. For instance:
Documentation: Did you create API documentation? Did you use a project management tool? Detail your process.
Collaboration: For group projects, clearly define your specific role and contributions. If you worked on an open-source repo, emphasize the experience of multi-cultural, distributed teamwork.
Oral presentation: In case you presented your project live somewhere and happened to have it recorded, include it in the portfolio (if you did the presentation, and did not record it, why?!?!?!?).
5. Final important data to include
Remember that your portfolio is open to the world. Then you need to include a way for visitors to know more about you and how to contact you. This can generate cold job offers for you from people visiting your page and finding your profile interesting. Never forget to include:
A link to your full CV (a link to your LinkedIn CV is also ok)
A contact method (usually the email)
Portfolio Best Practices at a Glance
Let’s summarize the dos and don’ts:
Do This
Avoid This
Embed a video of your project running.
Just linking to a GitHub repo with no context.
Use clear headings and bold important technologies (e.g., SLAM, Docker, C++).
Walls of text or overly complex technical jargon.
Explain the “why” behind your design choices.
Just describing “what” the robot does.
Mention tests, deployment methods (Docker), and Git flow.
Forgetting to mention the tools you used.
Have a separate, dedicated page for your Open-Source Contributions.
Mixing open-source work in with personal projects.
Some examples of successful portfolios
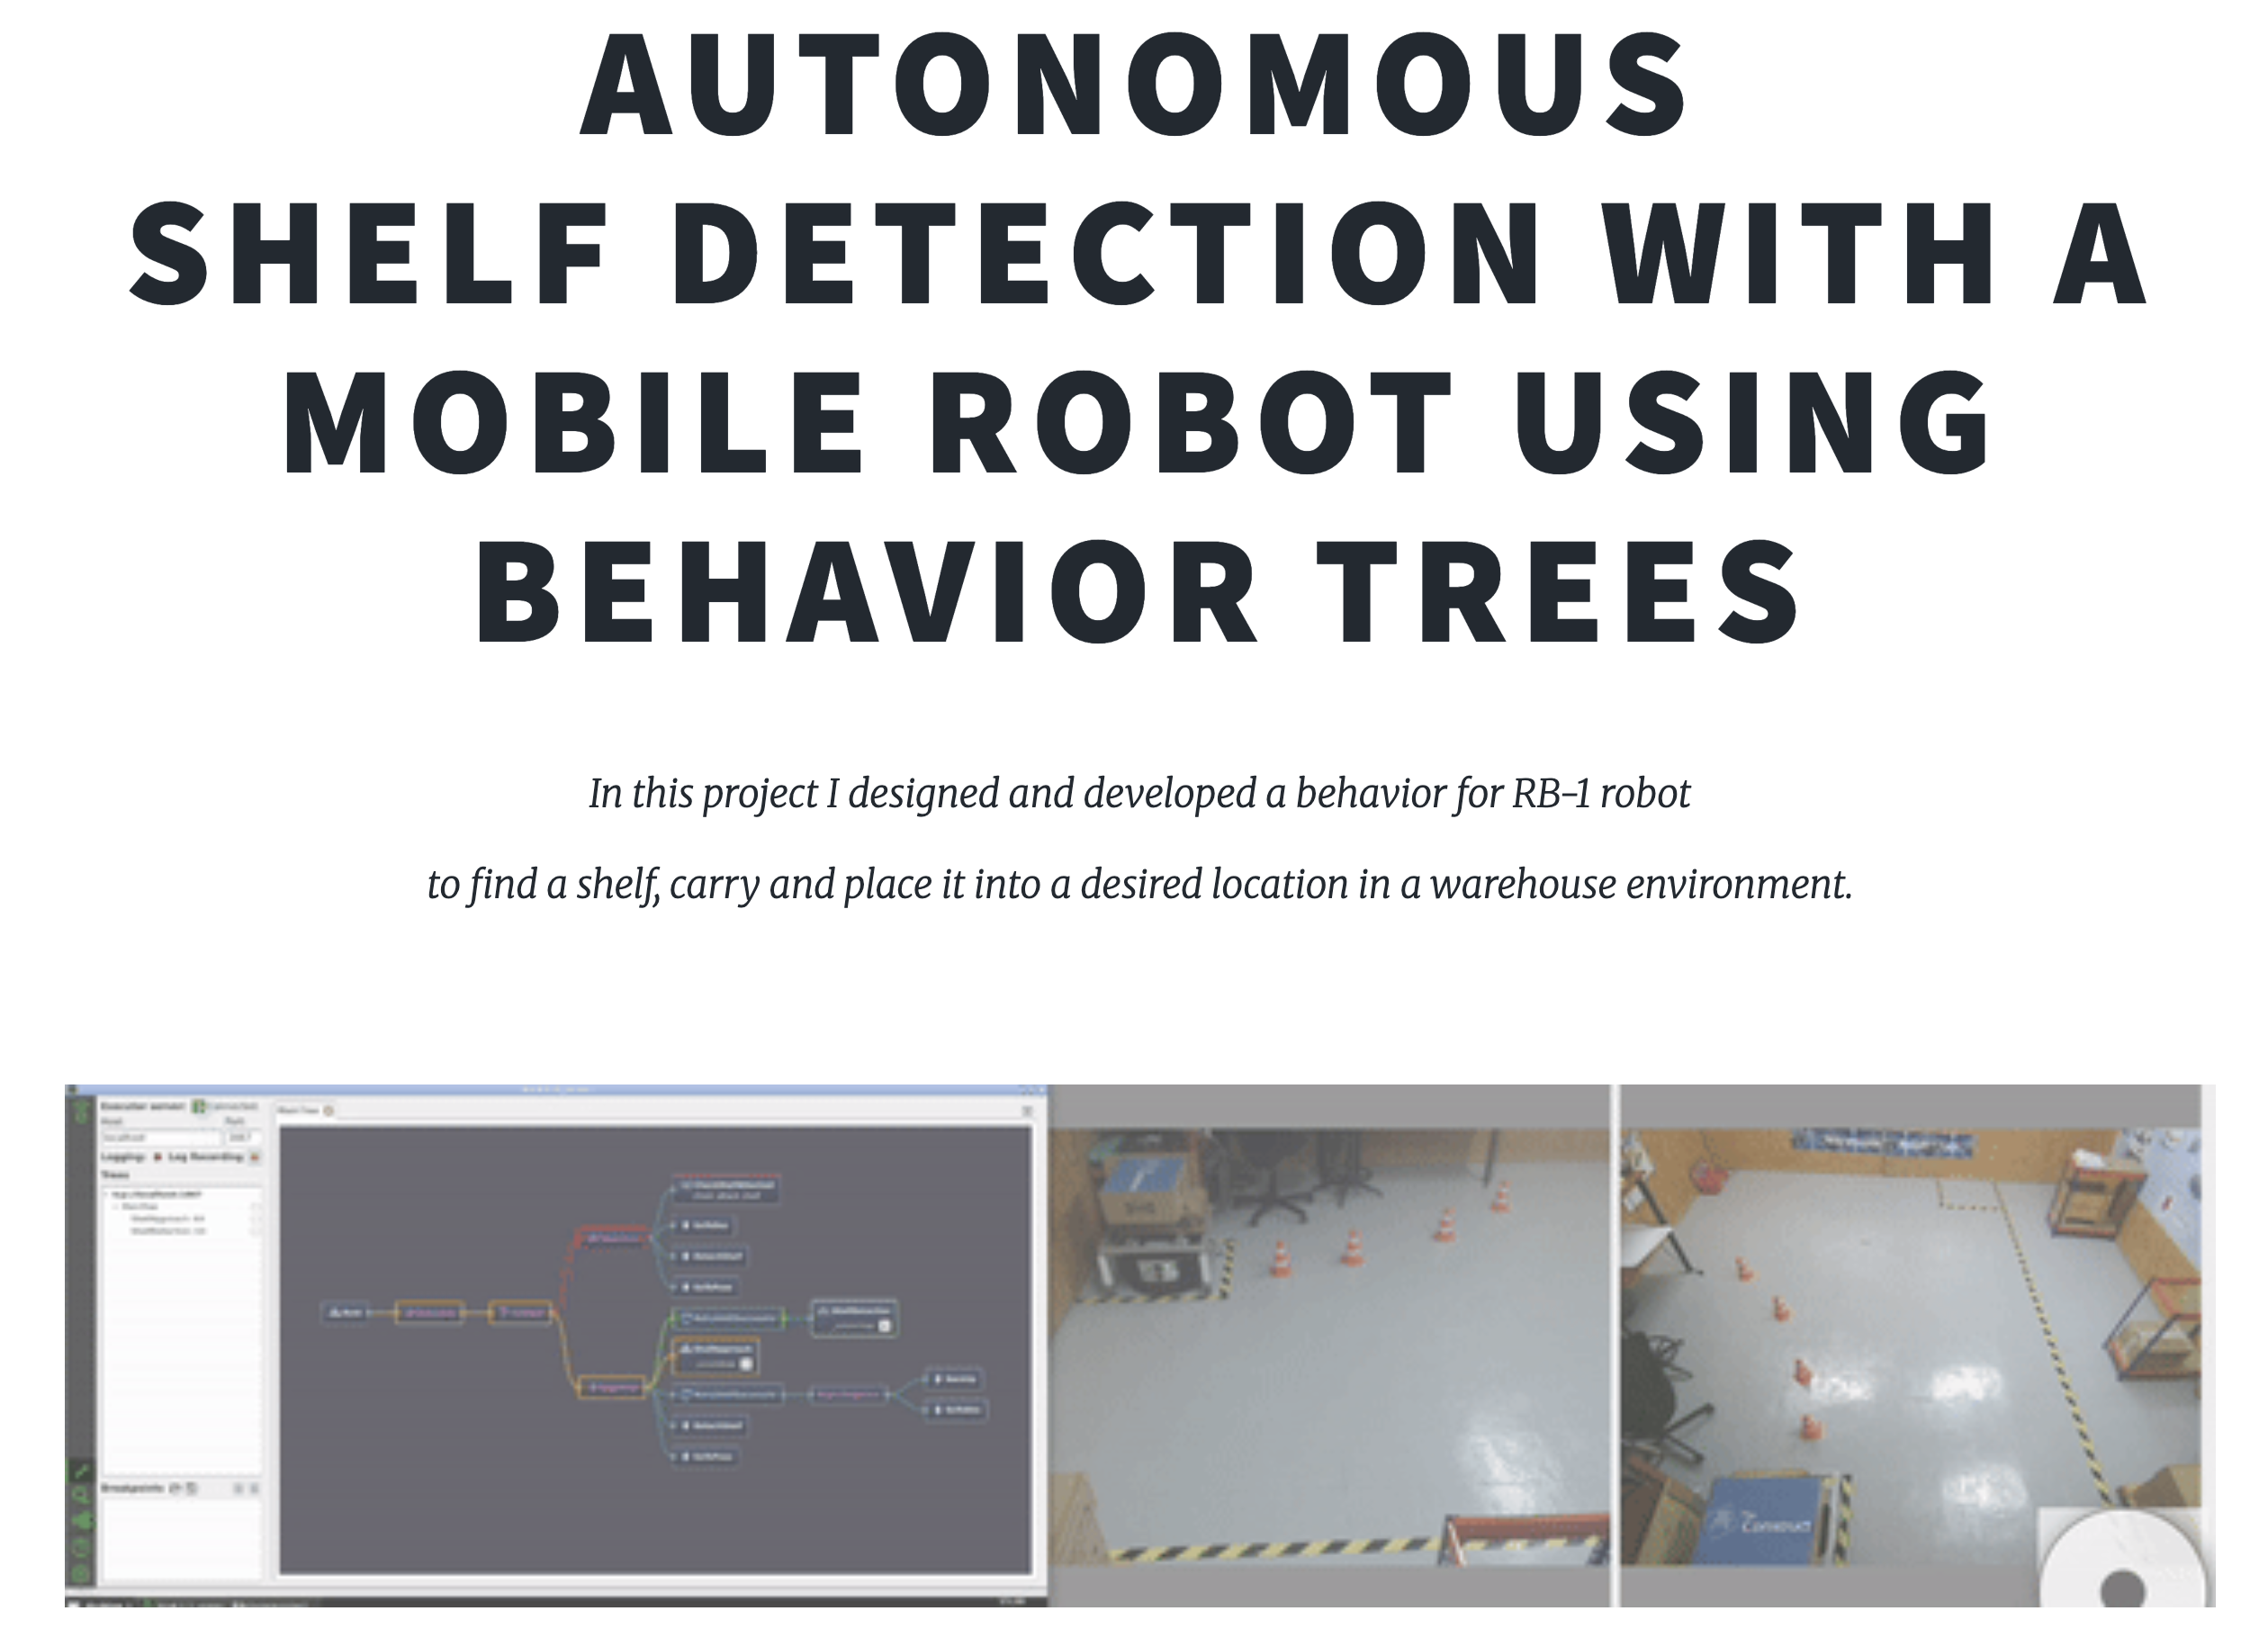
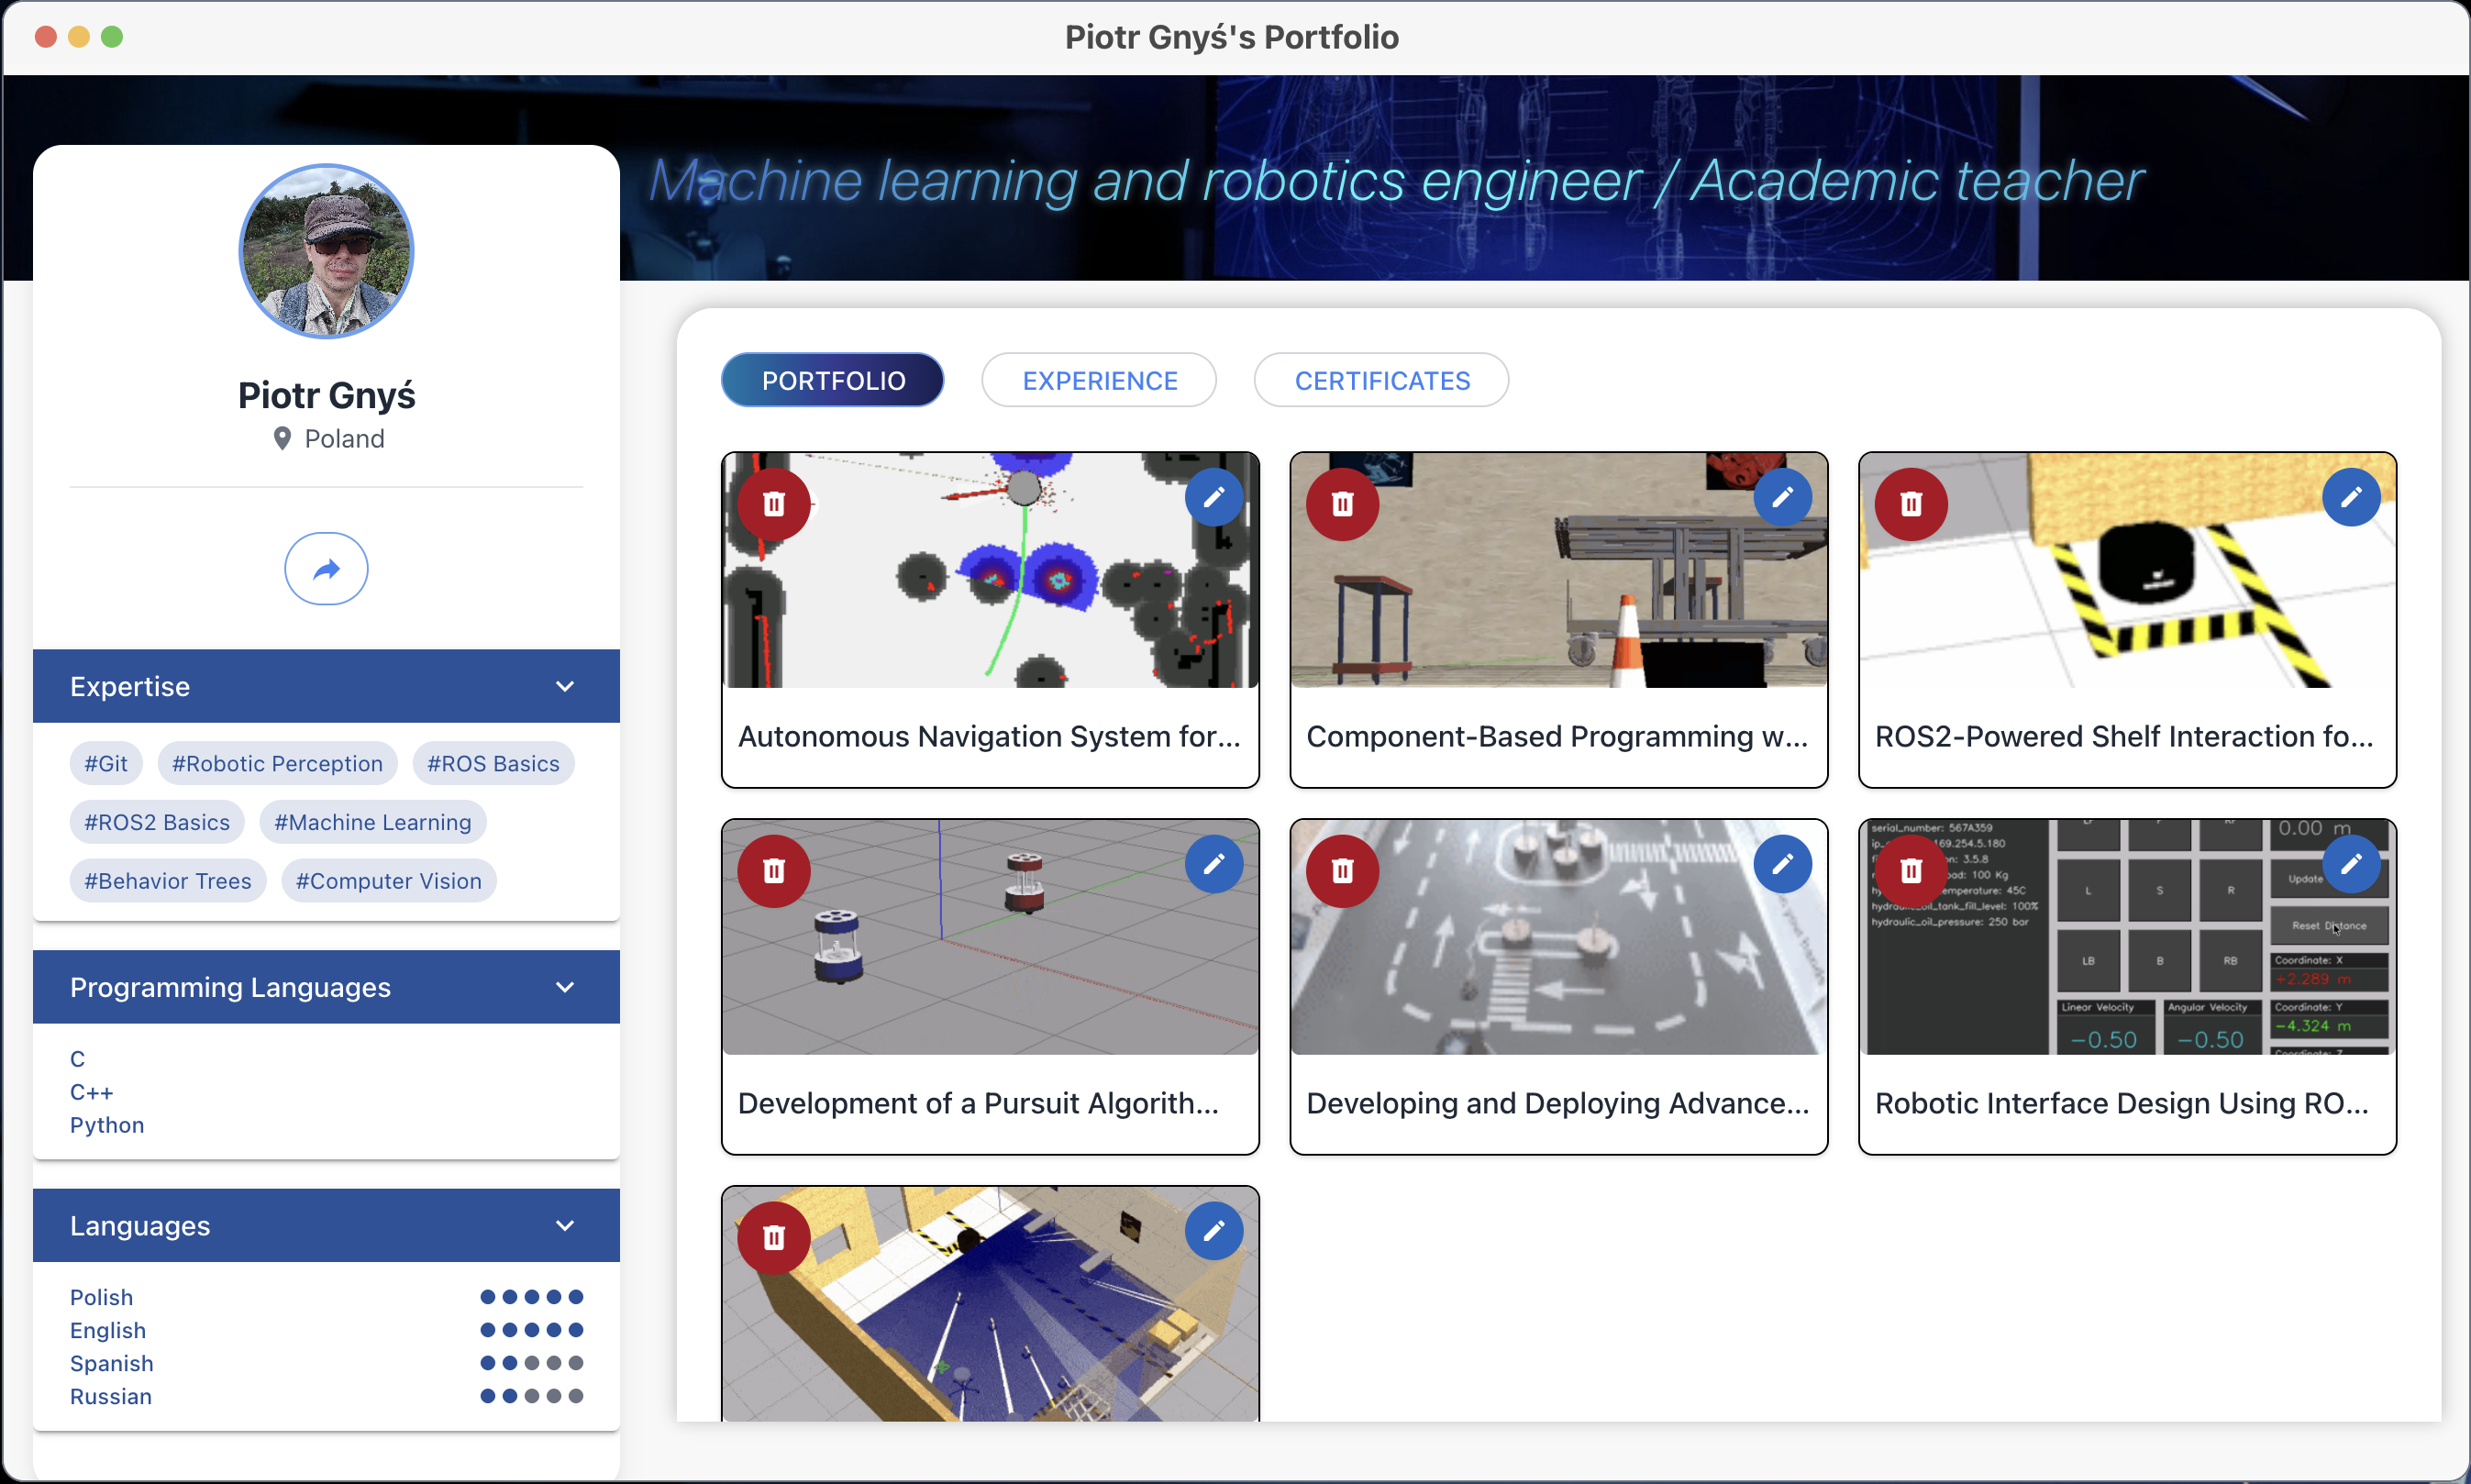
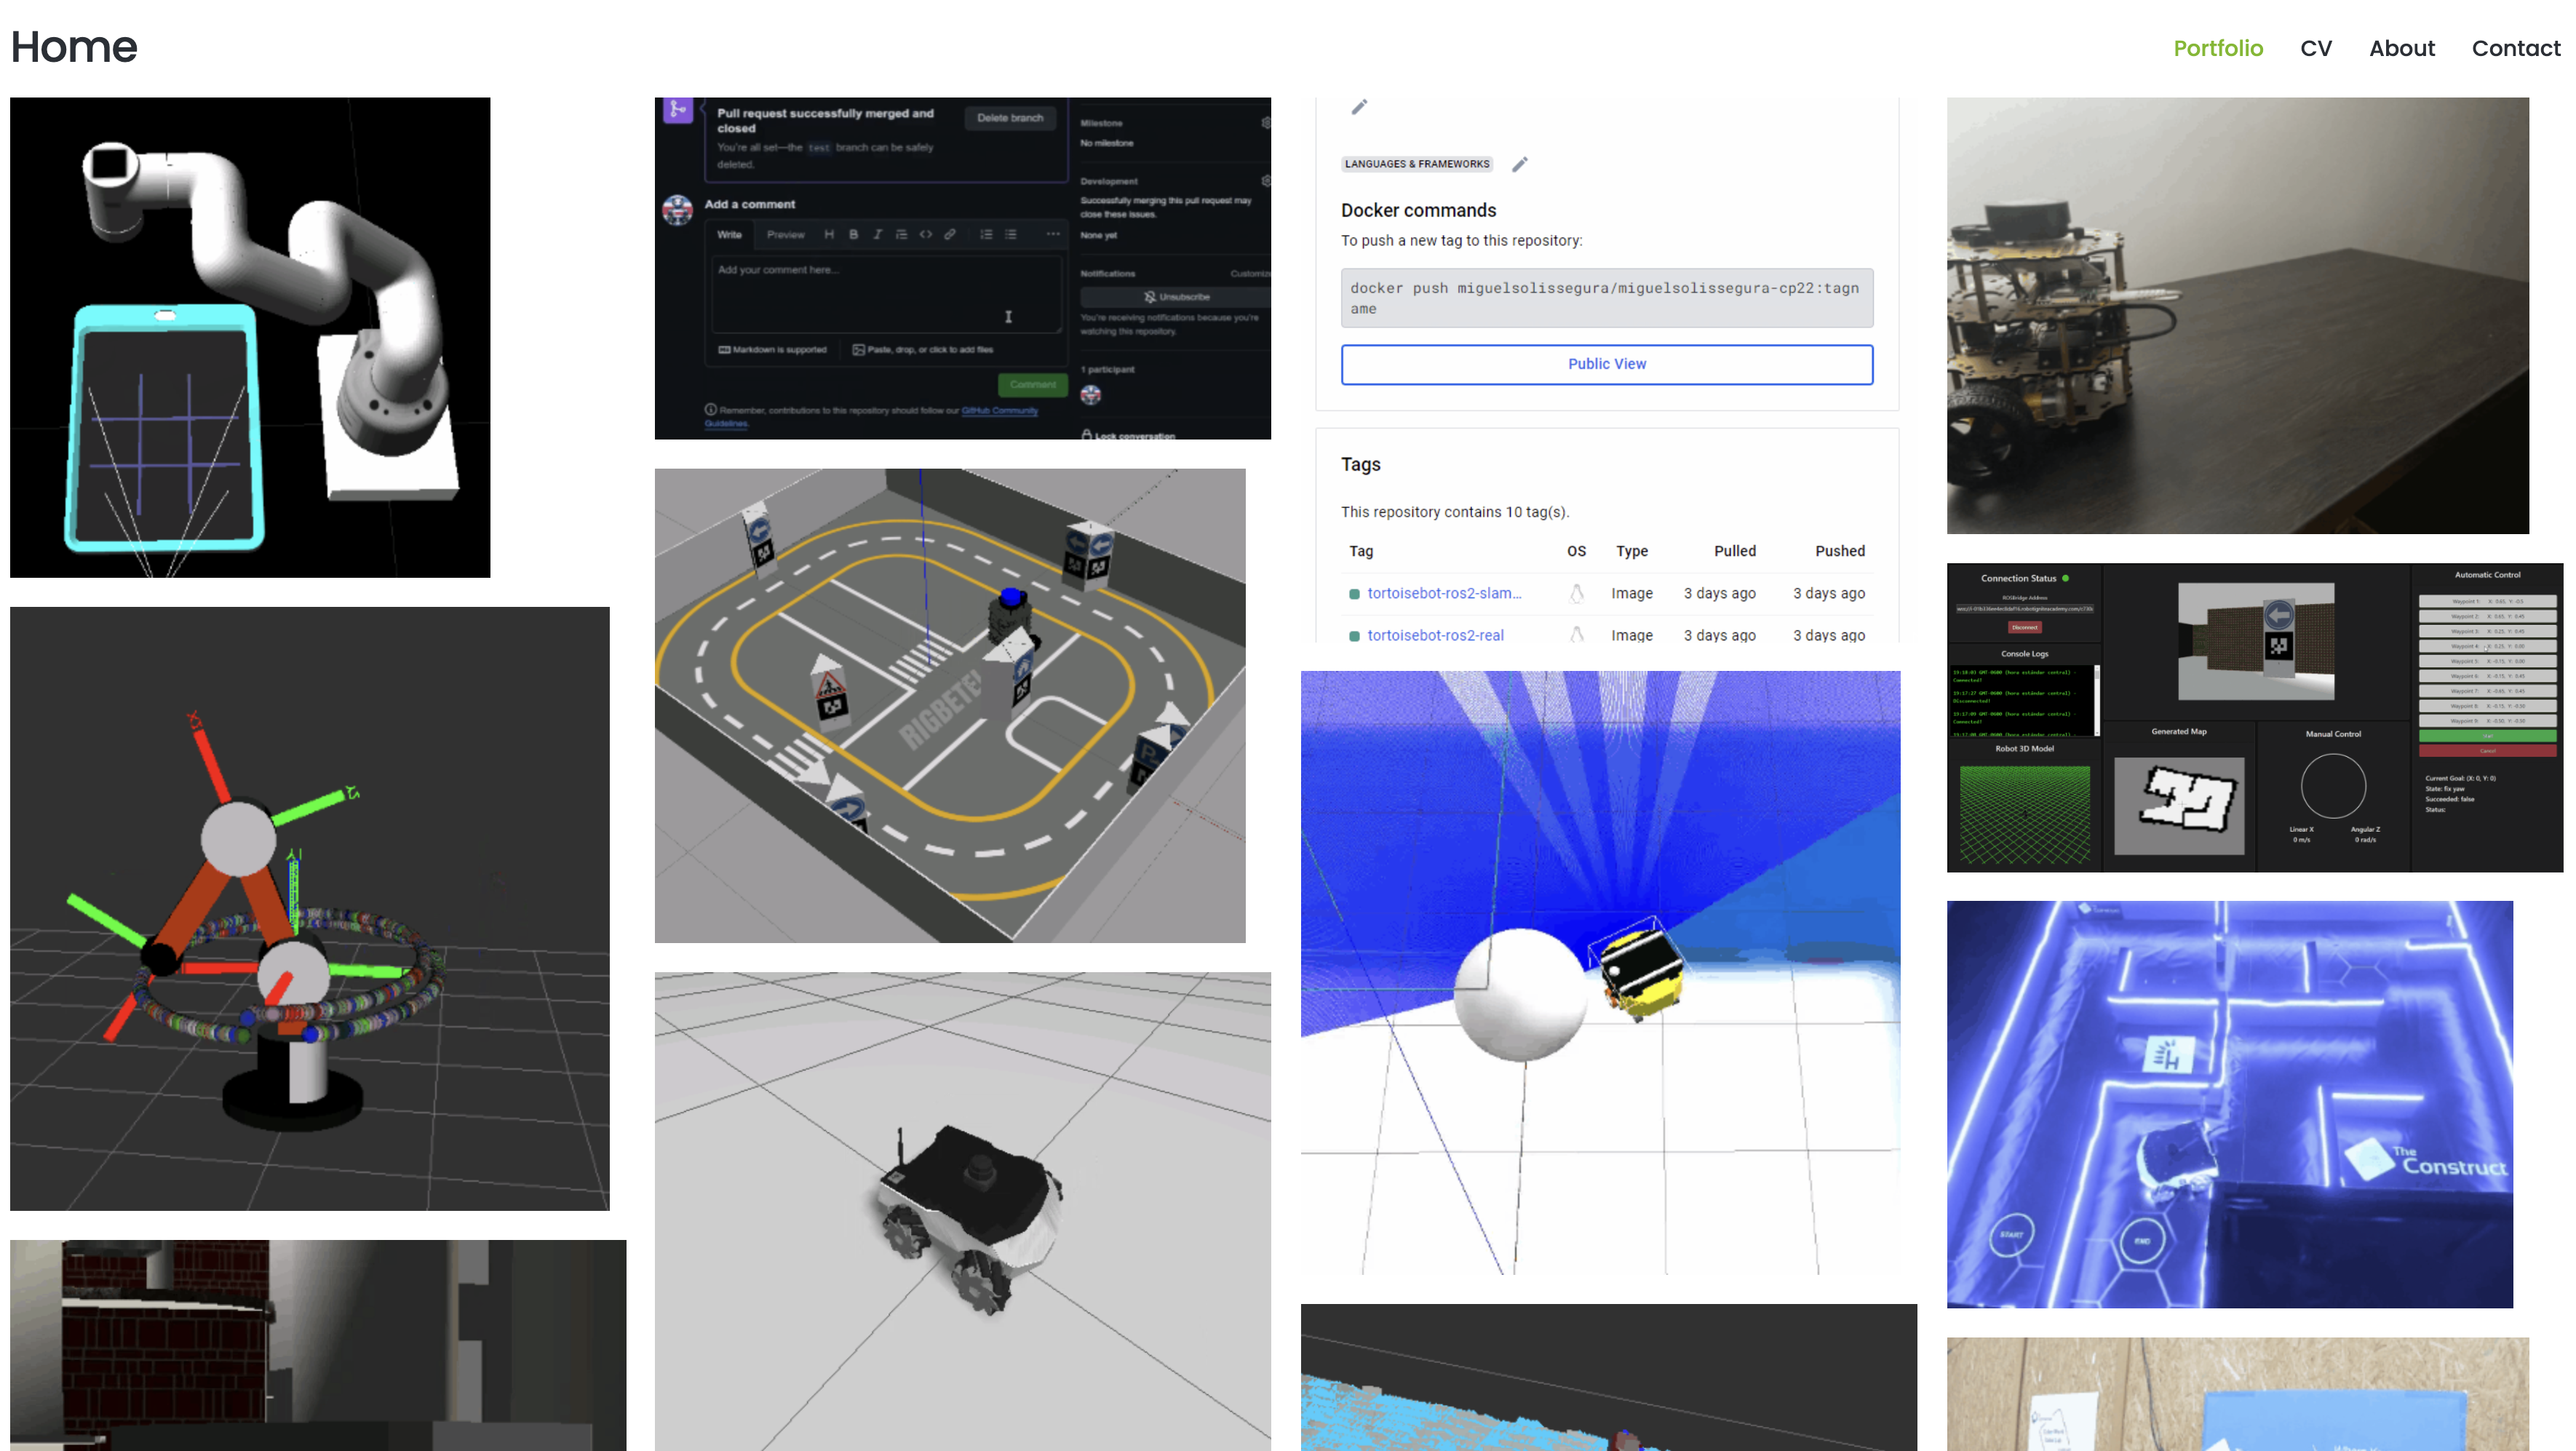
Here are a few examples of good portfolios from former students of mine:
Now it is your time to start building your portfolio, and if you want me to review it and give you some feedback, write a comment with the address to your portfolio and I’ll take a look.
*Final recommendation: Try the automatic portfolio generation from The Construct Robotics Institute, which provides a professional portfolio page for showcasing your robotics projects.
You can edit and fill the portfolio at will, but if you enrol in the Robotics Developers Masterclass, you will be doing awesome projects with simulations and real robots, and ALL THE PROJECTS ARE AUTOMATICALLY ADDED TO YOUR PORTFOLIO, including descriptions, links to code, and images.
In this post, we’ll be learning how to use nav2 SImple Command API to write a program that makes your program follow waypoints.
What we are going to create is something like a patroling system, in which the robot patrols a given area.
ROS Inside!
ROS Inside
Before anything else, if you want to use the logo above on your own robot or computer, feel free to download it and attach it to your robot. It is really free. Find it in the link below:
In order to follow this tutorial, we need to have ROS2 installed in our system, and ideally a ros2_ws (ROS2 Workspace). To make your life easier, we have already prepared a rosject with a simulation for that: https://app.theconstructsim.com/l/4da61f89/.
You can download the rosject on your own computer if you want to work locally, but just by copying the rosject (clicking the link), you will have a setup already prepared for you.
After the rosject has been successfully copied to your own area, you should see a Run button. Just click that button to launch the rosject (below you have a rosject example).
How to follow waypoints using nav2 – Run rosject (example of the RUN button)
After pressing the Run button, you should have the rosject loaded. Now, let’s head to the next section to get some real practice.
Launching the simulation
As you may imagine, instead of using a real robot, we are going to use a simulation. The simulation package we are using, neo_simulation2 (by Neobotix), comes along with all the new ROS 2 features.
Like its predecessor, the neo_simulation2 package is fully equipped with all the Neobotix robots that are available in the market.
By the way, Neobotix is a state-of-the manufacturer of mobile robots and robot systems. We offer robots and manipulators for all applications with full ROS support. Neobotix products range from small mobile robots to mobile robot arms and several omnidirectional robots. They are specialized in designing customized mobile robots to meet your unique requirements.
Combining the novelty of ROS 2 and the state-of-the-art Neobotix platforms would allow users to learn and develop various reliable and robust application that caters to their needs in both research and as well as in industries.
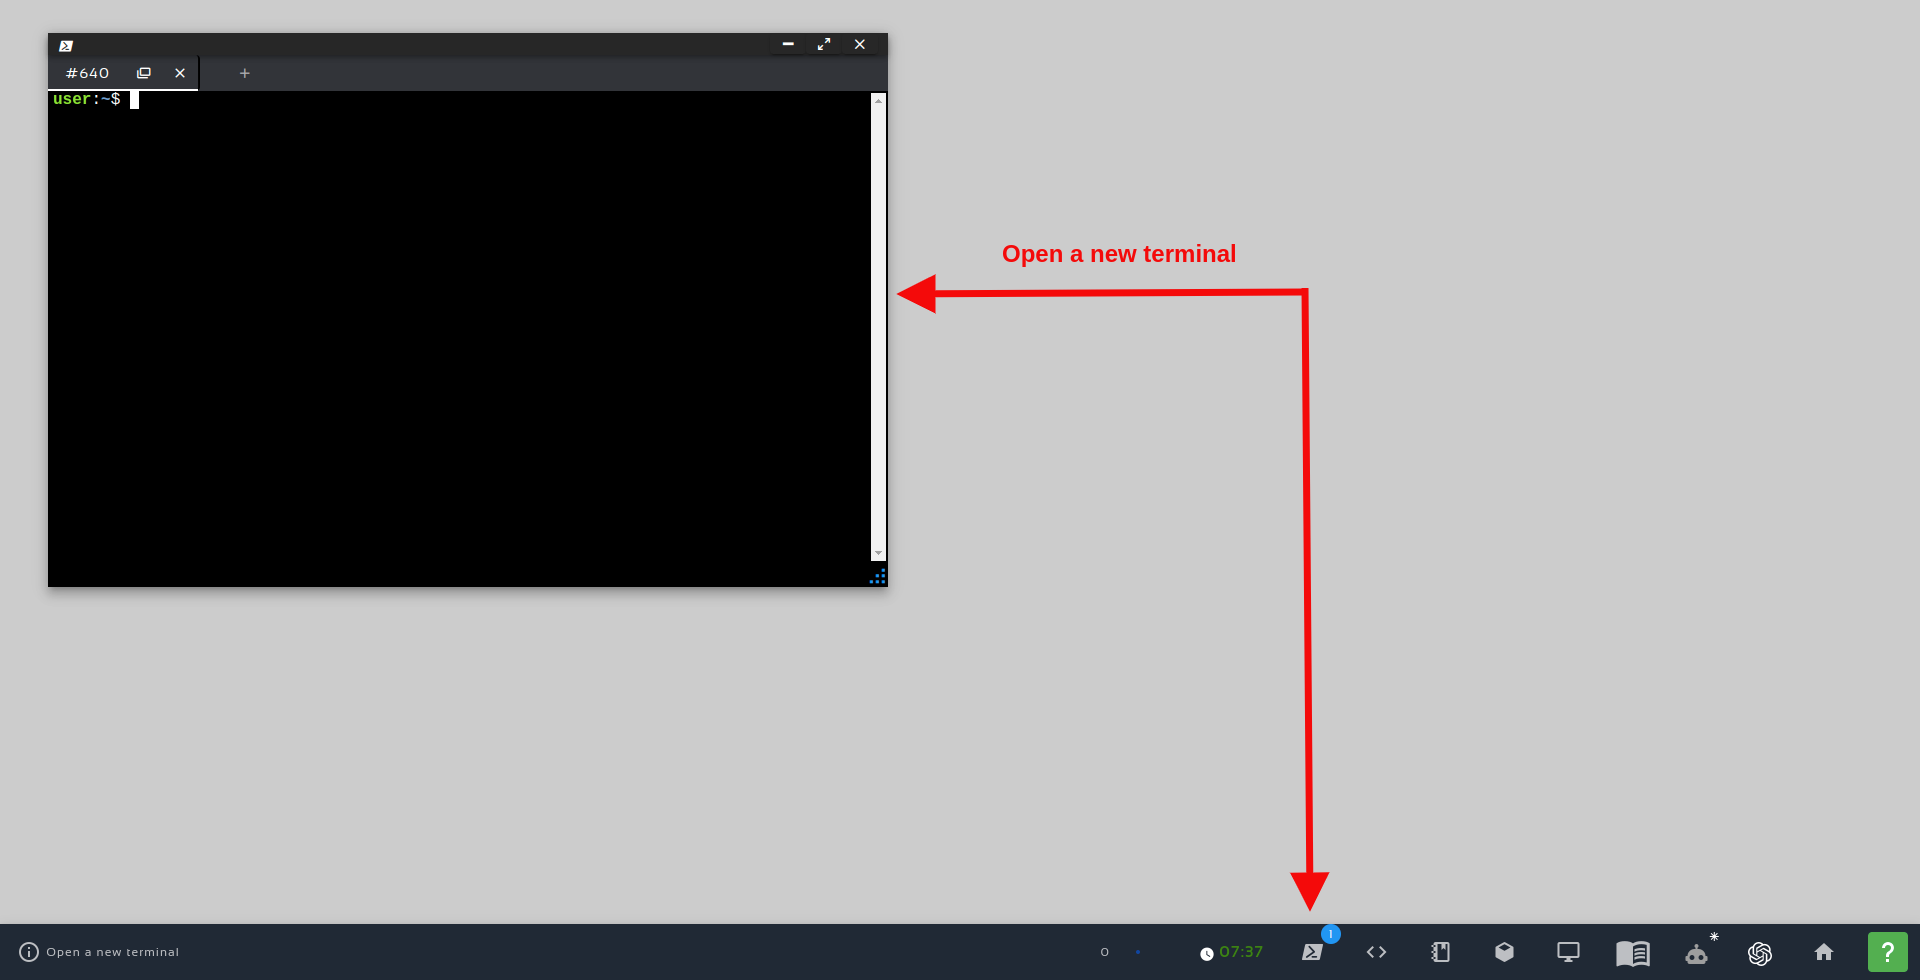
Alright, having opened the rosject and explained a little bit about Neobotix, let’s start running some commands in the terminal. For that, let’s open a terminal by clicking the Open a new terminal button.
Open a new Terminal
Once inside the first terminal, let’s run the commands below, to launch a simulation
cd ros2_ws
source install/setup.bash
ros2 launch neo_simulation2 simulation.launch.py
There will be countless red error messages on this simulation terminal. Let’s just ignore those messages for now.
If you want to know a bit more about Neobotix robots, they offer:
In order to move the robot to a desired goal location, pre-defined controllers and planners are available to be readily used. Thanks to Navigation 2, the all-new ROS-2 navigation stack, provides us with localization, global planning, and local planning algorithms, that allow us to jump-start by testing our intended application on the robot real-quick.
Almost all the algorithms found in move_base (ROS-1 Navigation stack) are available in Navigation2. All the Neobotix robots in the simulation for ROS-2 are primed and ready with Navigation2.
Once the simulation is started (seen in the previous tutorial), ROS-2 navigation stack can be launched using the following command
Now, in a second terminal, we can launch the Localization Server using the following command:
The commands above should have launched the simulation, Localization Server, and Path Planner server.
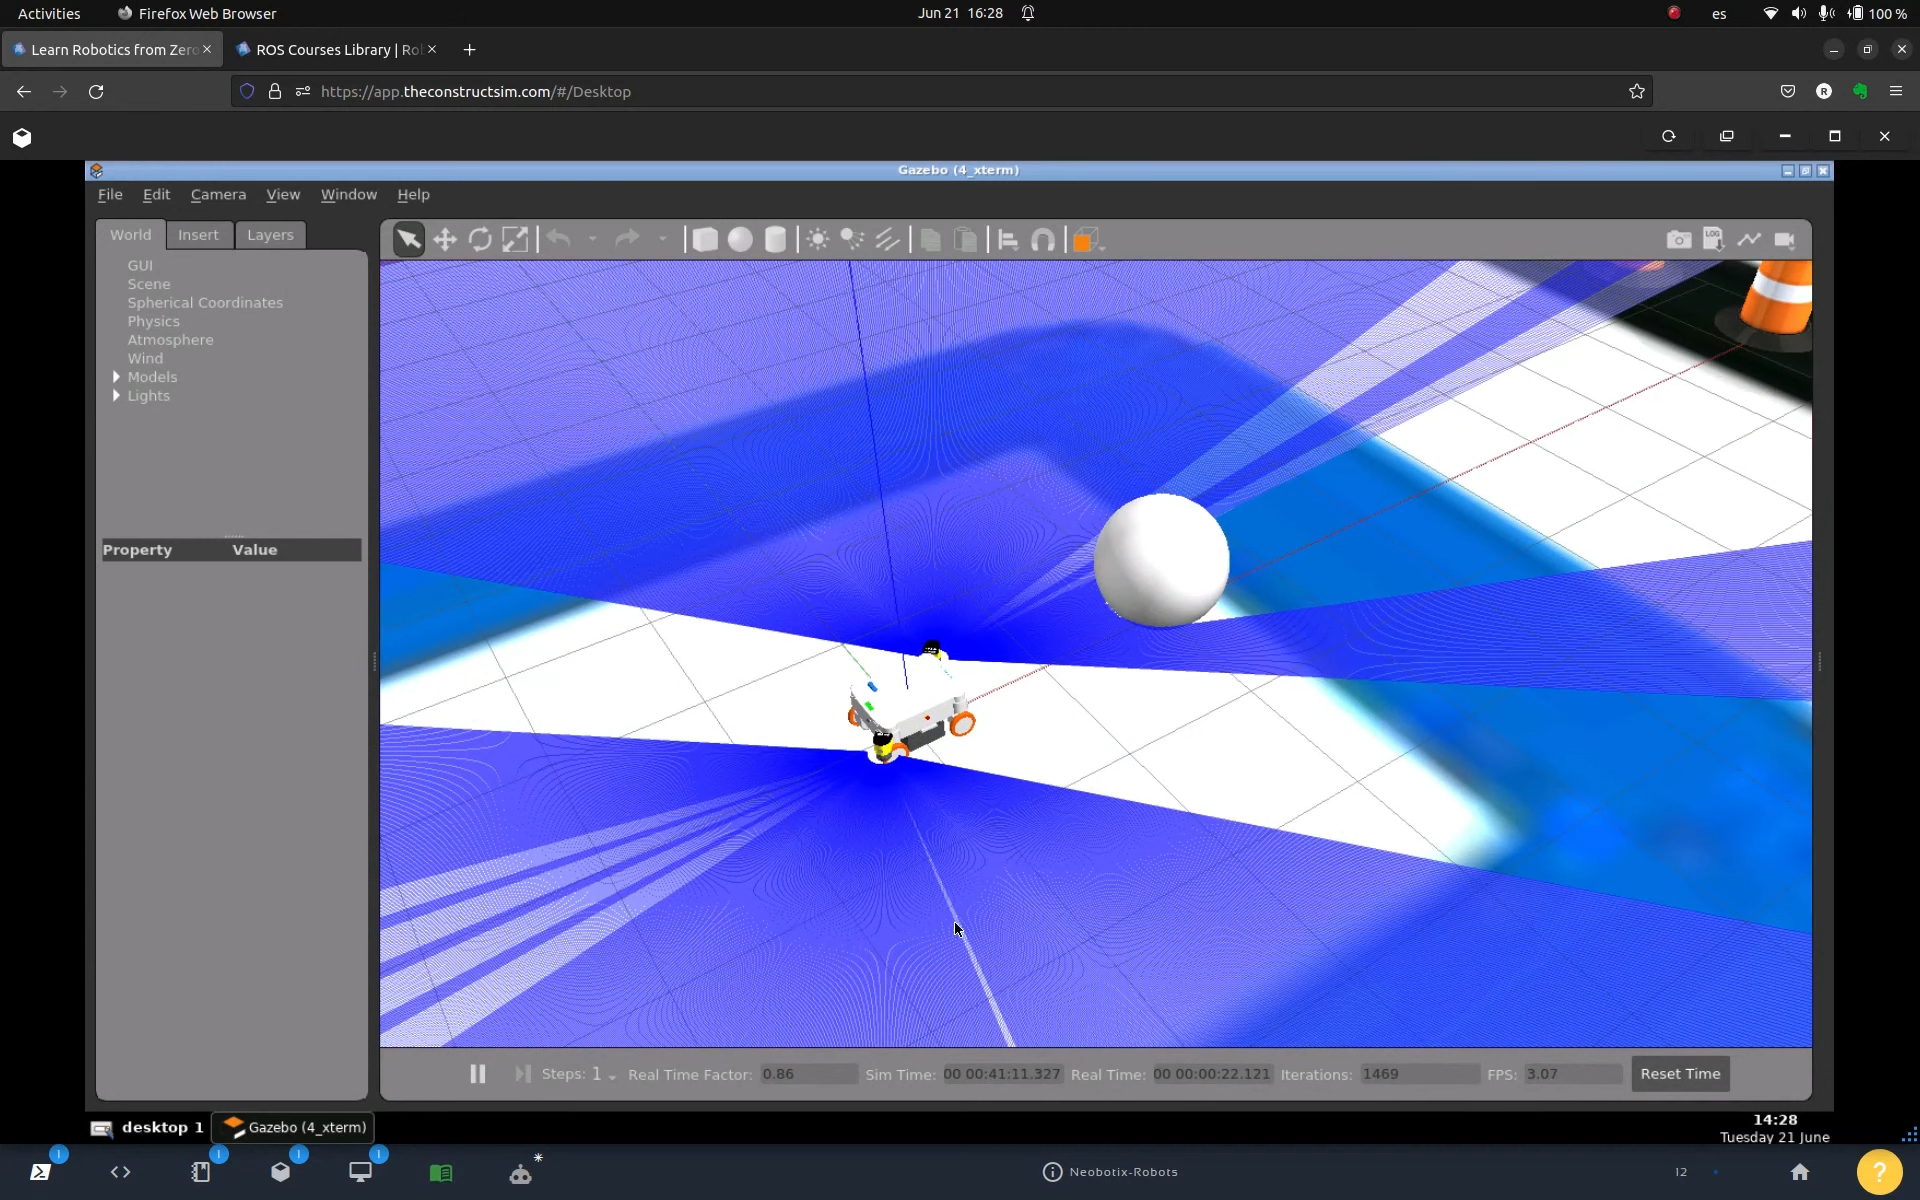
After some seconds, we should have Gazebo (simulation), RViz (Robot Visualization), and Teleop running now. The simulation should be similar to the following:
Simulation – How to follow waypoints using nav2
If the Gazebo simulation doesn’t pop up:
Please open the Gazebo from the below menu bar
RViz would have been loaded as well and can be found in the Graphical tools
Also, another terminal would have popped out in the Graphical tools for the teleoperation. Please follow the instruction given in that terminal for moving the robot.
To make sure everything is working so far, you can send a 2D NavGoal in RViz to make sure the navigation system is working.
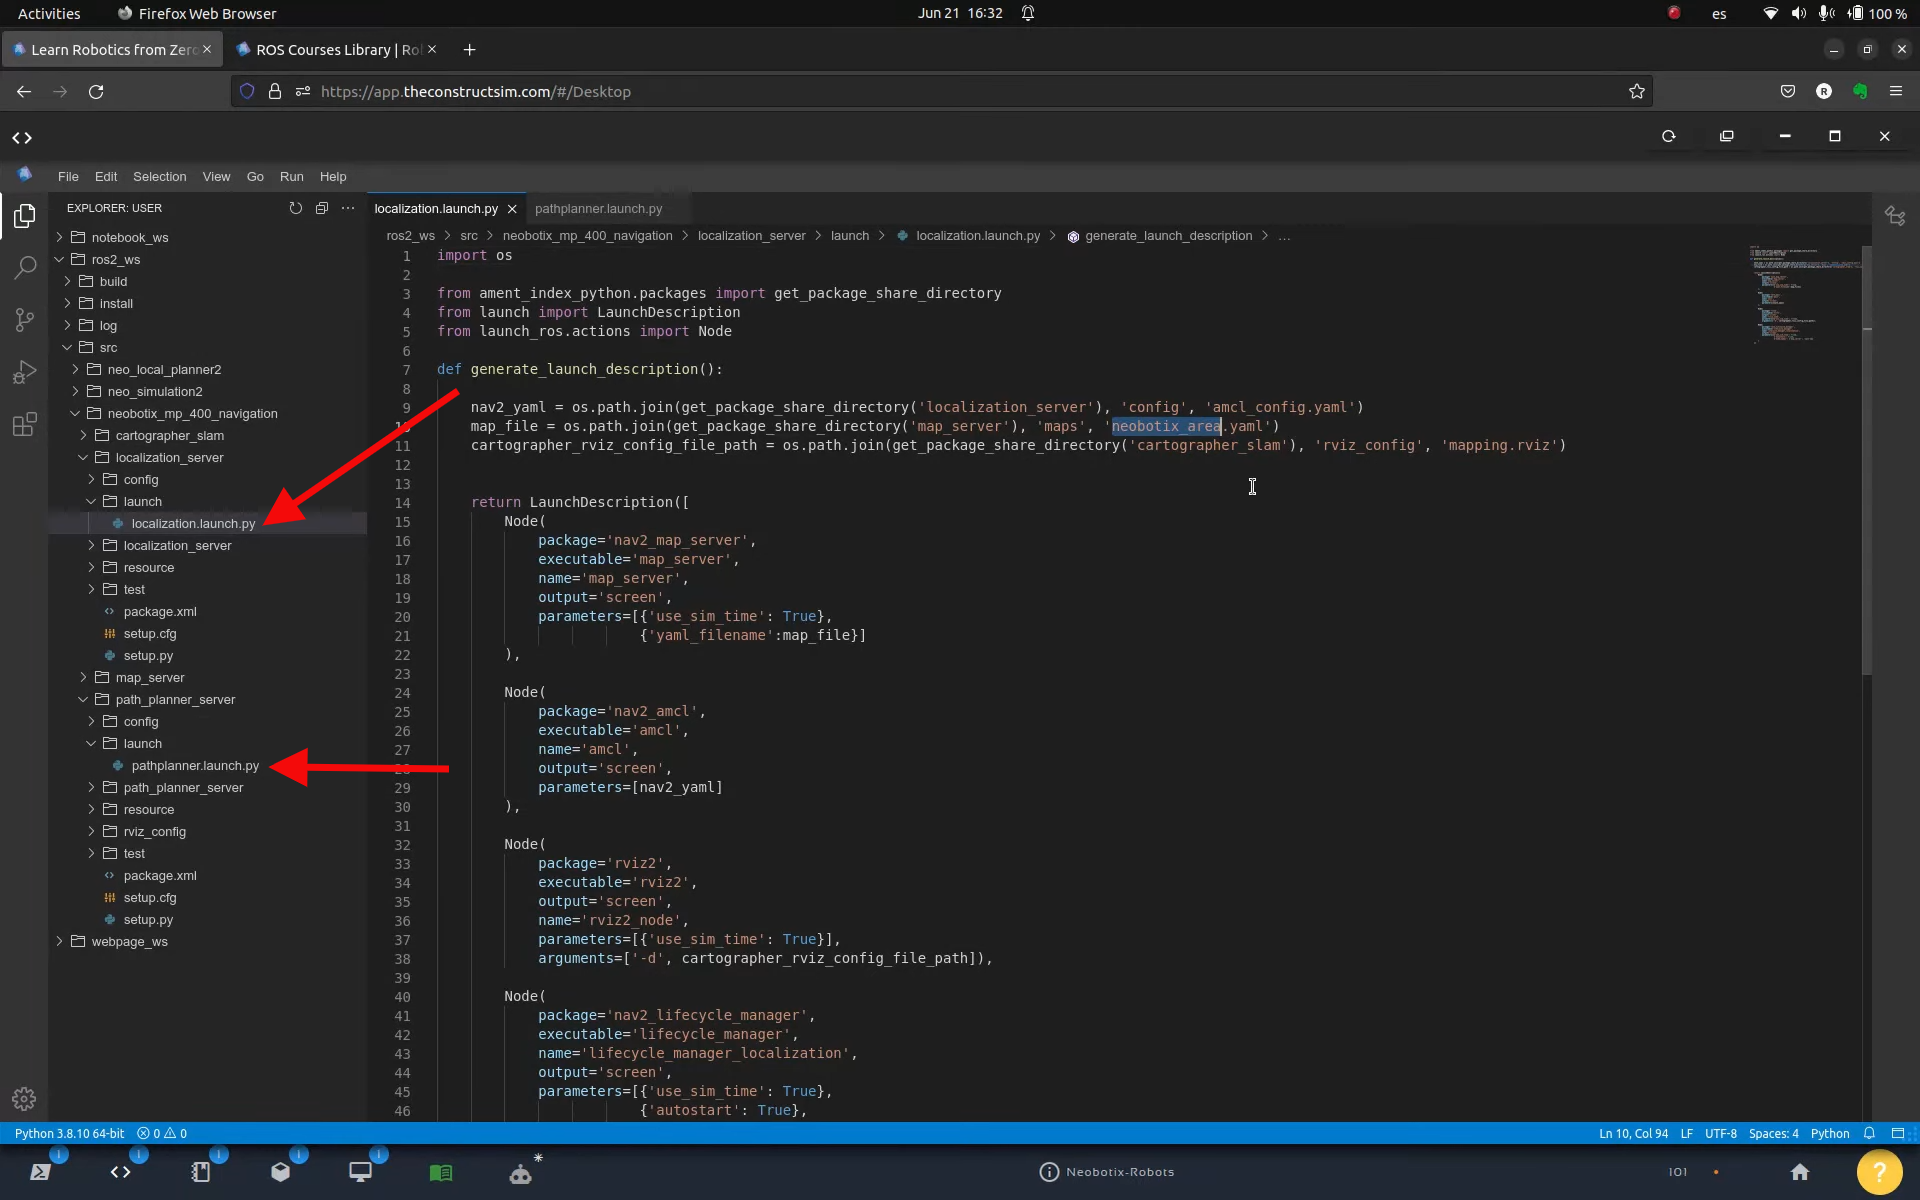
The files used to launch the Localization Server and Path Planner are found on the following paths:
ls ~/ros2_ws/src/neobotix_mp_400_navigation/localization_server/launch/localization.launch.py
ls ~/ros2_ws/src/neobotix_mp_400_navigation/path_planner_server/launch/pathplanner.launch.py
These files can also be seen in the Code Editor:
Localization Server and Path Planner – How to follow waypoints using nav2
Feel free to localize and send goals to the robot as shown in this video about ROS2 Navigation for Omnidirectional Robots:
Global Costmap and Local Costmap in RViz
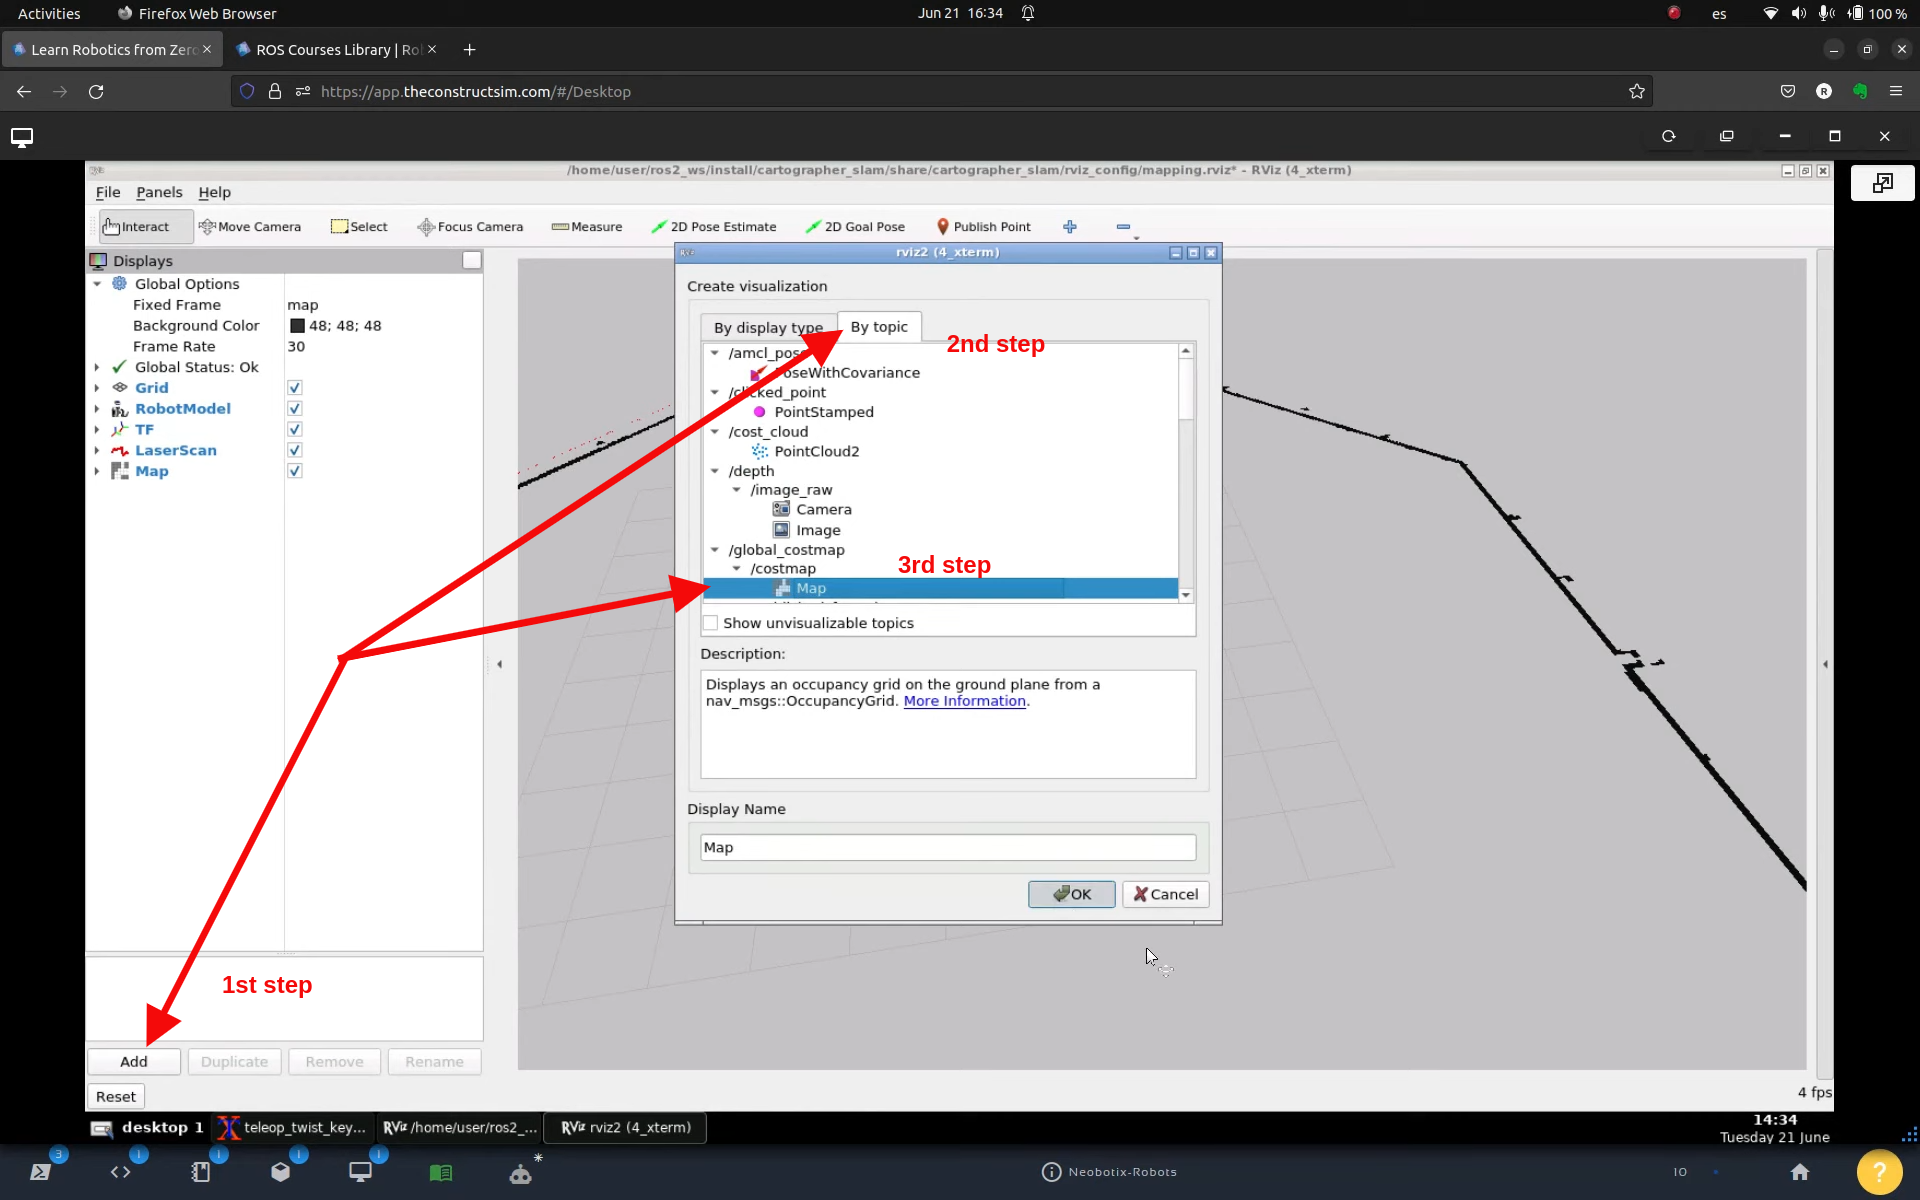
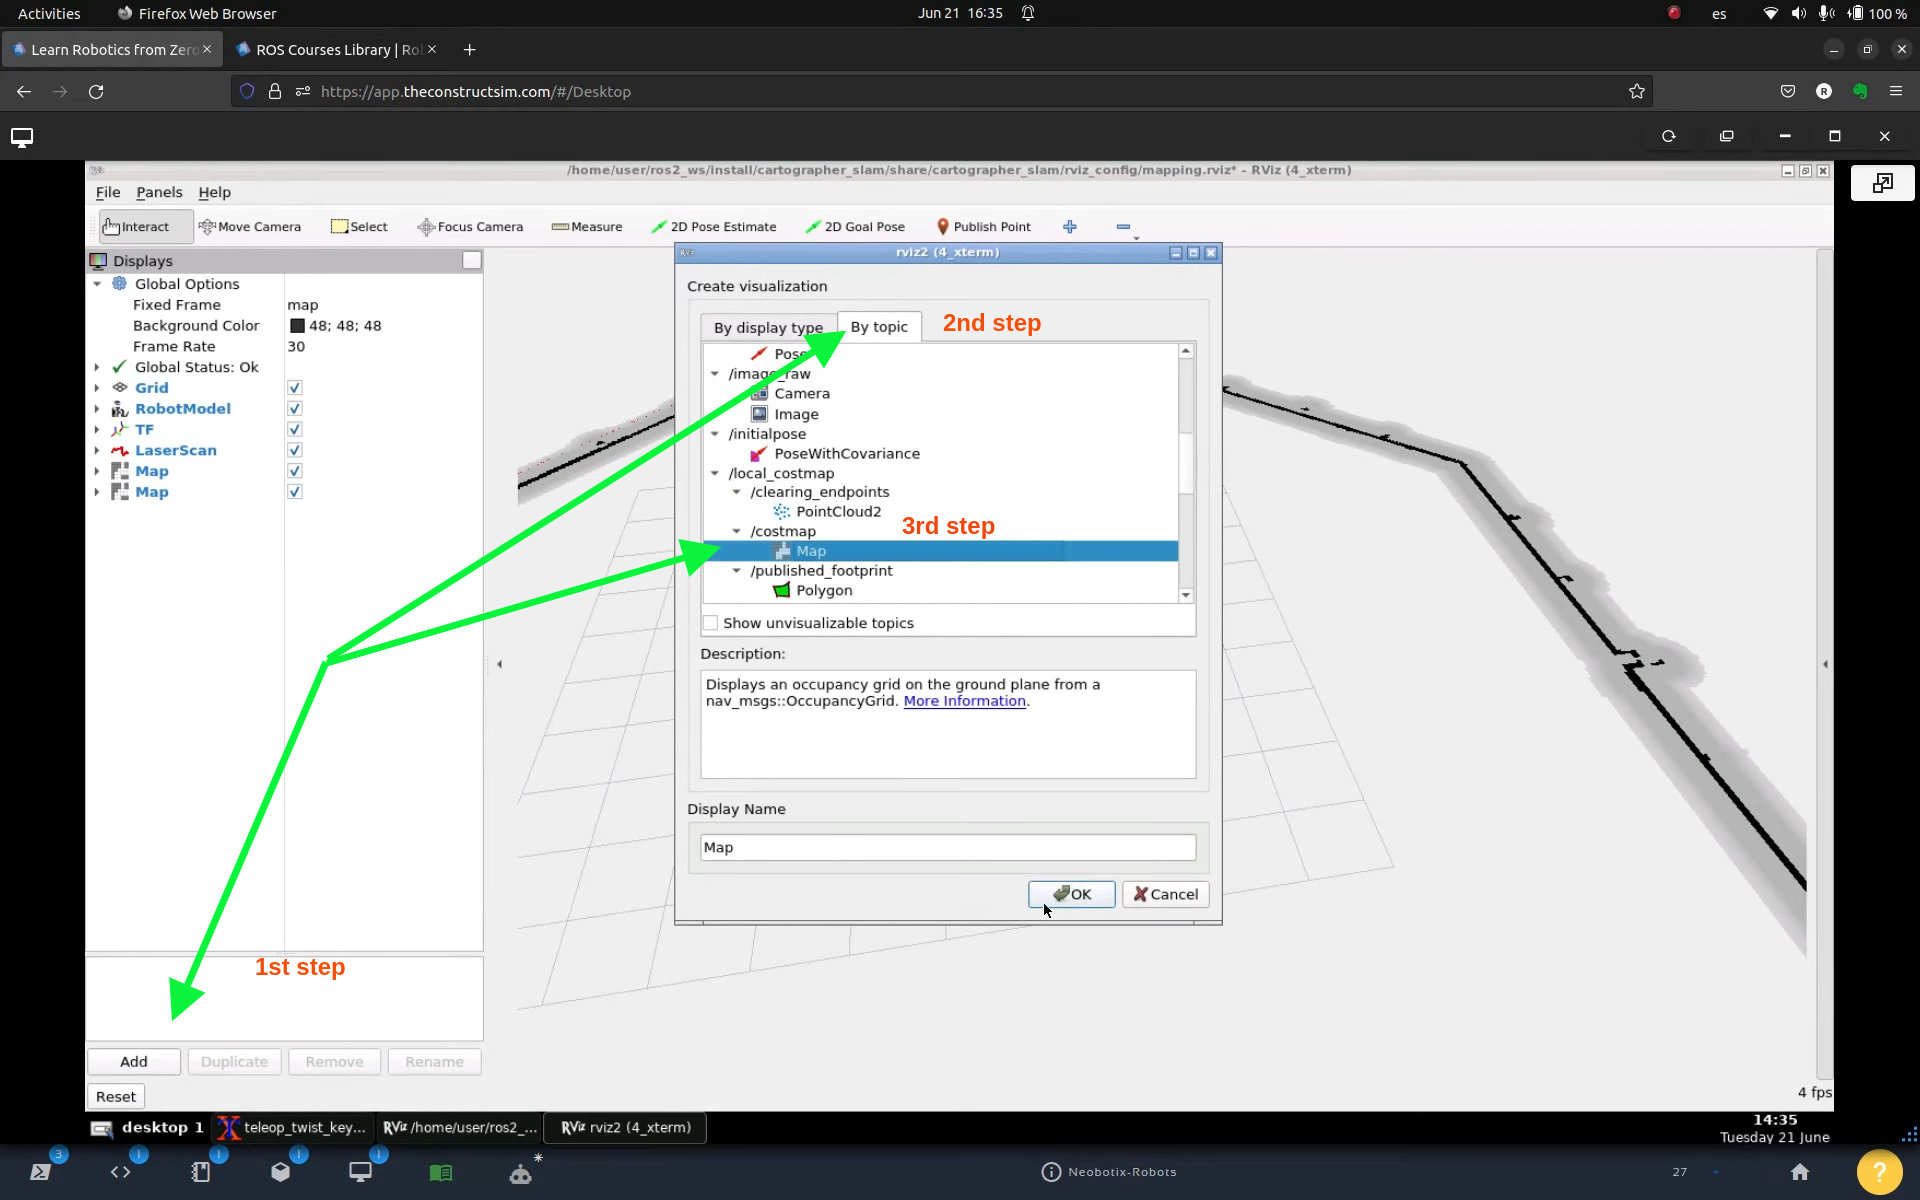
Assuming you have RViz running, you can add Global and Local costmaps to it. For that, click the Add button on the bottom left side of RViz, then Add by Topic, then select Global Costmap:
Add by topic – Global Costmap – How to follow waypoints using nav2
To add Local Costmap, click the Add button on the bottom left side of RViz, then Add by Topic, then select the Map under Local Costmap:
Add by topic – Local Costmap – How to follow waypoints using nav2
Assuming everything went well so far, now we are going to test the waypoint follower.
Waypoint follower
If you forked the rosject (clicking on the link we provided to you earlier), you should have a package named follow_waypoints on your ros2_ws/src folder already, but for documentation purposes, and in case you want to know the baby steps, here is how we created that package.
First, in a fourth terminal we created that package:
cd ~/ros2_ws/src

ros2 pkg create --build-type ament_python follow_waypoints
By listing the content of that ~/ros2_ws/src folder, we see that the package has been created:
ls

# follow_waypoints  neo_local_planner2  neo_simulation2  neobotix_mp_400_navigation
That follow_waypoints package has a folder with the same name on it. On that folder, we created a file named follow_waypoints.py
cd ~/ros2_ws/src/follow_waypoints/follow_waypoints

touch follow_waypoints.py

chmod +x follow_waypoints.py
The touch command was used to create the file, and the chmod +x command was used to give execution permissions to that file (make it executable, basically)
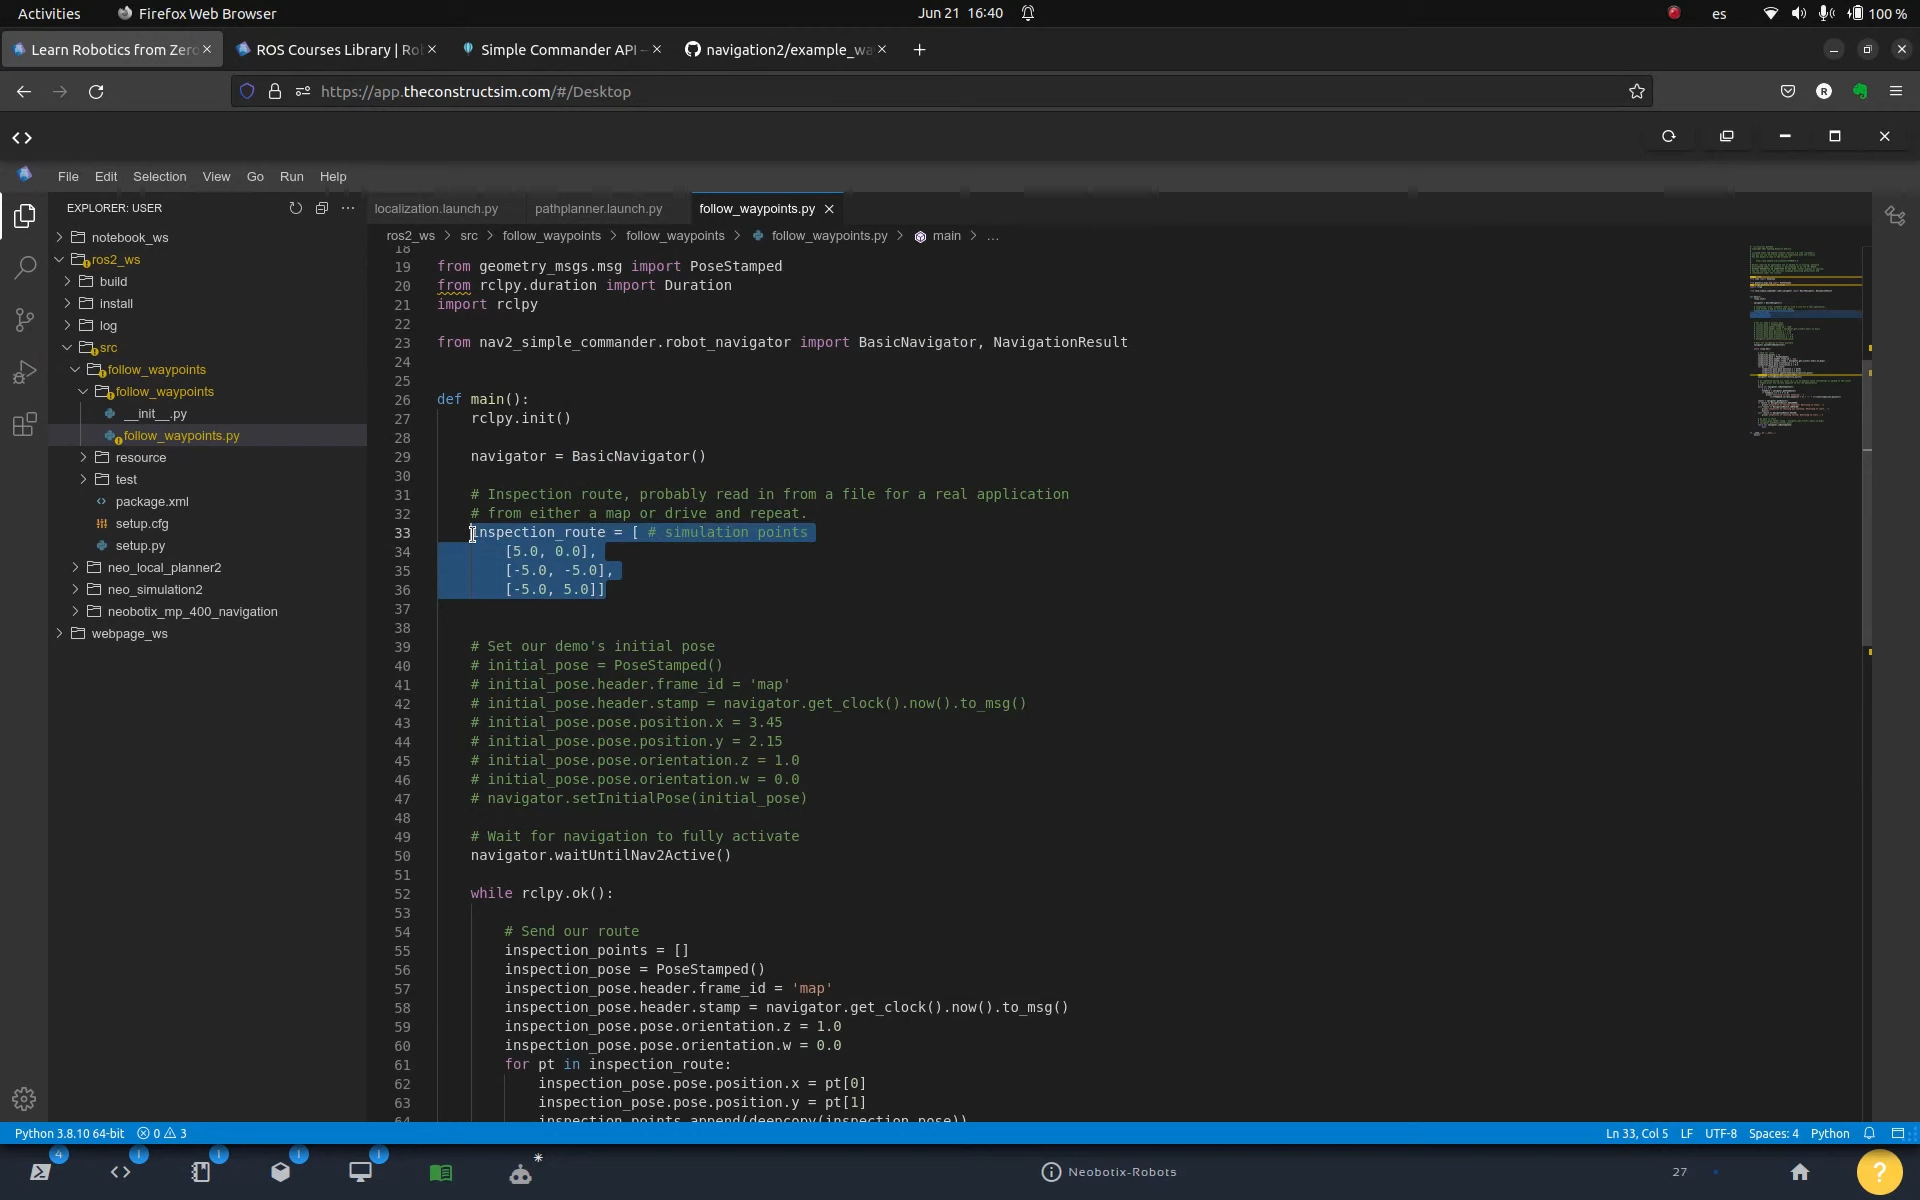
We then pasted some content on the follow_waypoints.py file. You can see the content by opening that file using the Code Editor.
Inspection Route – To navigation to – How to follow waypoints using nav2
On lines 33 to 36 we define an inspection_route variable, which essentially is an array that defines the waypoints (positions in the map) that the robot has to go when patrolling.
#! /usr/bin/env python3
# Copyright 2021 Samsung Research America
#
# Licensed under the Apache License, Version 2.0 (the "License");
# you may not use this file except in compliance with the License.
# You may obtain a copy of the License at
#
#     http://www.apache.org/licenses/LICENSE-2.0
#
# Unless required by applicable law or agreed to in writing, software
# distributed under the License is distributed on an "AS IS" BASIS,
# WITHOUT WARRANTIES OR CONDITIONS OF ANY KIND, either express or implied.
# See the License for the specific language governing permissions and
# limitations under the License.

import time
from copy import deepcopy

from geometry_msgs.msg import PoseStamped
from rclpy.duration import Duration
import rclpy

from nav2_simple_commander.robot_navigator import BasicNavigator, NavigationResult


def main():
    rclpy.init()

    navigator = BasicNavigator()

    # Inspection route, probably read in from a file for a real application
    # from either a map or drive and repeat.
    inspection_route = [ # simulation points
        [5.0, 0.0],
        [-5.0, -5.0],
        [-5.0, 5.0]]


    # Set our demo's initial pose
    # initial_pose = PoseStamped()
    # initial_pose.header.frame_id = 'map'
    # initial_pose.header.stamp = navigator.get_clock().now().to_msg()
    # initial_pose.pose.position.x = 3.45
    # initial_pose.pose.position.y = 2.15
    # initial_pose.pose.orientation.z = 1.0
    # initial_pose.pose.orientation.w = 0.0
    # navigator.setInitialPose(initial_pose)

    # Wait for navigation to fully activate
    navigator.waitUntilNav2Active()

    while rclpy.ok():

        # Send our route
        inspection_points = []
        inspection_pose = PoseStamped()
        inspection_pose.header.frame_id = 'map'
        inspection_pose.header.stamp = navigator.get_clock().now().to_msg()
        inspection_pose.pose.orientation.z = 1.0
        inspection_pose.pose.orientation.w = 0.0
        for pt in inspection_route:
            inspection_pose.pose.position.x = pt[0]
            inspection_pose.pose.position.y = pt[1]
            inspection_points.append(deepcopy(inspection_pose))
        nav_start = navigator.get_clock().now()
        navigator.followWaypoints(inspection_points)

        # Do something during our route (e.x. AI to analyze stock information or upload to the cloud)
        # Simply print the current waypoint ID for the demonstation
        i = 0
        while not navigator.isNavComplete():
            i = i + 1
            feedback = navigator.getFeedback()
            if feedback and i % 5 == 0:
                print('Executing current waypoint: ' +
                    str(feedback.current_waypoint + 1) + '/' + str(len(inspection_points)))

        result = navigator.getResult()
        if result == NavigationResult.SUCCEEDED:
            print('Inspection of shelves complete! Returning to start...')
        elif result == NavigationResult.CANCELED:
            print('Inspection of shelving was canceled. Returning to start...')
            exit(1)
        elif result == NavigationResult.FAILED:
            print('Inspection of shelving failed! Returning to start...')

        # go back to start
        # initial_pose.header.stamp = navigator.get_clock().now().to_msg()
        # navigator.goToPose(initial_pose)
        while not navigator.isNavComplete:
            pass


if __name__ == '__main__':
    main()
In addition to that follow_waypoints.py file, we also had to create the ~/ros2_ws/src/follow_waypoints/config/follow_waypoints.yaml and ~/ros2_ws/src/follow_waypoints/setup.py files.
Please check that files. If you want a deeper explanation about those files, please check the video available at the end of this post.
Alright, after having created that package and the required configuration files, the next was was compiling the package:
cd ~/ros2_ws

colcon build; source install/setup.bash
Then, to see the robot following the waypoints, we can run:
cd ~/ros2_ws

source install/setup.bash

ros2 run follow_waypoints follow_waypoints_exe
Looking at the simulation and at RViz, you should be able to see the robot moving.
Congratulations. You just learned how to make a robot follow waypoints using nav2 (the official ROS 2 Navigation package)
We hope this post was really helpful to you. If you want a live version of this post with more details, please check the video in the next section.
Youtube video
So this is the post for today. Remember that we have the live version of this post on YouTube. If you liked the content, please consider subscribing to our youtube channel. We are publishing new content ~every day.
Keep pushing your ROS Learning.
Related Courses & Training
If you want to learn more about ROS and ROS2, we recommend the following courses:
ROS2 is an open-source software framework for robotics that provides libraries and tools to help developers create robot applications.
Documentation is an essential part of any software project, and ROS2 welcomes contributions from anyone who wants to improve it.
In this video, we will show you how to find issues to work on, clone tutorial packages into a rosject, and create pull requests. By the end of this video, you will be able to make your first contribution to ROS2 documentation and become part of the ROS2 community.
ROS Inside!
ROS Inside
Before anything else, if you want to use the logo above on your own robot or computer, feel free to download it and attach it to your robot. It is really free. Find it in the link below:
In order to follow this tutorial, we need to have ROS2 installed in our system, and ideally a ros2_ws (ROS2 Workspace). To make your life easier, we have already prepared a rosject with a simulation for that: https://app.theconstructsim.com/l/56492ac1/.
You can download the rosject on your own computer if you want to work locally, but just by copying the rosject (clicking the link), you will have a setup already prepared for you.
After the rosject has been successfully copied to your own area, you should see a Run button. Just click that button to launch the rosject (below you have a rosject example).
How to release a ROS 2 binary package – Part 3 – Run rosject (example of the RUN button)
After pressing the Run button, you should have the rosject loaded. Now, let’s head to the next section to get some real practice.
Starting the simulation
After having opened the rosject, let’s start a simulation following the ROS Nav2 documentation to move the robot around. For that, let’s open a terminal by clicking the Open a new terminal button.
Open a new Terminal
Let’s run the following commands in the first terminal in order to launch the simulation:
If everything went ok, you should have something like we have in the image below, where we have a simulation (on the left side), and the RViz (Robot Visualization) window (on the right side)
Neo robot simulation – setting a pose goal on Nav2
If we just try to set a 2D Pose Goal for the robot to move around, by clicking on 2D Pose Goal on RViz, and then set the goal as we can see in the blue arrow in the image above, the robot should move without any problems (because the rosject is fixed).
Reproducing a problem found in the nav2 documentation
In order to move a robot around in ROS 2, we use the Nav2 package. There is a nav2 documentation in the following link, that we are interested in, for the purpose of this video:
At the end of the page on the link aforementioned, you will find a code that contains the “planner_server” term.
When this post was created, the code was indented more or less like what we see below (planner_server and ros__parameters have the same indentation):
How to easily contribute to ROS2 documentation – Indentation
The instructions in the linked aforementioned say that we could paste that content in the nav2_params.yaml file. .
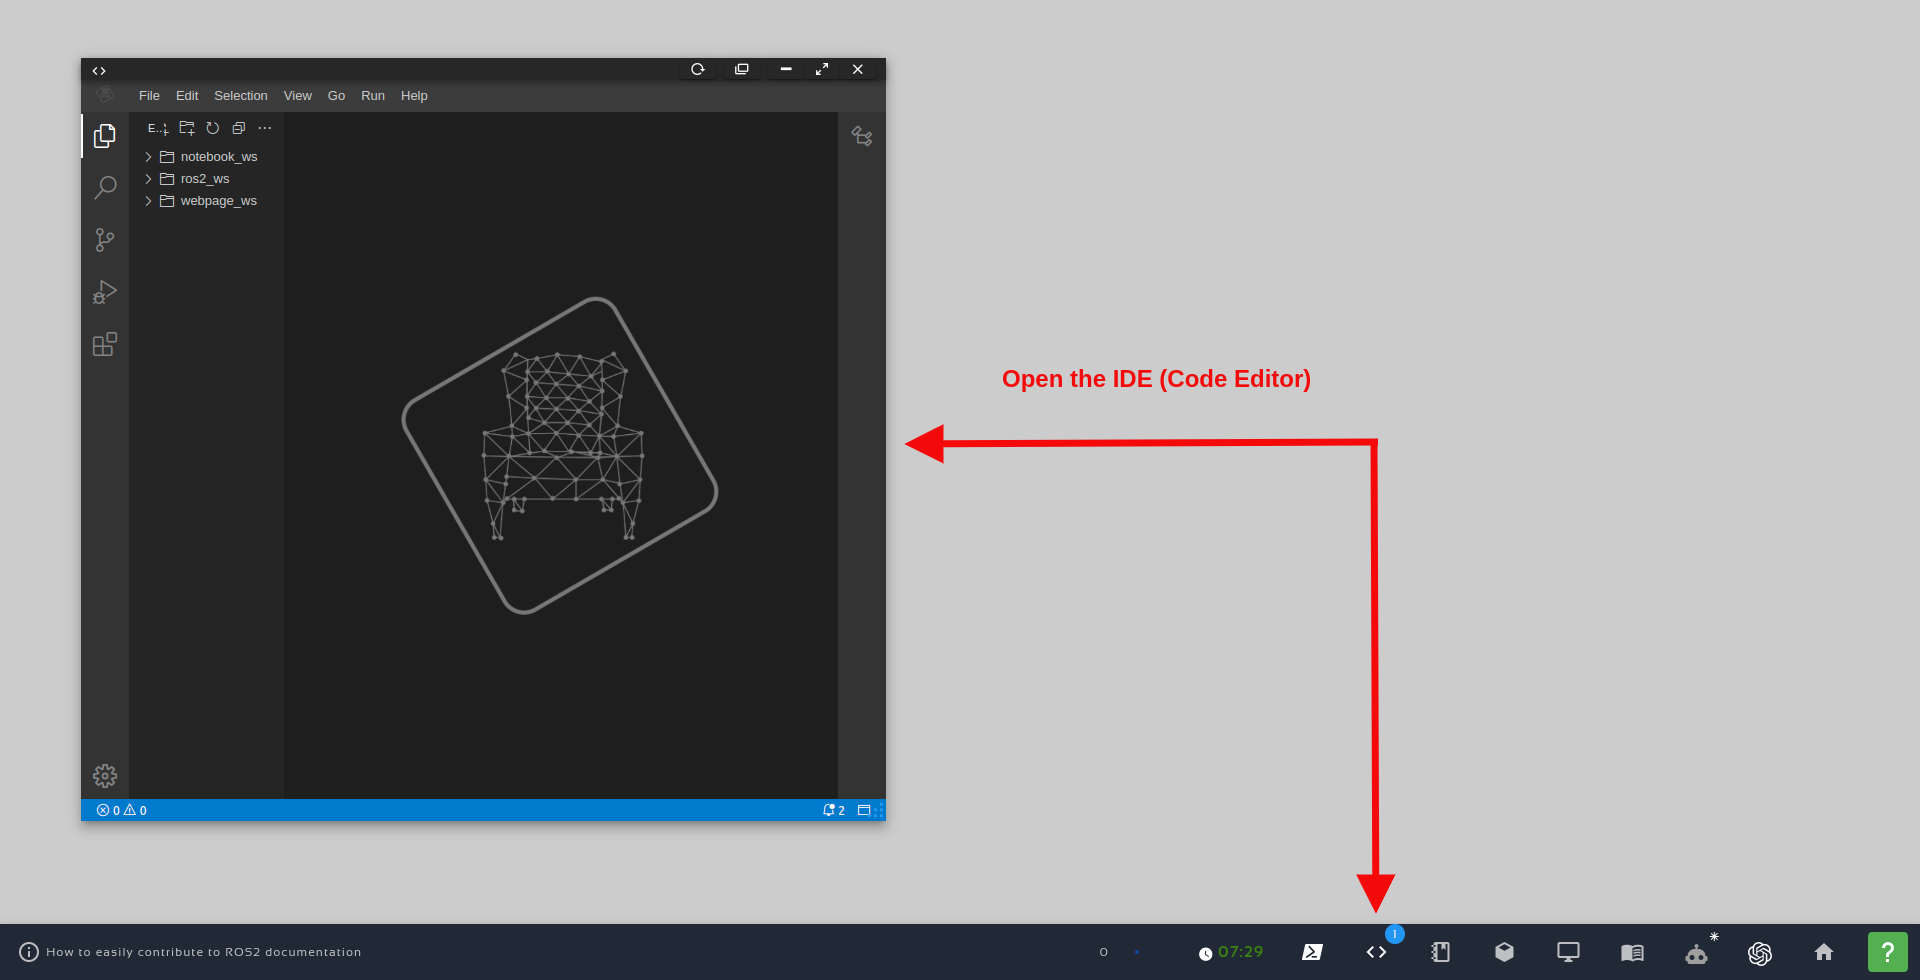
If you want to find that file on the rosject, you first have to open the Code Editor:
Open the IDE – Code Editor
The nav2 tutorial mentions nav2_params.yaml, but in the specific rosject shared at the beginning of this post, the file used is planner_server.yaml
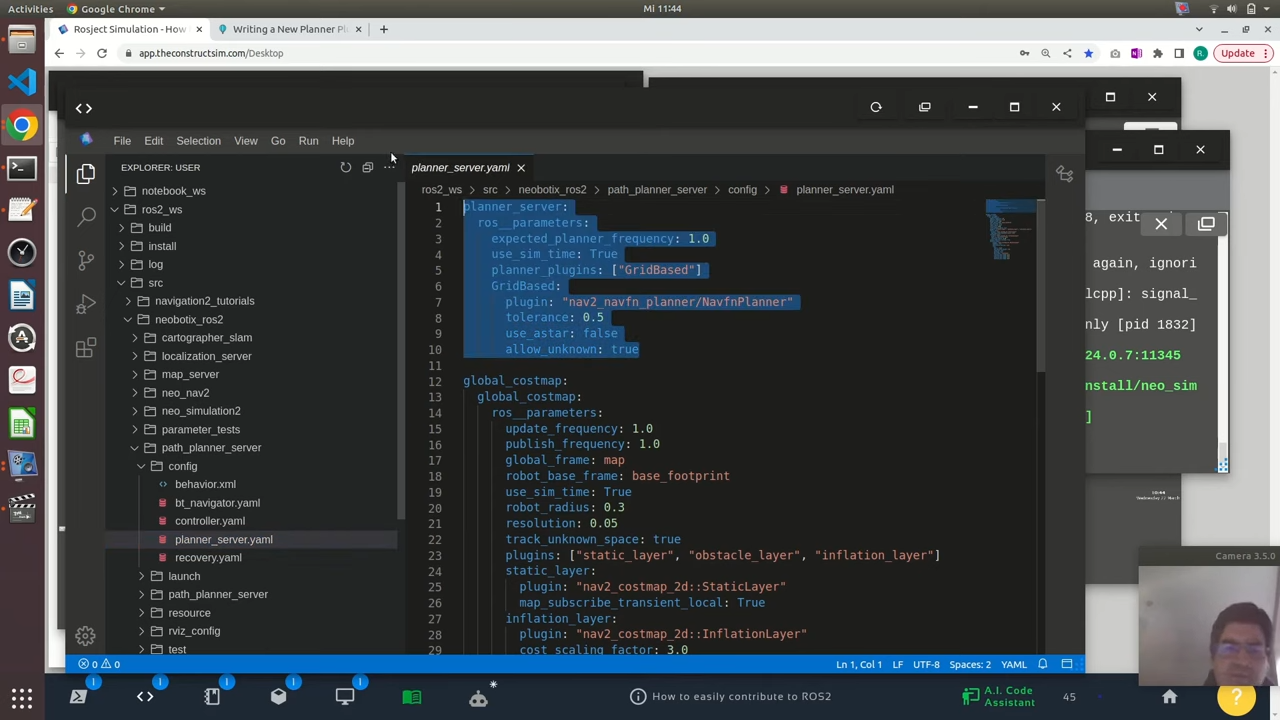
Once the Code Editor is open, you can find the nav2_params.yaml file at the following path: ~/ros2_ws/src/neobotix_ros2/path_planner_server/config/planner_server.yaml.
nav2_params.yaml – How to easily contribute to ROS2 documentation
You don’t have to, but if you replace the first 10 lines of planner_server.yaml with the non-indented code that was provided on the nav2 tutorial when this post was created, you would replace the first 10 lines with the following content:
If you had pasted the content above (as I said earlier, you don’t have to), you would have to kill the programs launched in the 3 terminals by pressing CTRL+C,
After that, you would have to recompile the ros2_ws using the following commands on the first terminal:
cd ~/ros2_ws

colcon build
After that, you could try to launch the simulation just like we did earlier:
In the first terminal, the simulation would be launched:
But, when launching the Path Planner, you would have the following error:
[planner_server-3] [ERROR] [1678443929.379055702] [rcl]: Failed to parse global arguments
[planner_server-3] terminate called after throwing an instance of 'rclcpp::exceptions::RCLInvalidROSArgsError
[planner_server-3]   what():  failed to initialize rcl: Couldn't parse params file:
'--params-file /home/user/ros2_ws/install/path_planner_server/share/path_planner_server/config/planner_server.yaml'.
Error: Cannot have a value before ros__parameters at line 12,
at /tmp/binarydeb/ros-galactic-rcl-yaml-param-parser-3.1.3/src/parse.c:793,
at /tmp/binarydeb/ros-galactic-rcl-3.1.3/src/rcl/arguments.c:406
The error message shows that there is a problem when trying to parse the file. The problem is mainly an indentation problem.
Now, since the problem was found in the nav2 tutorial itself, how to contribute to this fix get resolved?
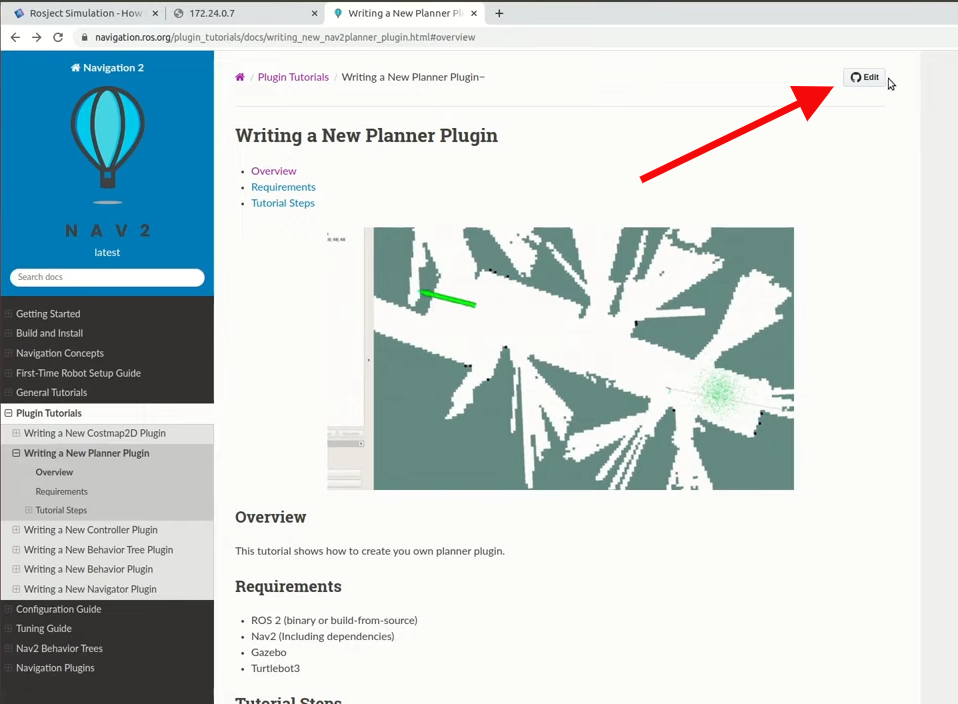
Contributing to the documentation – Creating a Pull Request
By opening this last link, you will see at the top right corner a button that allows you to edit that file. You just have to click that link.
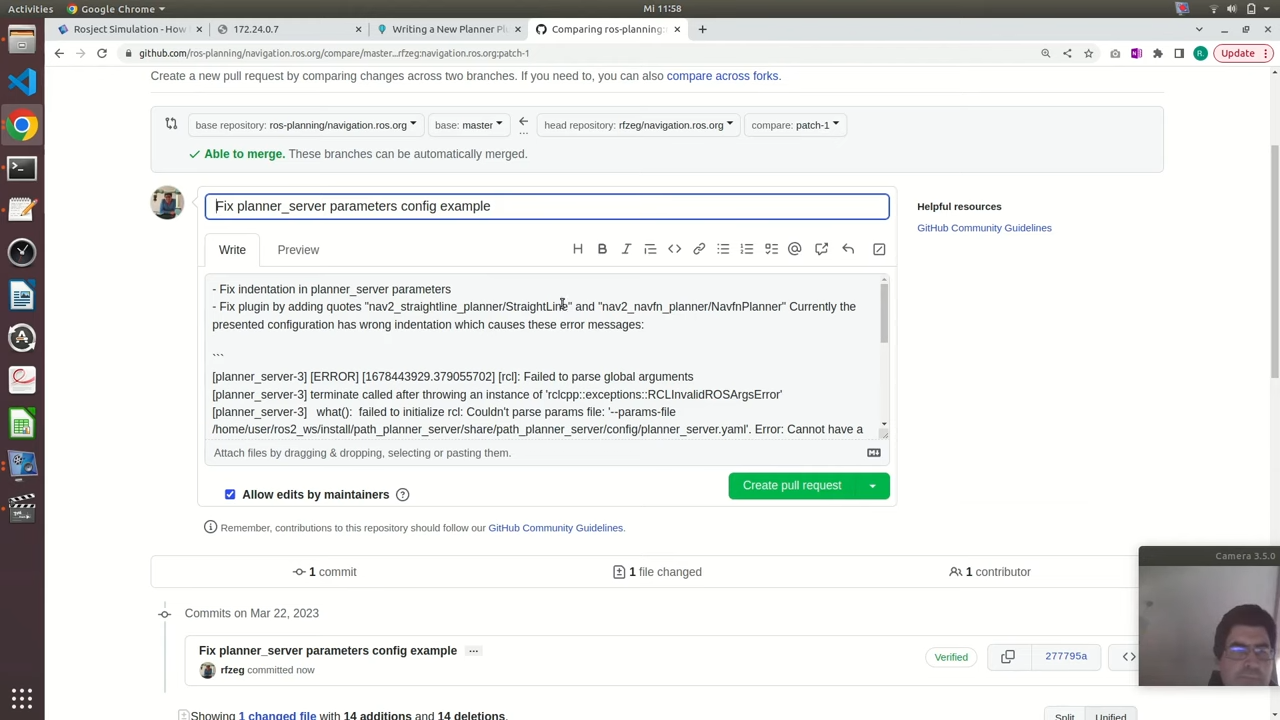
You can then make your changes, and create a commit. After that, you can just create a Pull Request:
Pull Request – fix nav2 documentation
And that is it.
The repository maintainers will review your changes, and if everything is ok, they will approve it. If not ok, they will suggest some changes. If they suggest changes, you just make the changes as requested.
Congratulations. You just learned how to contribute to the ROS Documentation.
We hope this post was really helpful to you. If you want a live version of this post with more details, please check the video in the next section.
Youtube video
So this is the post for today. Remember that we have the live version of this post on YouTube. If you liked the content, please consider subscribing to our youtube channel. We are publishing new content ~every day.
Keep pushing your ROS Learning.
Related Courses & Training
If you want to learn more about ROS and ROS2, we recommend the following courses:
In this post, you will learn how to publish and subscribe to a topic from a launch file. This post is a response to this question posted on Gazebo Answers.
Step 1: Fire up a system with ROS installation
“Hey, do you mean I have to install ROS first?” Absolutely not! Just log in to The Construct to get access to virtual machines pre-installed with ROS.
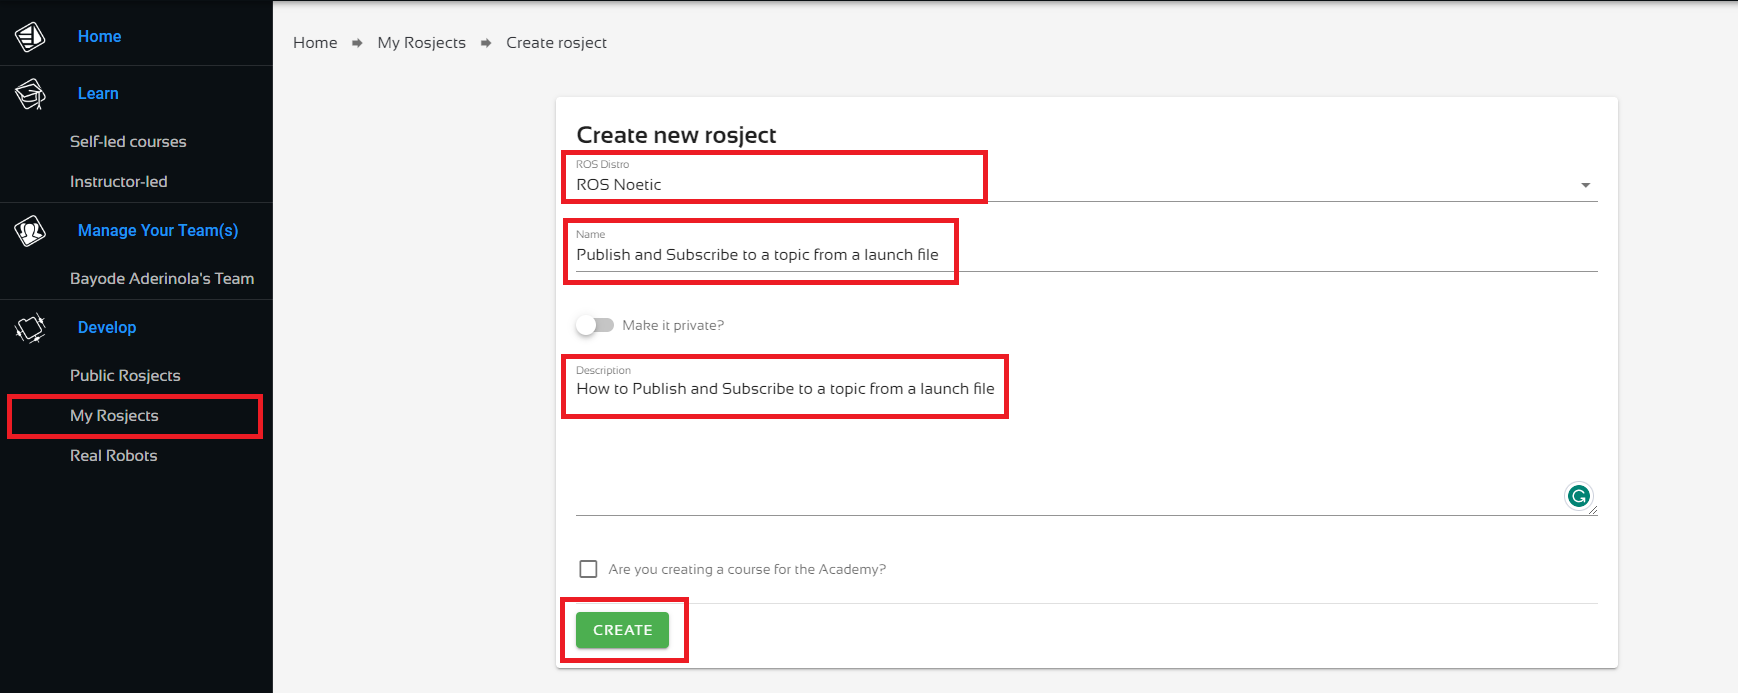
Once logged in, click on My Rosjects, then Create a New Rosject, supply the information as shown in the image below, and click Create. Then RUN the rosject.
Create a new Rosject
You might also want to try this on a local PC if you have ROS installed. However, please note that we don’t support local PCs and you will have to fix any errors you run into on your own. The rest of the instruction assumes that you are working on The Construct; please adapt them to your local PC and ROS installation.
PS: we are using ROS Noetic. You should be able to replicate the same on any ROS 1 distro.
Step 2: Create a package to demonstrate how to publish and subscribe to a topic from a launch file
Open a web shell
Open a web shell and run the following commands to create the package.
cd catkin_ws/src
source /opt/ros/noetic/setup.bash
catkin_create_pkg test_rostopic
Next, we create the launch directory and the launch files.
cd test_rostopic
mkdir launch
cd launch
touch test_pub.launch
touch test_echo.launch
Nice done! Now head over to the Code Editor to make changes to the launch files. Check the image below for how to open the Code Editor.
Open the Code Editor
Locate the launch folder in the code editor: catkin_ws > src > test_rostopic > launch and open the two launch files.
Paste the following lines into the test_pub.launch file. This is equivalent to rostopic pub /test_topic std_msgs/String "data: 'Hello there!'"
cd ~/catkin_ws
catkin_make
source devel/setup.bash
Success! We’ll test it in the next step.
PS: if your code did not compile correctly, please go over the instructions and ensure you have created the files in the exact locations specified.
Step 3: Test the package to demonstrate how to publish and subscribe to a topic from a launch file
Start the test_pub.launch file in the current terminal.
roslaunch test_rostopic test_pub.launch
When done, open another terminal and run the test_echo.launch file.
roslaunch test_rostopic test_echo.launch
Now you should see something similar to the following on the terminal where test_echo.launch is running:
process[rostopic_echo_node-1]: started with pid [xxxx]
data: "Hello there!"
---
Sweet! So we are able to publish with one launch file and echo what we publish in another launch file. And…we are done here, congrats!
Take home: try combining both into a single launch file. After trying, check the solution in this gist.
Step 4: Check your learning
Do you understand how to publish and subscribe to a topic from a launch file? If you don’t know it yet, please go over the post again, more carefully this time.
(Extra) Step 5: Watch the video to understand how to publish and subscribe to a topic from a launch file
Here you go:
Feedback
Did you like this post? Do you have any questions about how to publish and subscribe to a topic from a launch file? Please leave a comment in the comments section below, so we can interact and learn from each other.
If you want to learn about other ROS topics, please let us know in the comments area and we will do a video or post about it.


![[ROS2 Q&A] How to follow waypoints using nav2 #232](https://www.theconstruct.ai/wp-content/uploads/2023/06/How-to-follow-waypoints-using-nav2.jpg)