Here you can find the list of materials that you will need for this session:
RapsBerryPi Kit ( RaspBerry, PowerBrick, microSD16GB, Case, HDMI ) : https://www.amazon.es/Raspberry-Pi-Official-Desktop-Starter/dp/B01CI58722
H Bridge Motor Driver Hats : https://www.amazon.es/gp/product/B071FWNBXG
Batery: https://www.amazon.es/Kuman-expansión-alimentación-Interruptor-Raspberry/dp/B06W9FWDSP
Jumper Wires: https://www.amazon.es/Akozon-Conectores-Macho-Hembra-Macho-Macho-Hembra-Hembra/dp/B07GJLCGG8
Jack Connectors: https://www.amazon.es/gp/product/B06XPVJT1Z
AA Bateries: https://www.amazon.es/Energizer-Set-pilas-alcalinas-unidades/dp/B000IWXV4C
BluetoothKeyBoard: https://www.amazon.es/Rii-Bluetooth-disposición-Smartphone-PlayStation/dp/B0195Y4V5G
Want to learn more about how to Rosify a robot:
https://www.robotigniteacademy.com/en/course/building-and-rosifying-robot-scratch/details/
———————————————————————————
Music:
Original Track:https://youtu.be/FBv6rm1lY0w
Thanks to NewRetroWave for letting us use their music.
Here more info:
New Retro Wave + Bachelor of Hearts Aurora Borealis
Smooth vibes for you retro soul. Listen and enjoy.
OUT NOW on NRW Records:
https://newretrowave.bandcamp.com/album/a-cosmic-funk-odyssey-ep
iTunes: http://apple.co/2r6N1T7
Support:
https://www.facebook.com/BachelorOfHeartsmusic/
Artwork provided by Murryous, who is our featured artist for May. Please support him:
https://www.instagram.com/murryous/
Hang Ups (Want You) 4:04 Otis McDonald Hip hop y rap | Dramática
Puedes usar esta canción en cualquiera de tus vídeos.
———————–
No Copyright Motion Graphics
Motion Graphics provided by https://www.youtubestock.com
YouTube Channel: https://goo.gl/aayJRf
Learn how to create a differential drive with python for RaspBerryPi, using the ROS system.
This is the first part of a three-part video for creating a line following robot with a camera.
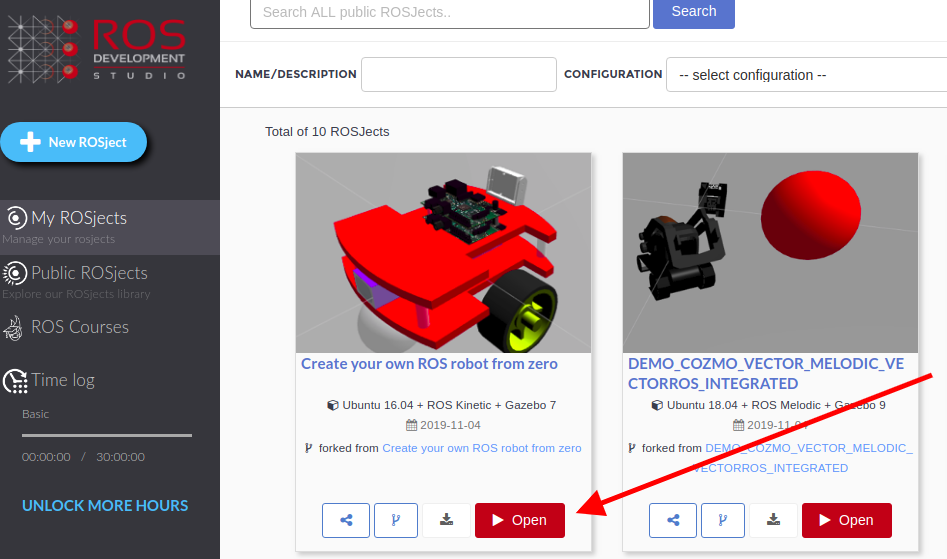
The code used in this post will be used to launch the real robot, but if you want to know how things would “before putting in production”, we can use the simulation for that. To launch the simulation, you first click in the ROSject link provided above (http://www.rosject.io/l/8292943/) to get a copy of it. Once you have it, you then you click on the Open button:
Creating your own robot from Scratch in ROSDS
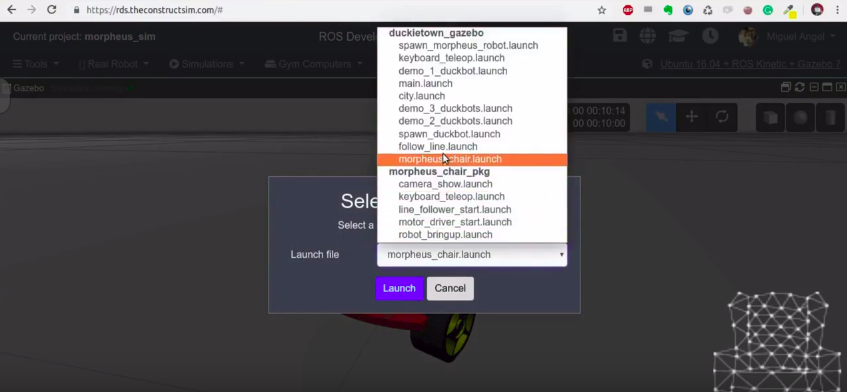
Now that the ROSject is open, you can run the simulation clicking on Simulations -> Select a Launch file and select under the duckietown_gazebo the file morpheus_chair.launch :
Launching dickietown_gazebo morpheus_chair.launch in ROSDS
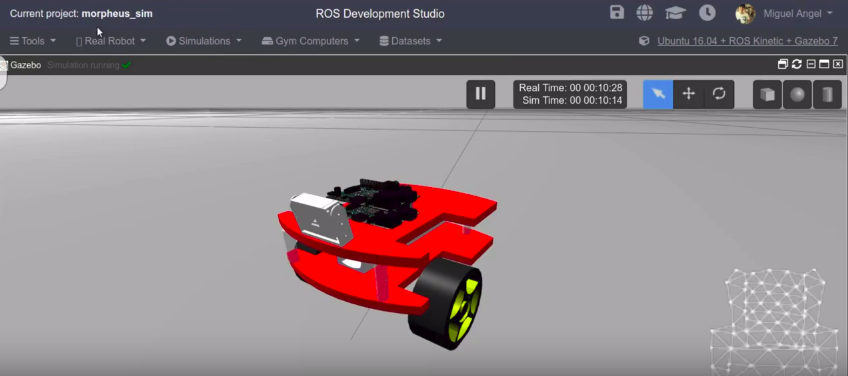
We should now have the simulation up and running, more or less like in the image below:
Real Robot with Raspberry PI simulated in ROSDS
Analyzing the code using the IDE (Code Editor)
To see the code, you just click Tools -> IDE. With the IDE open, you then open ~/simulation_ws/src/morpheus_chair/morpheus_chair_pkg/scripts/move_with_cmd_vel.py to see the RobotMover class used to move the robot around:
You can also open the file morpheus_chair/morpheus_chair_pkg/scripts/motor_driver.py to see the class that we use to control the motors:
#!/usr/bin/env python
import rospy
import RPi.GPIO as GPIO
import time

class MotorDriver(object):

    def __init__(self, wheel_distance=0.098, wheel_diameter=0.066, i_BASE_PWM=50, i_MULTIPLIER_STANDARD=0.1, i_MULTIPLIER_PIVOT=1.0, simple_mode = True):
        """
        M1 = Right Wheel
        M2 = Left Wheel
        :param wheel_distance: Distance Between wheels in meters
        :param wheel_diameter: Diameter of the wheels in meters
        """
        self.PIN = 18
        self.PWMA1 = 6
        self.PWMA2 = 13
        self.PWMB1 = 20
        self.PWMB2 = 21
        self.D1 = 12
        self.D2 = 26

        self.PWM1 = 0
        self.PWM2 = 0
        self.BASE_PWM = i_BASE_PWM
        self.MAX_PWM = 100

        self.simple_mode = simple_mode

        # Wheel and chasis dimensions
        self._wheel_distance = wheel_distance
        self._wheel_radius = wheel_diameter / 2.0
        self.MULTIPLIER_STANDARD = i_MULTIPLIER_STANDARD
        self.MULTIPLIER_PIVOT = i_MULTIPLIER_PIVOT

        GPIO.setmode(GPIO.BCM)
        GPIO.setwarnings(False)
        GPIO.setup(self.PIN, GPIO.IN, GPIO.PUD_UP)
        GPIO.setup(self.PWMA1, GPIO.OUT)
        GPIO.setup(self.PWMA2, GPIO.OUT)
        GPIO.setup(self.PWMB1, GPIO.OUT)
        GPIO.setup(self.PWMB2, GPIO.OUT)
        GPIO.setup(self.D1, GPIO.OUT)
        GPIO.setup(self.D2, GPIO.OUT)
        self.p1 = GPIO.PWM(self.D1, 500)
        self.p2 = GPIO.PWM(self.D2, 500)
        self.p1.start(self.PWM1)
        self.p2.start(self.PWM2)

    def __del__(self):
        GPIO.cleanup()

    def set_motor(self, A1, A2, B1, B2):
        GPIO.output(self.PWMA1, A1)
        GPIO.output(self.PWMA2, A2)
        GPIO.output(self.PWMB1, B1)
        GPIO.output(self.PWMB2, B2)

    def forward(self):
        self.set_motor(0, 1, 0, 1)

    def stop(self):
        self.set_motor(0, 0, 0, 0)


    def reverse(self):
        self.set_motor(1, 0, 1, 0)


    def left(self):
        self.set_motor(0, 1, 0, 0)

    def left_reverse(self):
        self.set_motor(1, 0, 0, 0)

    def pivot_left(self):
        self.set_motor(1, 0, 0, 1)


    def right(self):
        self.set_motor(0, 0, 0, 1)

    def right_reverse(self):
        self.set_motor(0, 0, 1, 0)

    def pivot_right(self):
        self.set_motor(0, 1, 1, 0)

    def set_M1M2_speed(self, rpm_speedM1, rpm_speedM2, multiplier):

        self.set_M1_speed(rpm_speedM1, multiplier)
        self.set_M2_speed(rpm_speedM2, multiplier)

    def set_M1_speed(self, rpm_speed, multiplier):

        self.PWM1 = min(int((rpm_speed * multiplier) * self.BASE_PWM), self.MAX_PWM)
        self.p1.ChangeDutyCycle(self.PWM1)
        print("M1="+str(self.PWM1))

    def set_M2_speed(self, rpm_speed, multiplier):

        self.PWM2 = min(int(rpm_speed * multiplier * self.BASE_PWM), self.MAX_PWM)
        self.p2.ChangeDutyCycle(self.PWM2)
        print("M2="+str(self.PWM2))

    def calculate_body_turn_radius(self, linear_speed, angular_speed):
        if angular_speed != 0.0:
            body_turn_radius = linear_speed / angular_speed
        else:
            # Not turning, infinite turn radius
            body_turn_radius = None
        return body_turn_radius

    def calculate_wheel_turn_radius(self, body_turn_radius, angular_speed, wheel):

        if body_turn_radius is not None:
            """
            if angular_speed > 0.0:
                angular_speed_sign = 1
            elif angular_speed < 0.0:
                angular_speed_sign = -1
            else:
                angular_speed_sign = 0.0
            """
            if wheel == "right":
                wheel_sign = 1
            elif wheel == "left":
                wheel_sign = -1
            else:
                assert False, "Wheel Name not supported, left or right only."

            wheel_turn_radius = body_turn_radius + ( wheel_sign * (self._wheel_distance / 2.0))
        else:
            wheel_turn_radius = None

        return wheel_turn_radius

    def calculate_wheel_rpm(self, linear_speed, angular_speed, wheel_turn_radius):
        """
        Omega_wheel = Linear_Speed_Wheel / Wheel_Radius
        Linear_Speed_Wheel = Omega_Turn_Body * Radius_Turn_Wheel
        --> If there is NO Omega_Turn_Body, Linear_Speed_Wheel = Linear_Speed_Body
        :param angular_speed:
        :param wheel_turn_radius:
        :return:
        """
        if wheel_turn_radius is not None:
            # The robot is turning
            wheel_rpm = (angular_speed * wheel_turn_radius) / self._wheel_radius
        else:
            # Its not turning therefore the wheel speed is the same as the body
            wheel_rpm = linear_speed / self._wheel_radius

        return wheel_rpm

    def set_wheel_movement(self, right_wheel_rpm, left_wheel_rpm):

        #print("W1,W2=["+str(right_wheel_rpm)+","+str(left_wheel_rpm)+"]")

        if right_wheel_rpm > 0.0 and left_wheel_rpm > 0.0:
            #print("All forwards")
            self.set_M1M2_speed(abs(right_wheel_rpm), abs(left_wheel_rpm), self.MULTIPLIER_STANDARD)

            if self.simple_mode:
                # We make it turn only on one wheel
                if right_wheel_rpm > left_wheel_rpm:
                    #print("GO FORWARDS RIGHT")
                    self.right()
                if right_wheel_rpm < left_wheel_rpm:
                    #print("GO FORWARDS LEFT")
                    self.left()
                if right_wheel_rpm == left_wheel_rpm:
                    #print("GO FORWARDS")
                    self.forward()
            else:
                #print("GO FORWARDS")
                self.forward()


        elif right_wheel_rpm > 0.0 and left_wheel_rpm == 0.0:
            #print("Right Wheel forwards, left stop")
            self.set_M1M2_speed(abs(right_wheel_rpm), abs(left_wheel_rpm), self.MULTIPLIER_STANDARD)
            self.left()

        elif right_wheel_rpm > 0.0 and left_wheel_rpm < 0.0:
            #print("Right Wheel forwards, left backwards --> Pivot left")
            self.set_M1M2_speed(abs(right_wheel_rpm), abs(left_wheel_rpm), self.MULTIPLIER_PIVOT)
            self.pivot_left()
        elif right_wheel_rpm == 0.0 and left_wheel_rpm > 0.0:
            #print("Right stop, left forwards")
            self.set_M1M2_speed(abs(right_wheel_rpm), abs(left_wheel_rpm), self.MULTIPLIER_STANDARD)
            self.right()

        elif right_wheel_rpm < 0.0 and left_wheel_rpm > 0.0:
            #print("Right backwards, left forwards --> Pivot right")
            self.set_M1M2_speed(abs(right_wheel_rpm), abs(left_wheel_rpm), self.MULTIPLIER_PIVOT)
            self.pivot_right()
        elif right_wheel_rpm < 0.0 and left_wheel_rpm < 0.0:
            #print("All backwards")
            self.set_M1M2_speed(abs(right_wheel_rpm), abs(left_wheel_rpm), self.MULTIPLIER_STANDARD)

            if self.simple_mode:
                # We make it turn only on one wheel
                if abs(right_wheel_rpm) > abs(left_wheel_rpm):
                    #print("GO BACKWARDS RIGHT")
                    self.right_reverse()
                if abs(right_wheel_rpm) < abs(left_wheel_rpm):
                    #print("GO BACKWARDS LEFT")
                    self.left_reverse()
                if right_wheel_rpm == left_wheel_rpm:
                    #print("GO BACKWARDS")
                    self.reverse()
            else:
                self.reverse()


        elif right_wheel_rpm == 0.0 and left_wheel_rpm == 0.0:
            #print("Right stop, left stop")
            self.set_M1M2_speed(abs(right_wheel_rpm), abs(left_wheel_rpm), self.MULTIPLIER_STANDARD)
            self.stop()
        else:
            assert False, "A case wasn't considered==>"+str(right_wheel_rpm)+","+str(left_wheel_rpm)
            pass

    def set_cmd_vel(self, linear_speed, angular_speed):

        body_turn_radius = self.calculate_body_turn_radius(linear_speed, angular_speed)

        wheel = "right"
        right_wheel_turn_radius = self.calculate_wheel_turn_radius(body_turn_radius,
                                                                   angular_speed,
                                                                   wheel)

        wheel = "left"
        left_wheel_turn_radius = self.calculate_wheel_turn_radius(body_turn_radius,
                                                                  angular_speed,
                                                                  wheel)

        right_wheel_rpm = self.calculate_wheel_rpm(linear_speed, angular_speed, right_wheel_turn_radius)
        left_wheel_rpm = self.calculate_wheel_rpm(linear_speed, angular_speed, left_wheel_turn_radius)


        self.set_wheel_movement(right_wheel_rpm, left_wheel_rpm)
Explaining all the details of the code above in this post can be time-consuming. Then, we recommend watching the live version of this post in youtube, following the link at the end of this post if you want to know the tiny details of the file.
Moving the robot around
In order to move the robot, we first have to launch the motor drivers using the command below in the shell. If you don’t know to open the shell, click Tools -> Shell. Then run the command:
We hope you liked the post. If you prefer, we also have a live version of it in YouTube with all the details. Please have a look following the link below:
More Resources
New Retro Wave + Bachelor of Hearts Aurora Borealis
Smooth vibes for you retro soul. Listen and enjoy.
OUT NOW on NRW Records:
https://newretrowave.bandcamp.com/album/a-cosmic-funk-odyssey-ep
iTunes: http://apple.co/2r6N1T7
Support:
https://www.facebook.com/BachelorOfHeartsmusic/
Artwork provided by Murryous, who is our featured artist for May. Please support him:
https://www.instagram.com/murryous/
Hang Ups (Want You) 4:04 Otis McDonald Hip hop y rap | Dramática
Puedes usar esta canción en cualquiera de tus vídeos.
———————–
No Copyright Motion Graphics
Motion Graphics provided by https://www.youtubestock.com
YouTube Channel: https://goo.gl/aayJRf
In this video, you will learn how to mount the robot in an autonomous system. We will learn:
– How to install the Raspberry Pi Camera.
– How to do ssh to Raspberry Pi, remote desktop and install ROS kinetic in Raspberry Pi Ubuntu Mate.
– How to start a roslaunch that will allow us to move with the keyboard through ssh the robot
– How to see the images published in ROS of the camera.
List of materials
Raspberry Pi Kit ( RaspBerry, PowerBrick, microSD16GB, Case, HDMI )
About:
In this video, you will learn how to install the UbuntuMate OS in RaspBerry pi to then move using a MotorDriver Hat
two DC motors directly from RaspberryPi.
———————————————————————–
Here you can find the list of materials that you will need for this session:
RapsBerryPi Kit ( RaspBerry, PowerBrick, microSD16GB, Case, HDMI ) : https://www.amazon.es/Raspberry-Pi-Official-Desktop-Starter/dp/B01CI58722
H Bridge Motor Driver Hats : https://www.amazon.es/gp/product/B071FWNBXG
Jumper Wires: https://www.amazon.es/Akozon-Conectores-Macho-Hembra-Macho-Macho-Hembra-Hembra/dp/B07GJLCGG8
Jack Connectors: https://www.amazon.es/gp/product/B06XPVJT1Z
AA Bateries: https://www.amazon.es/Energizer-Set-pilas-alcalinas-unidades/dp/B000IWXV4C
BluetoothKeyBoard: https://www.amazon.es/Rii-Bluetooth-disposición-Smartphone-PlayStation/dp/B0195Y4V5G
Want to learn more about how to Rosify a robot:
https://www.robotigniteacademy.com/en/course/building-and-rosifying-robot-scratch/details/
———————————————————————————
Usefull links:
Git of MorpheusChair Code:
https://bitbucket.org/theconstructcore/morpheus_chair/src/master/
How to install UbuntuMate in microSD card video from Martin Wimpress (https://www.youtube.com/channel/UC0GV1M9WgakX_FGx4_kDRNw):
https://www.youtube.com/watch?v=V_6GNyL6Dac
———————————————————————————
Music:
Original Track:https://youtu.be/FBv6rm1lY0w
Thanks to NewRetroWave for letting us use their music.
Here more info:
New Retro Wave + Bachelor of Hearts Aurora Borealis
Smooth vibes for you retro soul. Listen and enjoy.
OUT NOW on NRW Records:
https://newretrowave.bandcamp.com/album/a-cosmic-funk-odyssey-ep
iTunes: http://apple.co/2r6N1T7
Support:
https://www.facebook.com/BachelorOfHeartsmusic/
Artwork provided by Murryous, who is our featured artist for May. Please support him:
https://www.instagram.com/murryous/
Hang Ups (Want You) 4:04 Otis McDonald Hip hop y rap | Dramática
Puedes usar esta canción en cualquiera de tus vídeos.
———————–
3D Models:
Orange Robot:
https://www.blendswap.com/blends/view/77718
Welcome to Morpheus-Chair, the program where you will learn how to build a ROS RaspBerry Pi Robot to be used as a foundation to learn all there is in this fascinating world of Robotics.
In this first video, we introduce the video series and teach you how to assemble the chassis step-by-step.
Want Your Robotics Idea Happen in 2018? This Is Your Webinar!
What you will learn from this ROS Robots Webinar Series
We will guide you step by step from idea to a real robotics product that you can start selling in three weeks from now
We will show you which materials to use, which parts to buy, how to program the whole robot to perform its task, and how to launch it to the world
We will use the example of Barista robot, a robot that serves coffee to the tables, made in 3 months by a couple of students with no prior knowledge of robotics.
EPISODE #1
We will:
▸ Set the outline of the whole project
▸ Find the parts that will have to buy
▸ Decide software to build
EPISODE #2
We will:
▸ Show you the document which describes the Barista robot project (based on what was taught on EPISODE 1).
▸ Based on that document, we will see how to select the parts you need for your project.
▸ Based on that document, we show you how to start with simulating your robot and environment.
▸ Then we start developing the software that will go on the robot, using that simulation.
▸ The whole process will be taught for a general product (your product!). Also, we will show how we applied all this to the development of the Barista robot
▸ We will answer your questions about your own robotic product.
EPISODE #3
We will:
▸ We will show you how to find the people and parts that will make your robot a real product.
▸ We will show you how to proceed to test with the real robot.
▸ We will show you how to iterate, jumping from simulation to the real robot until the product really works as needed.
▸ We will show you how to present to society at a big launching event.
▸ The whole process will be taught for a general product (your product!). Also, we will show how we applied all this to the development of the Barista robot
▸ We will answer your questions about your own robotic product.
![[Morpheus Chair] Create a LineFollower with RGB Camera and ROS #Episode 5](https://www.theconstruct.ai/wp-content/uploads/2019/03/morpheuschair5-1.jpg)
![[Morpheus Chair] Differential drive with RaspBerryPi #Episode 4](https://www.theconstruct.ai/wp-content/uploads/2019/02/Morpheus-Chair-Differential-drive-with-RaspBerryPi-Episode-4.jpg)
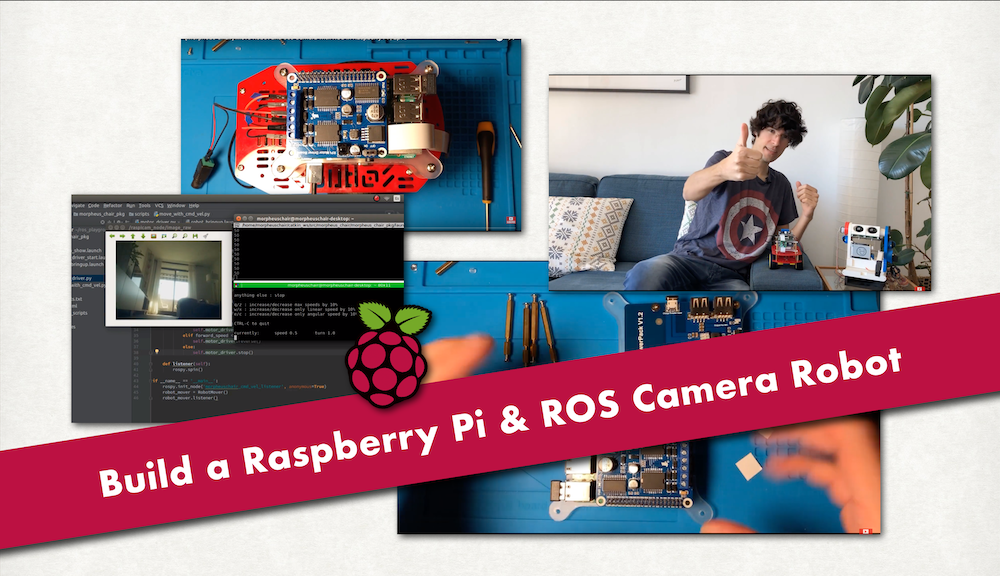
![[Morpheus Chair] Move DC Motors for a robot with RaspBerryPi Episode 2](https://www.theconstruct.ai/wp-content/uploads/2019/02/dc-robots-raspberry-pi.jpg)
![[Morpheus Chair] Build the Structure of a ROS Raspberry Pi Robot #Ep.1](https://www.theconstruct.ai/wp-content/uploads/2019/01/Build-the-Structure-of-a-ROS-Raspberry-Pi-Robot.jpg)