

What we are going to learn
- How to find issues to work on
- How to clone tutorial packages into a rosject
- How to create pull requests
List of resources used in this post
- Use the rosject: https://app.theconstructsim.com/l/56492ac1/
- The Construct: https://app.theconstructsim.com/
- ROS2 Courses –▸
- ROS2 Basics in 5 Days Humble (Python): https://app.theconstructsim.com/Course/132
- ROS2 Basics in 5 Days Humble (C++): https://app.theconstructsim.com/Course/133
- https://navigation.ros.org/plugin_tutorials/docs/writing_new_nav2planner_plugin.html
Overview
ROS2 is an open-source software framework for robotics that provides libraries and tools to help developers create robot applications.
Documentation is an essential part of any software project, and ROS2 welcomes contributions from anyone who wants to improve it.
In this video, we will show you how to find issues to work on, clone tutorial packages into a rosject, and create pull requests. By the end of this video, you will be able to make your first contribution to ROS2 documentation and become part of the ROS2 community.
ROS Inside!

ROS Inside
Before anything else, if you want to use the logo above on your own robot or computer, feel free to download it and attach it to your robot. It is really free. Find it in the link below:
Opening the rosject
In order to follow this tutorial, we need to have ROS2 installed in our system, and ideally a ros2_ws (ROS2 Workspace). To make your life easier, we have already prepared a rosject with a simulation for that: https://app.theconstructsim.com/l/56492ac1/.
You can download the rosject on your own computer if you want to work locally, but just by copying the rosject (clicking the link), you will have a setup already prepared for you.
After the rosject has been successfully copied to your own area, you should see a Run button. Just click that button to launch the rosject (below you have a rosject example).

How to release a ROS 2 binary package – Part 3 – Run rosject (example of the RUN button)
After pressing the Run button, you should have the rosject loaded. Now, let’s head to the next section to get some real practice.
Starting the simulation
After having opened the rosject, let’s start a simulation following the ROS Nav2 documentation to move the robot around. For that, let’s open a terminal by clicking the Open a new terminal button.
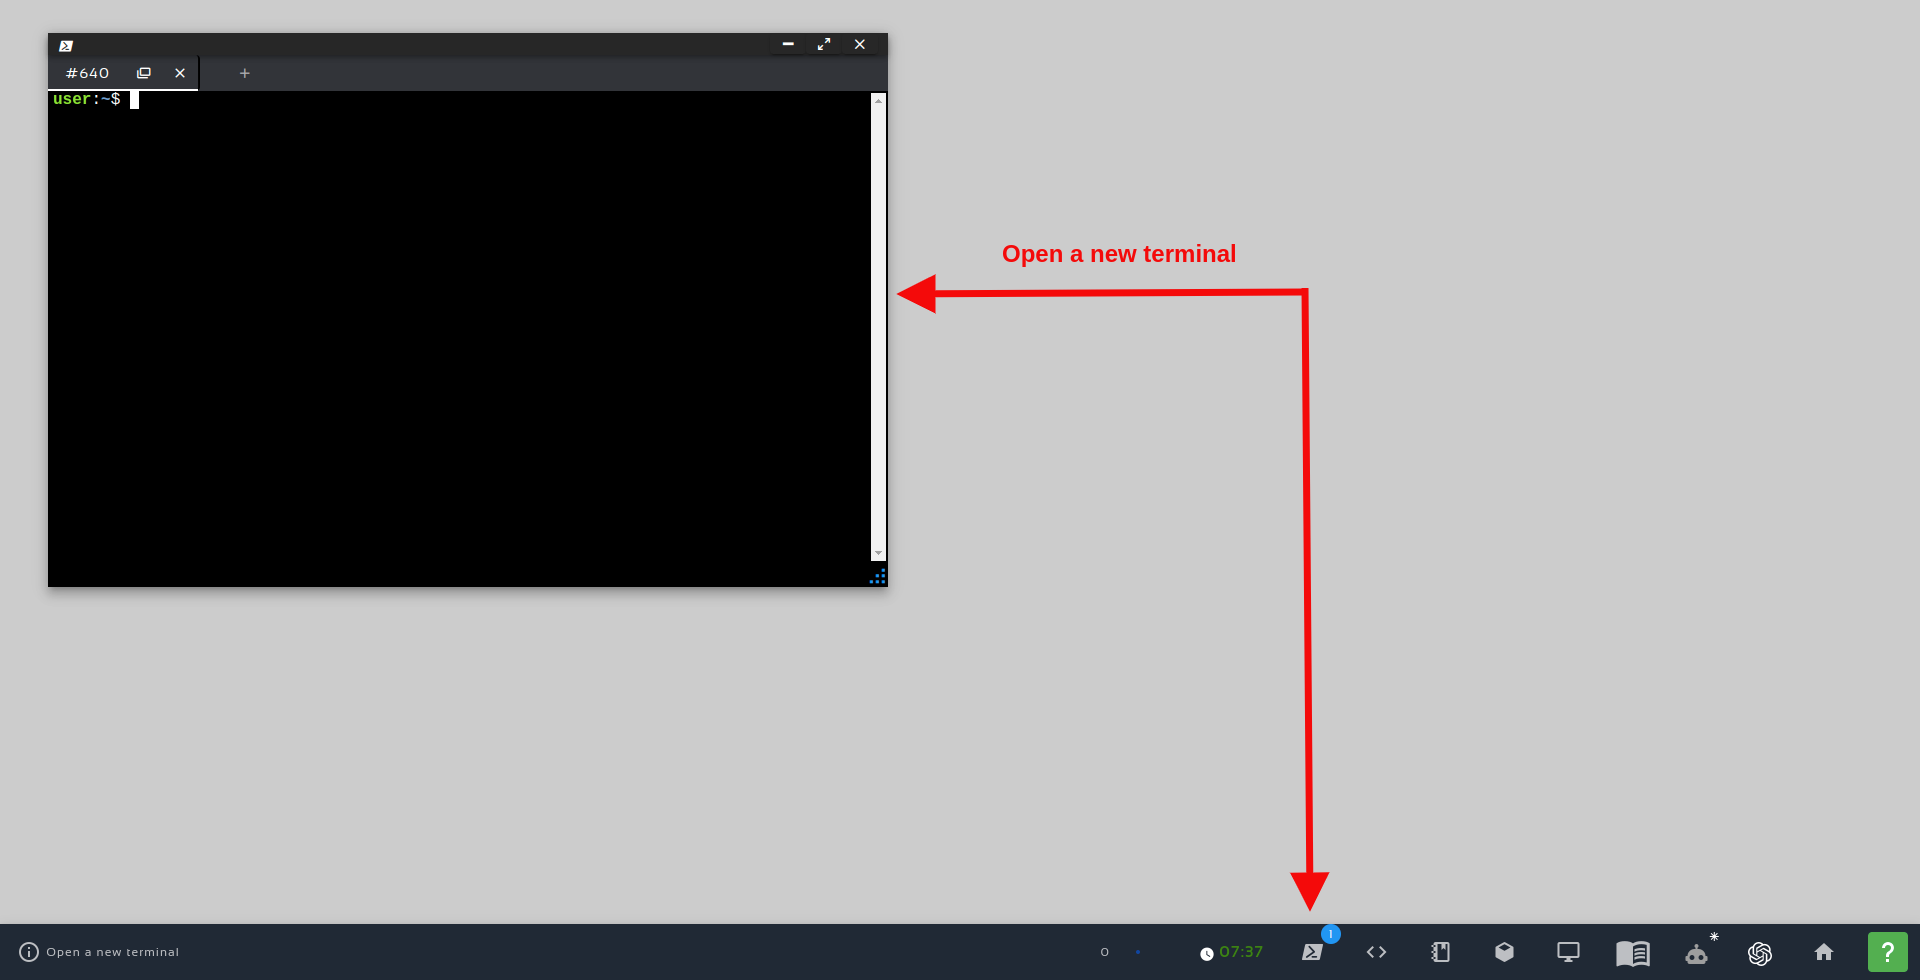
Open a new Terminal
Let’s run the following commands in the first terminal in order to launch the simulation:
source ~/ros2_ws/install/setup.bash

export GAZEBO_MODEL_PATH=/home/user/ros2_ws/src/neobotix_ros2/neo_simulation2/models:/home/user/ros2_ws/src:/home/user/ros2_ws/src/neobotix_ros2

ros2 launch neo_simulation2 simulation_basics.launch.py
Now, in a second terminal, let’s launch the Localization Server using the following command:
ros2 launch localization_server localization.launch.py
Then, in a third terminal, let’s launch the Path Planner using the following command:
ros2 launch path_planner_server pathplanner.launch.py
If everything went ok, you should have something like we have in the image below, where we have a simulation (on the left side), and the RViz (Robot Visualization) window (on the right side)

Neo robot simulation – setting a pose goal on Nav2
If we just try to set a 2D Pose Goal for the robot to move around, by clicking on 2D Pose Goal on RViz, and then set the goal as we can see in the blue arrow in the image above, the robot should move without any problems (because the rosject is fixed).
Reproducing a problem found in the nav2 documentation
In order to move a robot around in ROS 2, we use the Nav2 package. There is a nav2 documentation in the following link, that we are interested in, for the purpose of this video:
https://navigation.ros.org/plugin_tutorials/docs/writing_new_nav2planner_plugin.html
At the end of the page on the link aforementioned, you will find a code that contains the “planner_server” term.
When this post was created, the code was indented more or less like what we see below (planner_server and ros__parameters have the same indentation):

How to easily contribute to ROS2 documentation – Indentation
The instructions in the linked aforementioned say that we could paste that content in the nav2_params.yaml file. .
If you want to find that file on the rosject, you first have to open the Code Editor:
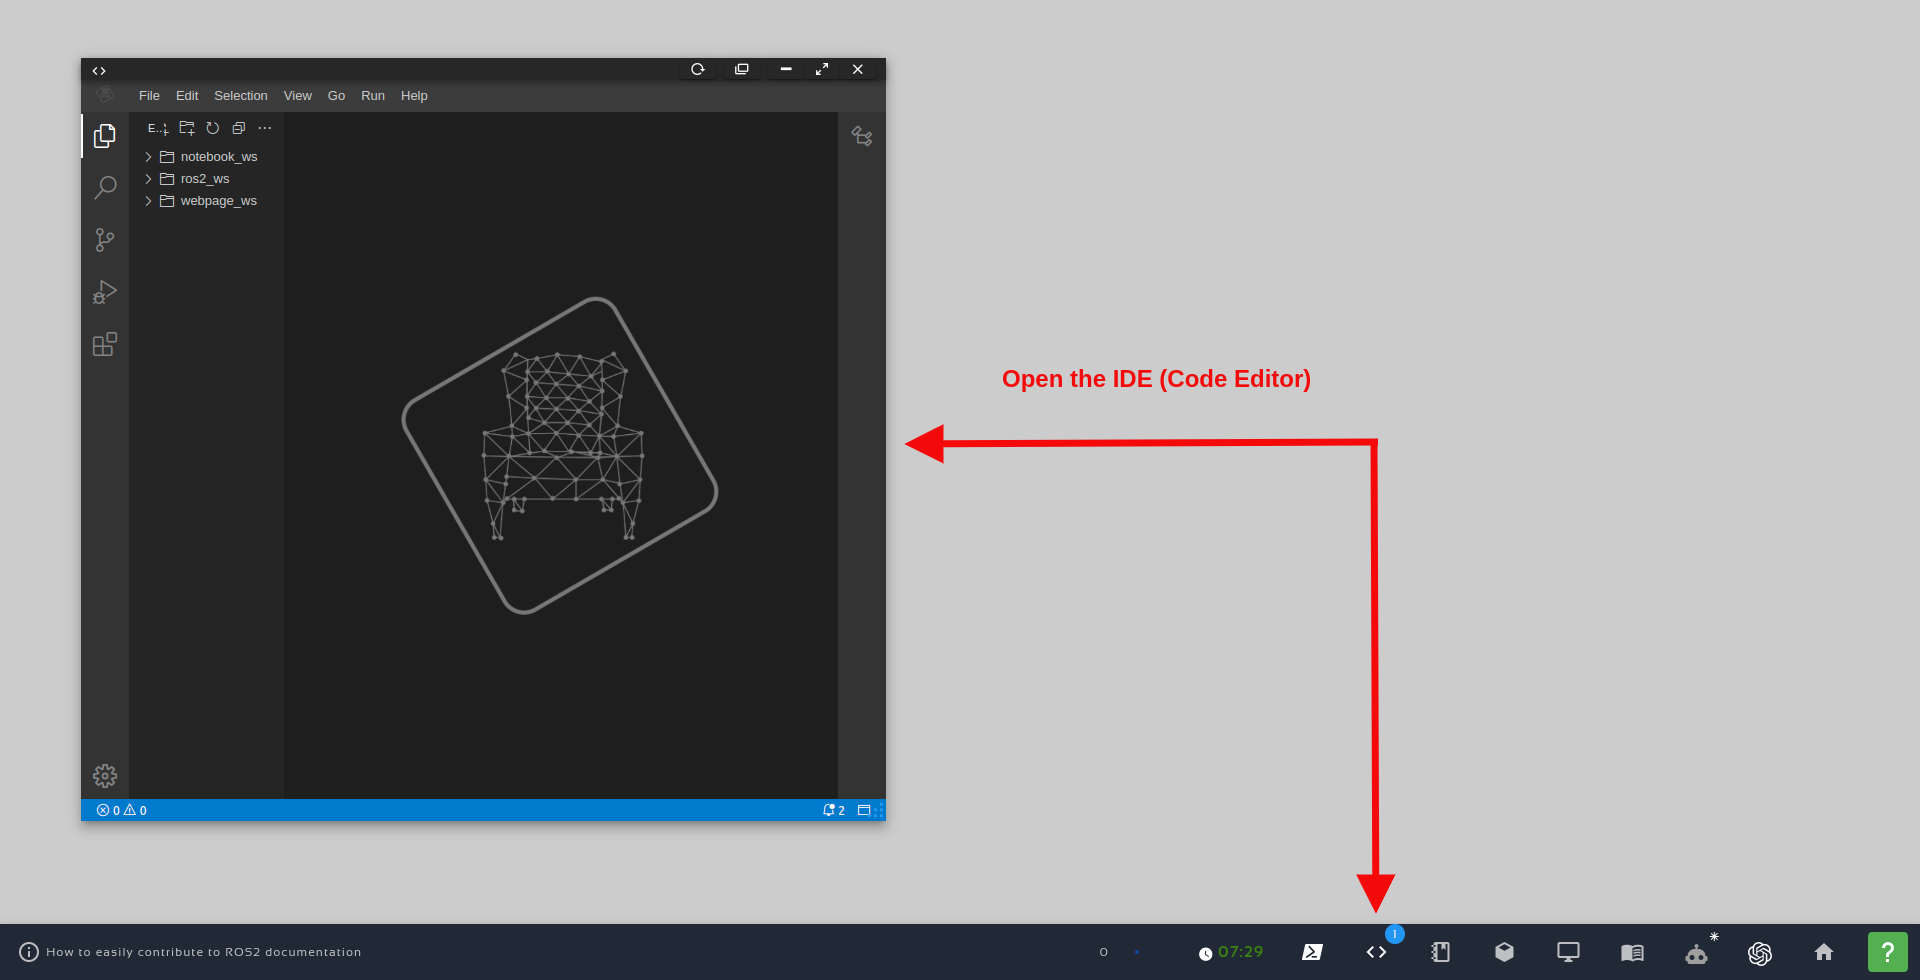
Open the IDE – Code Editor
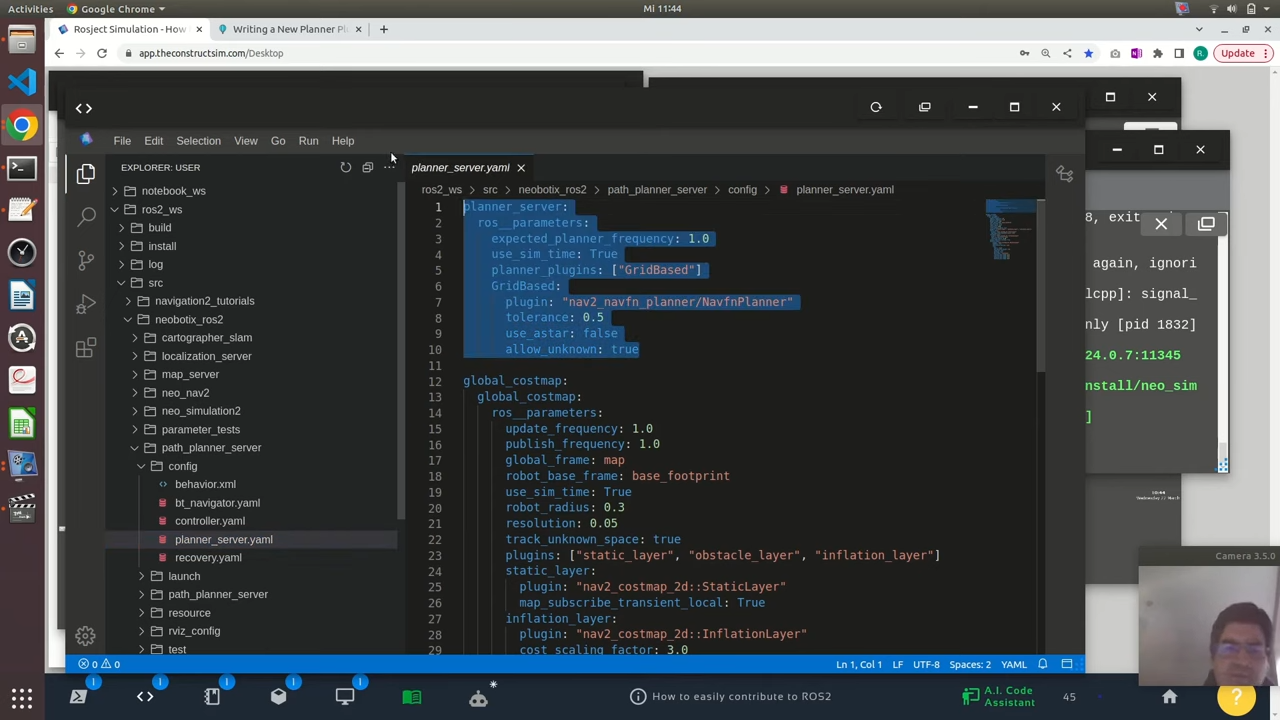
The nav2 tutorial mentions nav2_params.yaml, but in the specific rosject shared at the beginning of this post, the file used is planner_server.yaml
Once the Code Editor is open, you can find the nav2_params.yaml file at the following path: ~/ros2_ws/src/neobotix_ros2/path_planner_server/config/planner_server.yaml.
nav2_params.yaml – How to easily contribute to ROS2 documentation
You don’t have to, but if you replace the first 10 lines of planner_server.yaml with the non-indented code that was provided on the nav2 tutorial when this post was created, you would replace the first 10 lines with the following content:
planner_server:
ros__parameters:
  plugins: ["GridBased"]
  use_sim_time: True
  GridBased:
    plugin: "nav2_straightline_planner/StraightLine"
    interpolation_resolution: 0.1
If you had pasted the content above (as I said earlier, you don’t have to), you would have to kill the programs launched in the 3 terminals by pressing CTRL+C,
After that, you would have to recompile the ros2_ws using the following commands on the first terminal:
cd ~/ros2_ws

colcon build
After that, you could try to launch the simulation just like we did earlier:
In the first terminal, the simulation would be launched:
source ~/ros2_ws/install/setup.bash

export GAZEBO_MODEL_PATH=/home/user/ros2_ws/src/neobotix_ros2/neo_simulation2/models:/home/user/ros2_ws/src:/home/user/ros2_ws/src/neobotix_ros2

ros2 launch neo_simulation2 simulation_basics.launch.py
In the second terminal, the Localization Server would be launched:
ros2 launch localization_server localization.launch.py
Then, in a third terminal, the Path Planner would be launched:
ros2 launch path_planner_server pathplanner.launch.py
But, when launching the Path Planner, you would have the following error:
[planner_server-3] [ERROR] [1678443929.379055702] [rcl]: Failed to parse global arguments
[planner_server-3] terminate called after throwing an instance of 'rclcpp::exceptions::RCLInvalidROSArgsError
[planner_server-3]   what():  failed to initialize rcl: Couldn't parse params file:
'--params-file /home/user/ros2_ws/install/path_planner_server/share/path_planner_server/config/planner_server.yaml'.
Error: Cannot have a value before ros__parameters at line 12,
at /tmp/binarydeb/ros-galactic-rcl-yaml-param-parser-3.1.3/src/parse.c:793,
at /tmp/binarydeb/ros-galactic-rcl-3.1.3/src/rcl/arguments.c:406
The error message shows that there is a problem when trying to parse the file. The problem is mainly an indentation problem.
Now, since the problem was found in the nav2 tutorial itself, how to contribute to this fix get resolved?
Contributing to the documentation – Creating a Pull Request
At the top of the https://navigation.ros.org/plugin_tutorials/docs/writing_new_nav2planner_plugin.html page, we have an Edit button.
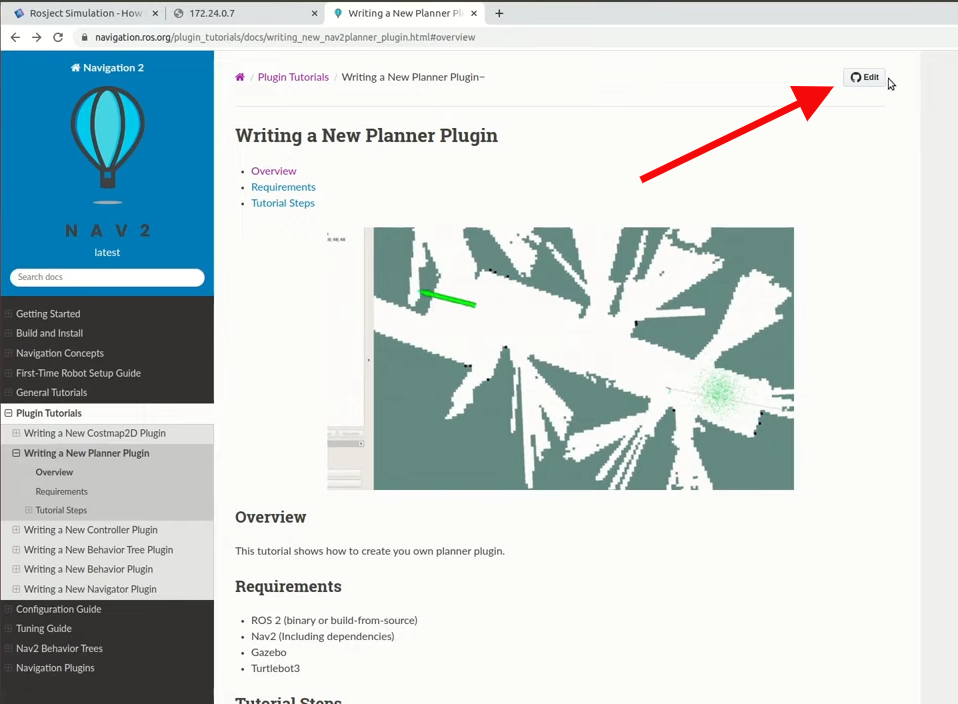
Edit documentation – How to easily contribute to ROS2 documentation
By clicking on that button, we will be sent to the ROS Navigation repository available at https://github.com/ros-planning/navigation.ros.org
The correct path for the file that generates the Nav2 Planner Plugin is https://github.com/ros-planning/navigation.ros.org/blob/master/plugin_tutorials/docs/writing_new_nav2planner_plugin.rst
By opening this last link, you will see at the top right corner a button that allows you to edit that file. You just have to click that link.
You can then make your changes, and create a commit. After that, you can just create a Pull Request:
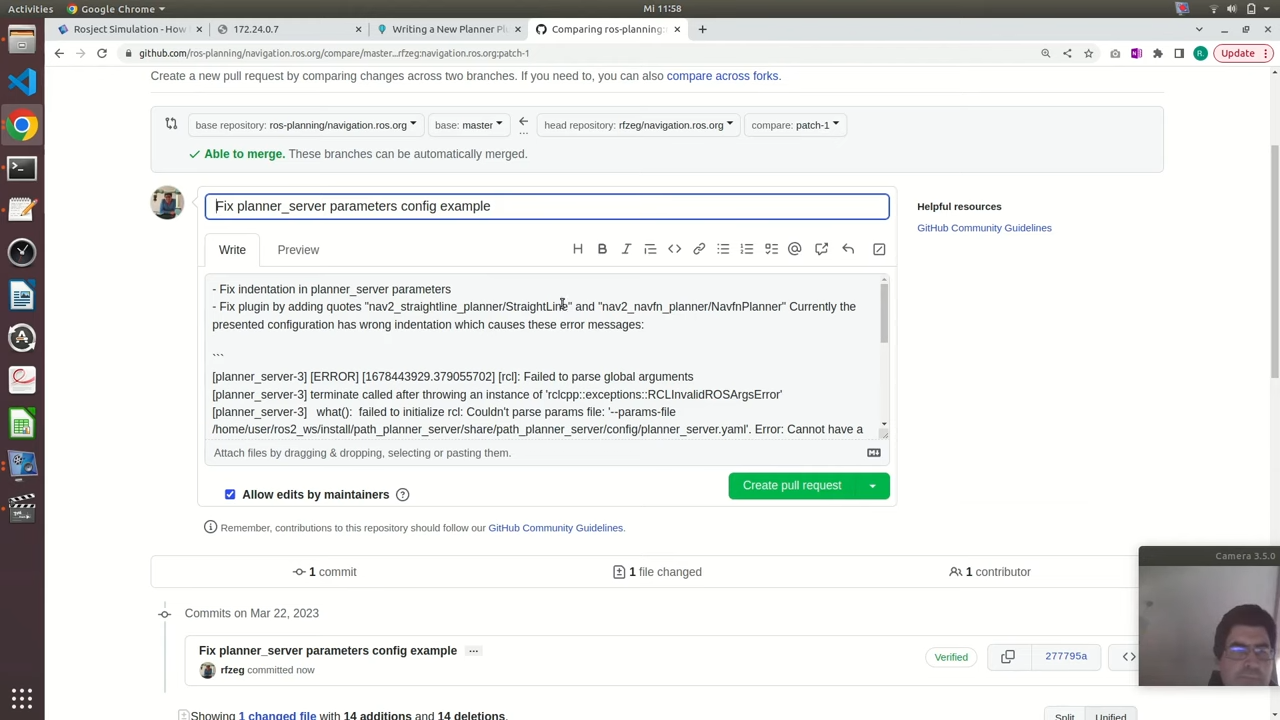
Pull Request – fix nav2 documentation
And that is it.
The repository maintainers will review your changes, and if everything is ok, they will approve it. If not ok, they will suggest some changes. If they suggest changes, you just make the changes as requested.
Congratulations. You just learned how to contribute to the ROS Documentation.
We hope this post was really helpful to you. If you want a live version of this post with more details, please check the video in the next section.
Youtube video
So this is the post for today. Remember that we have the live version of this post on YouTube. If you liked the content, please consider subscribing to our youtube channel. We are publishing new content ~every day.
Keep pushing your ROS Learning.
Related Courses & Training
If you want to learn more about ROS and ROS2, we recommend the following courses:
-
- ROS2 Basics in 5 Days Humble (Python): https://app.theconstructsim.com/Course/132
- ROS2 Basics in 5 Days Humble (C++): https://app.theconstructsim.com/Course/133
- Open-RMF / Fleet Management Training: https://www.theconstruct.ai/robot-fleet-management-ros2-open-rmf-training/

Get ROS2 Industrial Ready- Hands-On Training by The Construct cover.png
 2026 Brochure Header - 1")


0 Comments