

What we are going to learn
- How to launch a functional nav2 system
- How to use nav2 simple commander API
- How to launch nav2 waypoint follower module
List of resources used in this post
- Use the rosject: https://app.theconstructsim.com/l/4da61f89/
- The Construct: https://app.theconstructsim.com/
- Nav2 simple commander API: https://github.com/ros-planning/navigation2/tree/main/nav2_simple_commander
- ROS2 Courses –▸
- ROS2 Basics in 5 Days Humble (Python): https://app.theconstructsim.com/Course/132
- ROS2 Basics in 5 Days Humble (C++): https://app.theconstructsim.com/Course/133
Overview
In this post, we’ll be learning how to use nav2 SImple Command API to write a program that makes your program follow waypoints.
What we are going to create is something like a patroling system, in which the robot patrols a given area.
ROS Inside!

ROS Inside
Before anything else, if you want to use the logo above on your own robot or computer, feel free to download it and attach it to your robot. It is really free. Find it in the link below:
Opening the rosject
In order to follow this tutorial, we need to have ROS2 installed in our system, and ideally a ros2_ws (ROS2 Workspace). To make your life easier, we have already prepared a rosject with a simulation for that: https://app.theconstructsim.com/l/4da61f89/.
You can download the rosject on your own computer if you want to work locally, but just by copying the rosject (clicking the link), you will have a setup already prepared for you.
After the rosject has been successfully copied to your own area, you should see a Run button. Just click that button to launch the rosject (below you have a rosject example).

How to follow waypoints using nav2 – Run rosject (example of the RUN button)
After pressing the Run button, you should have the rosject loaded. Now, let’s head to the next section to get some real practice.
Launching the simulation
As you may imagine, instead of using a real robot, we are going to use a simulation. The simulation package we are using, neo_simulation2 (by Neobotix), comes along with all the new ROS 2 features.
Like its predecessor, the neo_simulation2 package is fully equipped with all the Neobotix robots that are available in the market.
By the way, Neobotix is a state-of-the manufacturer of mobile robots and robot systems. We offer robots and manipulators for all applications with full ROS support. Neobotix products range from small mobile robots to mobile robot arms and several omnidirectional robots. They are specialized in designing customized mobile robots to meet your unique requirements.
Combining the novelty of ROS 2 and the state-of-the-art Neobotix platforms would allow users to learn and develop various reliable and robust application that caters to their needs in both research and as well as in industries.
Alright, having opened the rosject and explained a little bit about Neobotix, let’s start running some commands in the terminal. For that, let’s open a terminal by clicking the Open a new terminal button.
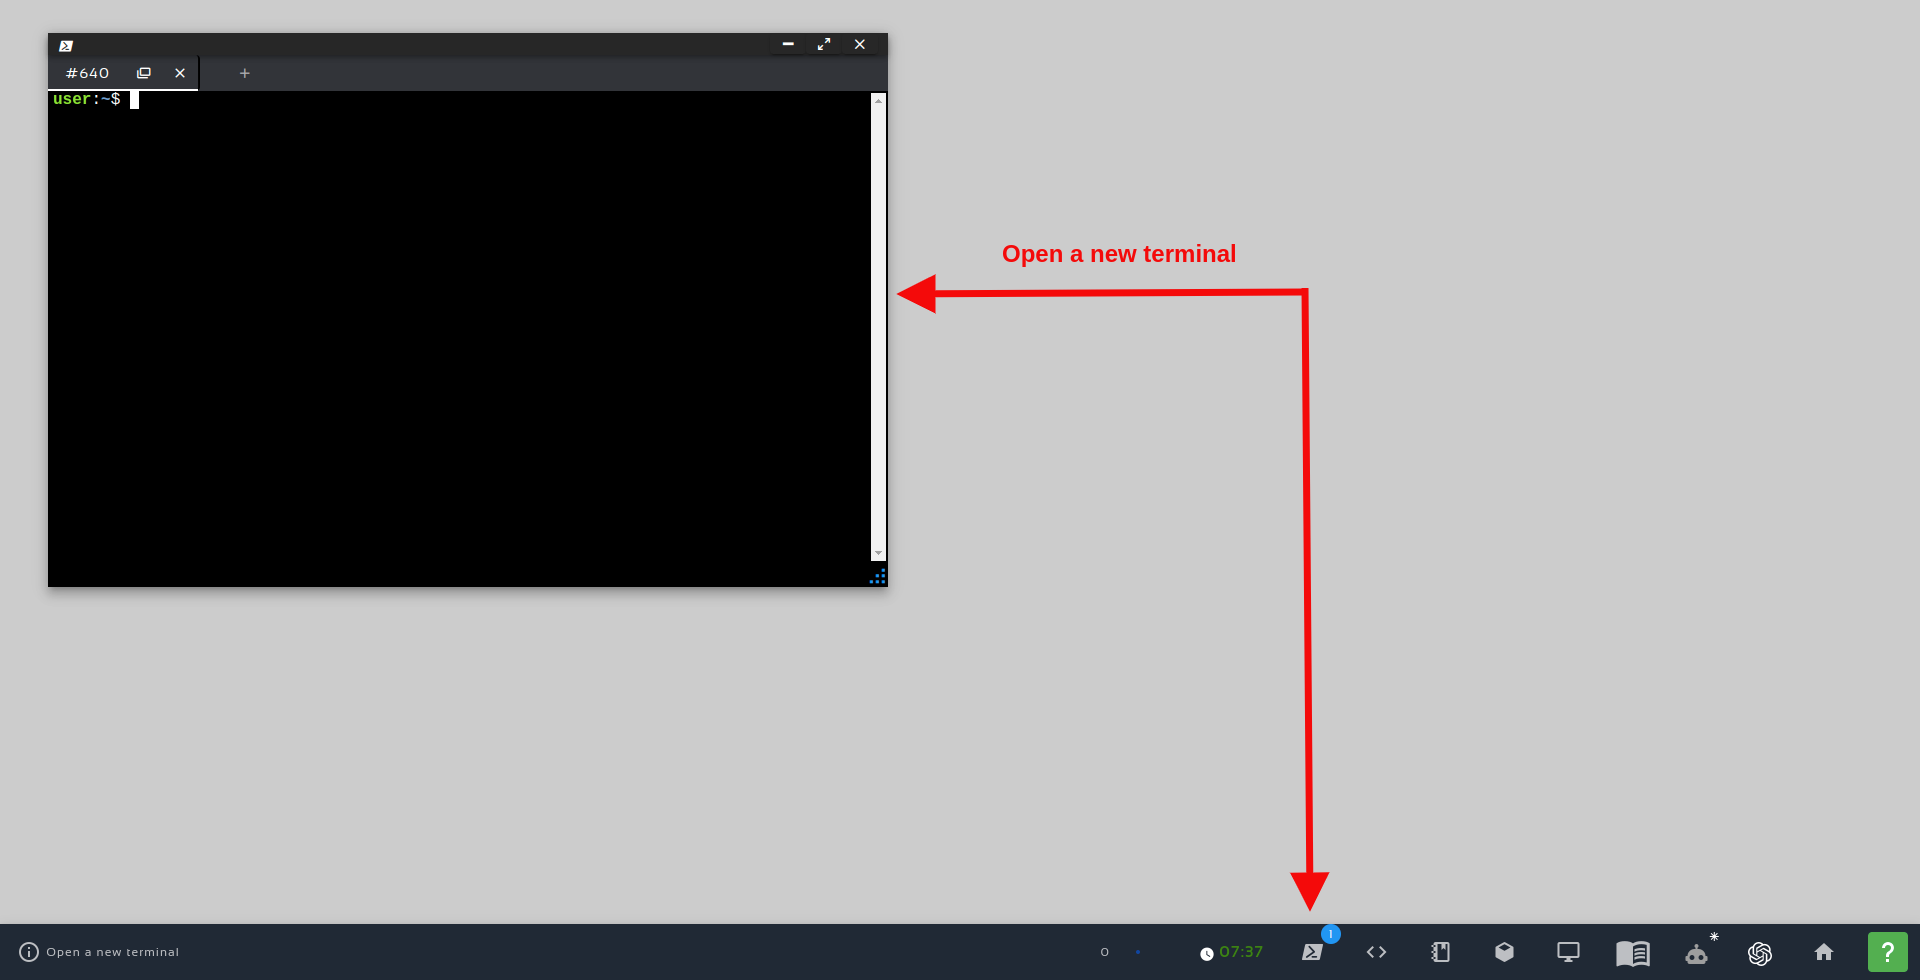
Open a new Terminal
Once inside the first terminal, let’s run the commands below, to launch a simulation
cd ros2_ws
source install/setup.bash
ros2 launch neo_simulation2 simulation.launch.py
- neo_mpo_700: https://www.neobotix-robots.com/products/mobile-robots/mobile-robot-mpo-700
- neo_mpo_500: https://www.neobotix-robots.com/products/mobile-robots/mobile-robot-mpo-500
ROS2 Navigation
In order to move the robot to a desired goal location, pre-defined controllers and planners are available to be readily used. Thanks to Navigation 2, the all-new ROS-2 navigation stack, provides us with localization, global planning, and local planning algorithms, that allow us to jump-start by testing our intended application on the robot real-quick.
Almost all the algorithms found in move_base (ROS-1 Navigation stack) are available in Navigation2. All the Neobotix robots in the simulation for ROS-2 are primed and ready with Navigation2.
Once the simulation is started (seen in the previous tutorial), ROS-2 navigation stack can be launched using the following command
Now, in a second terminal, we can launch the Localization Server using the following command:
ros2 launch localization_server localization.launch.py
ros2 launch path_planner_server pathplanner.launch.py
The commands above should have launched the simulation, Localization Server, and Path Planner server.
After some seconds, we should have Gazebo (simulation), RViz (Robot Visualization), and Teleop running now. The simulation should be similar to the following:
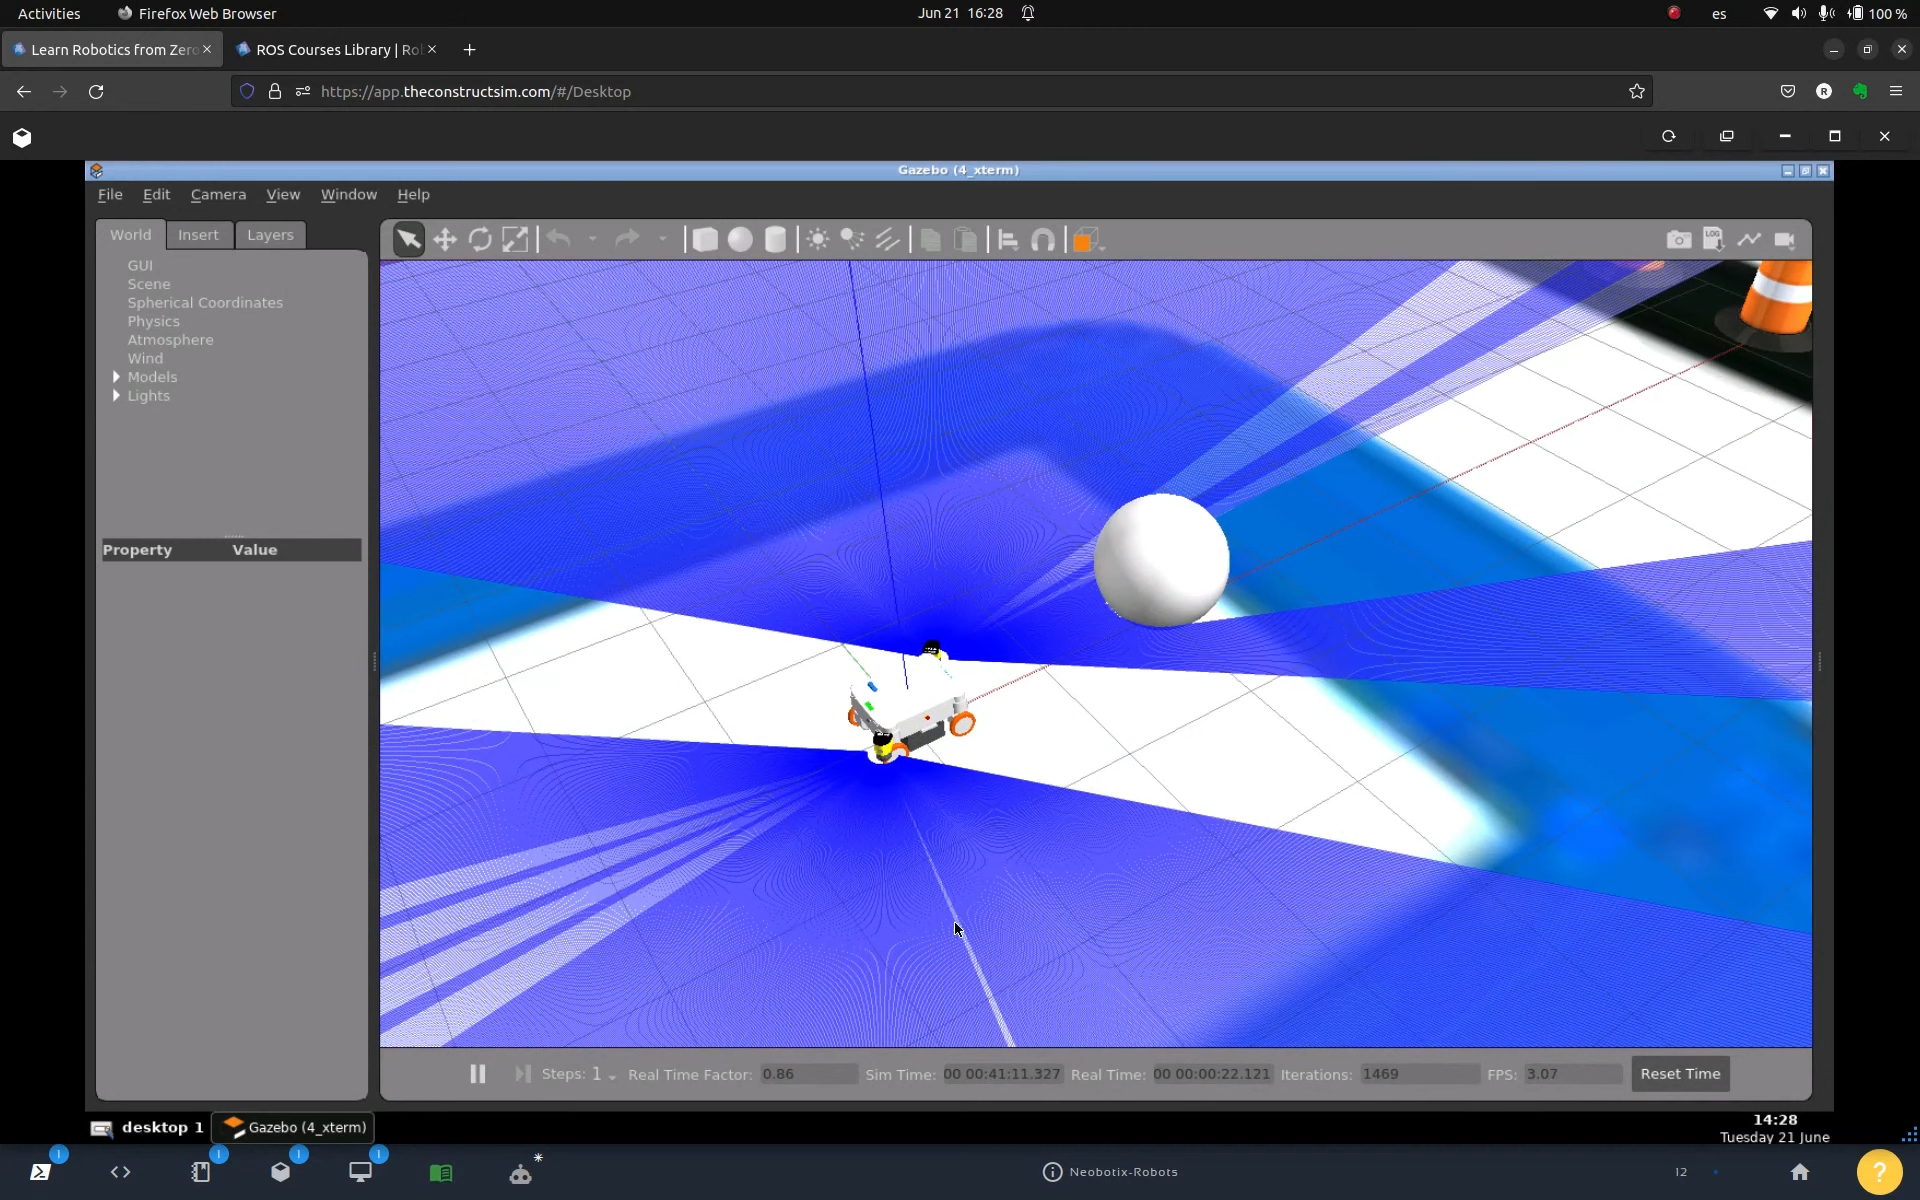
Simulation – How to follow waypoints using nav2
If the Gazebo simulation doesn’t pop up:
- Please open the Gazebo from the below menu bar
- RViz would have been loaded as well and can be found in the Graphical tools
- Also, another terminal would have popped out in the Graphical tools for the teleoperation. Please follow the instruction given in that terminal for moving the robot.
To make sure everything is working so far, you can send a 2D NavGoal in RViz to make sure the navigation system is working.
The files used to launch the Localization Server and Path Planner are found on the following paths:
ls ~/ros2_ws/src/neobotix_mp_400_navigation/localization_server/launch/localization.launch.py
ls ~/ros2_ws/src/neobotix_mp_400_navigation/path_planner_server/launch/pathplanner.launch.py
These files can also be seen in the Code Editor:
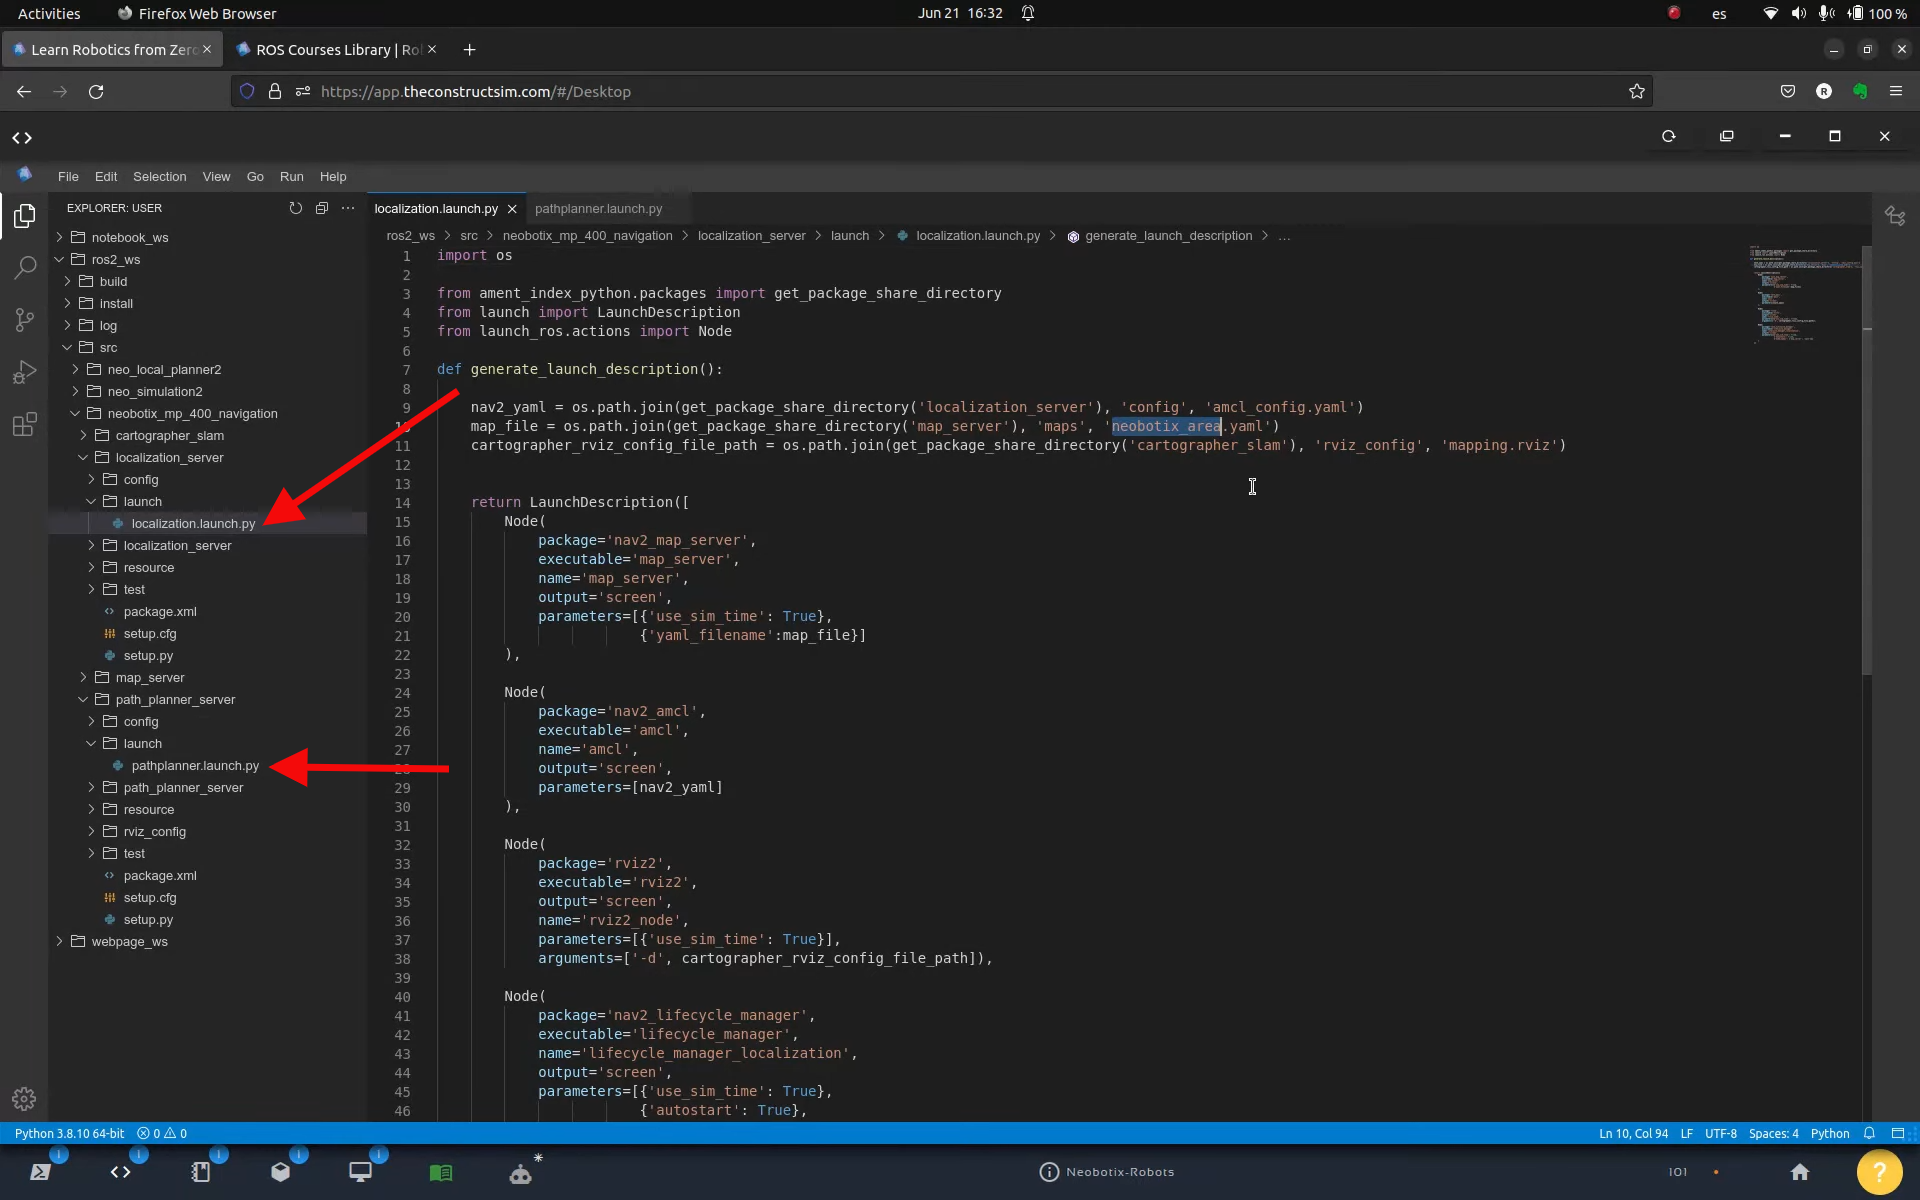
Localization Server and Path Planner – How to follow waypoints using nav2
Feel free to localize and send goals to the robot as shown in this video about ROS2 Navigation for Omnidirectional Robots:
Global Costmap and Local Costmap in RViz
Assuming you have RViz running, you can add Global and Local costmaps to it. For that, click the Add button on the bottom left side of RViz, then Add by Topic, then select Global Costmap:
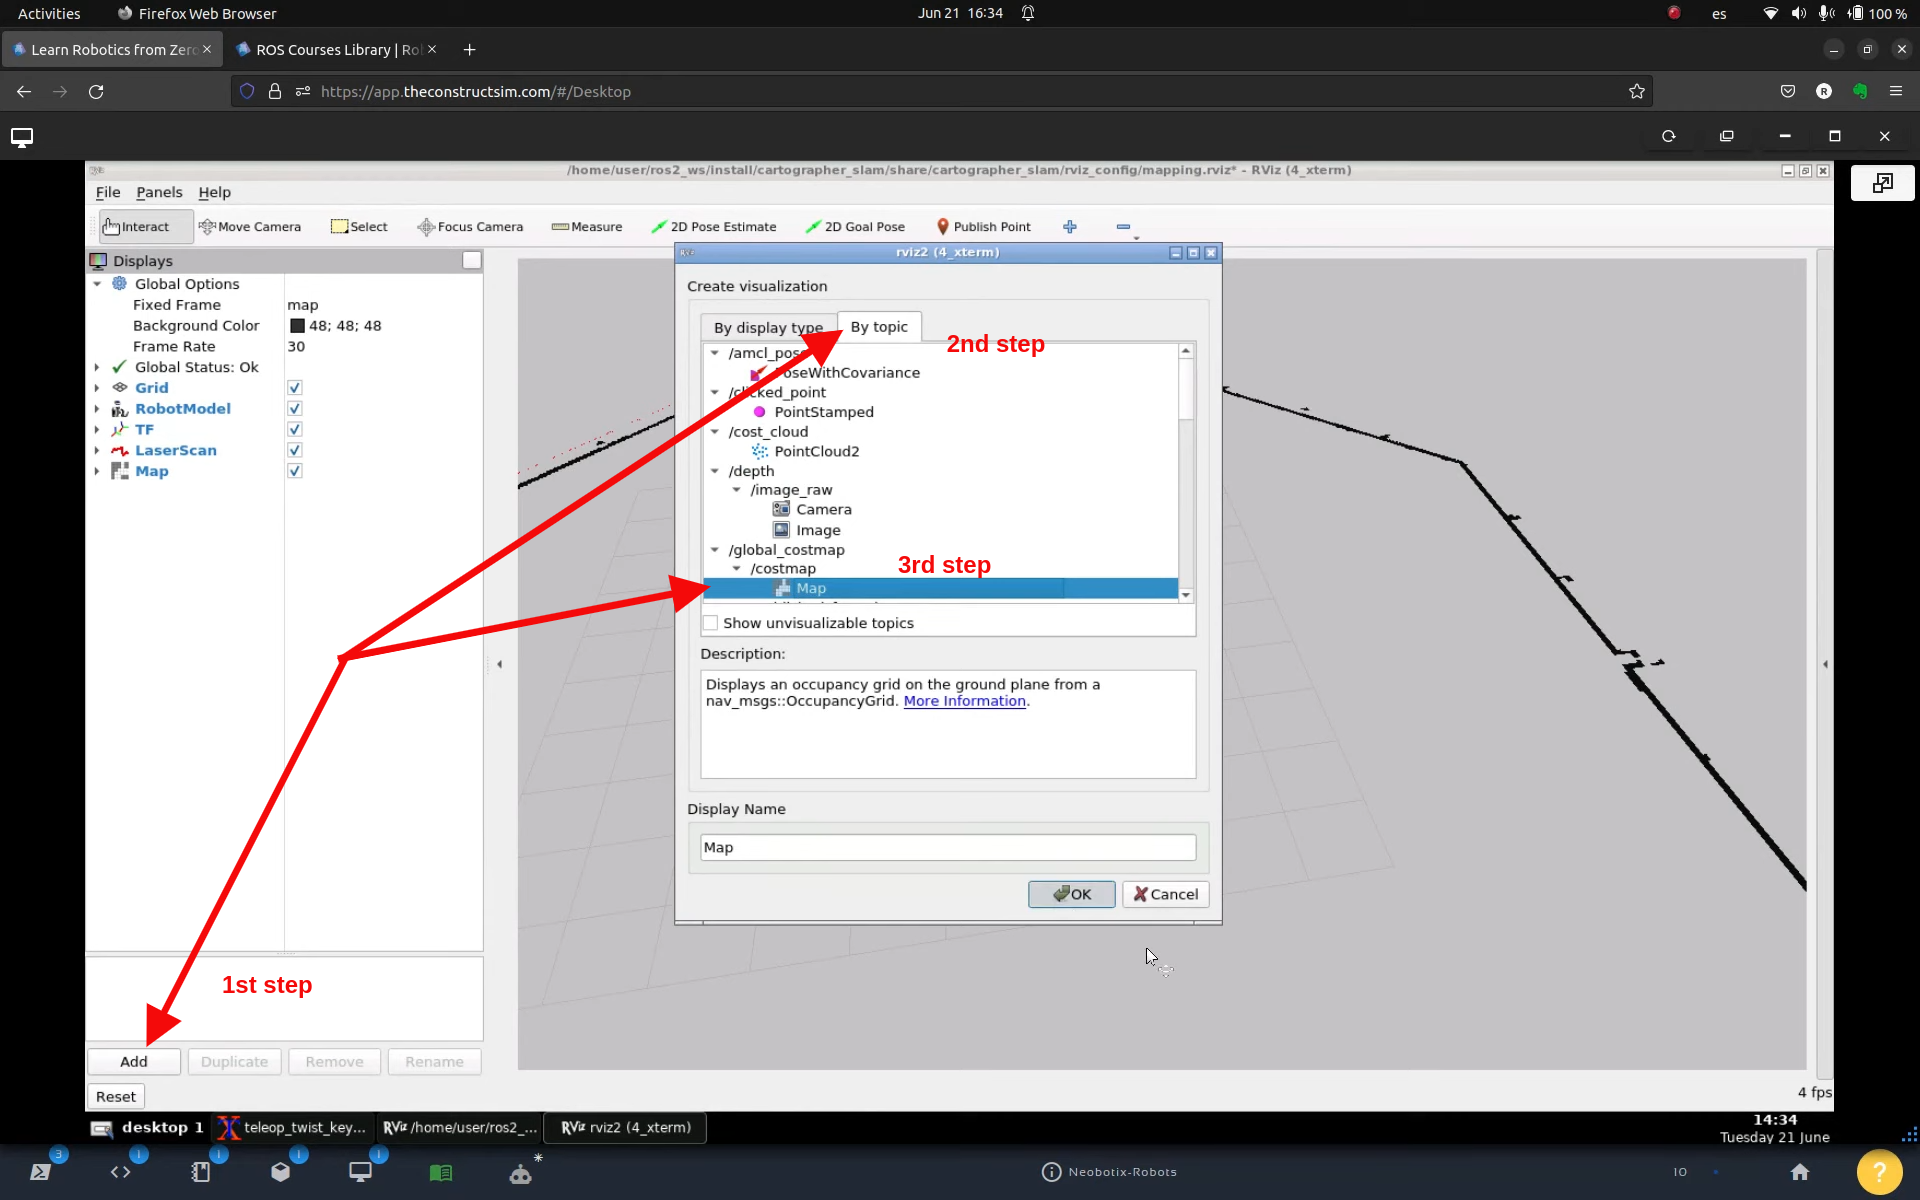
Add by topic – Global Costmap – How to follow waypoints using nav2
To add Local Costmap, click the Add button on the bottom left side of RViz, then Add by Topic, then select the Map under Local Costmap:
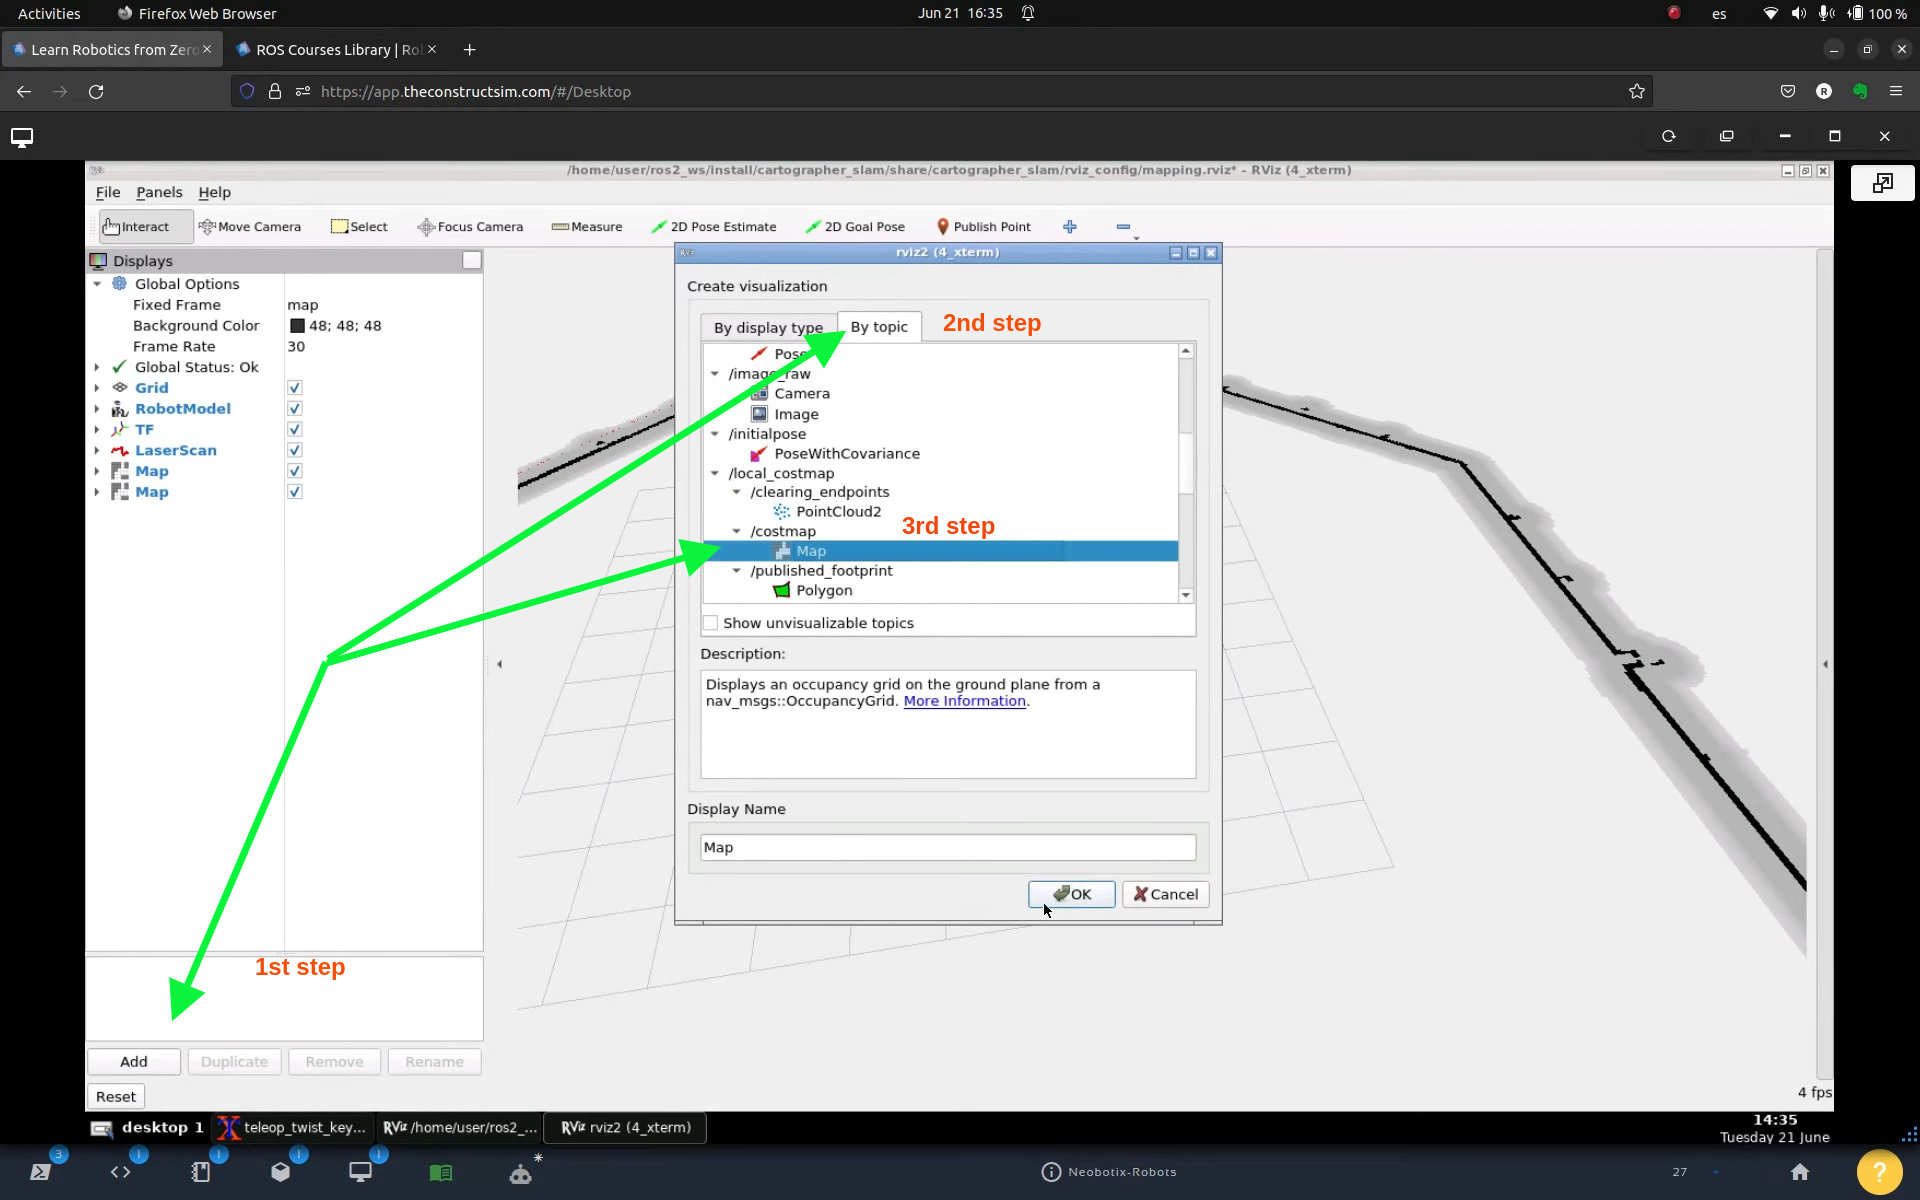
Add by topic – Local Costmap – How to follow waypoints using nav2
Assuming everything went well so far, now we are going to test the waypoint follower.
Waypoint follower
If you forked the rosject (clicking on the link we provided to you earlier), you should have a package named follow_waypoints on your ros2_ws/src folder already, but for documentation purposes, and in case you want to know the baby steps, here is how we created that package.
First, in a fourth terminal we created that package:
cd ~/ros2_ws/src

ros2 pkg create --build-type ament_python follow_waypoints
ls

# follow_waypoints  neo_local_planner2  neo_simulation2  neobotix_mp_400_navigation
That follow_waypoints package has a folder with the same name on it. On that folder, we created a file named follow_waypoints.py
cd ~/ros2_ws/src/follow_waypoints/follow_waypoints

touch follow_waypoints.py

chmod +x follow_waypoints.py
The touch command was used to create the file, and the chmod +x command was used to give execution permissions to that file (make it executable, basically)
We then pasted some content on the follow_waypoints.py file. You can see the content by opening that file using the Code Editor.
The content we pasted is basically a modified version of https://github.com/ros-planning/navigation2/blob/main/nav2_simple_commander/nav2_simple_commander/example_waypoint_follower.py
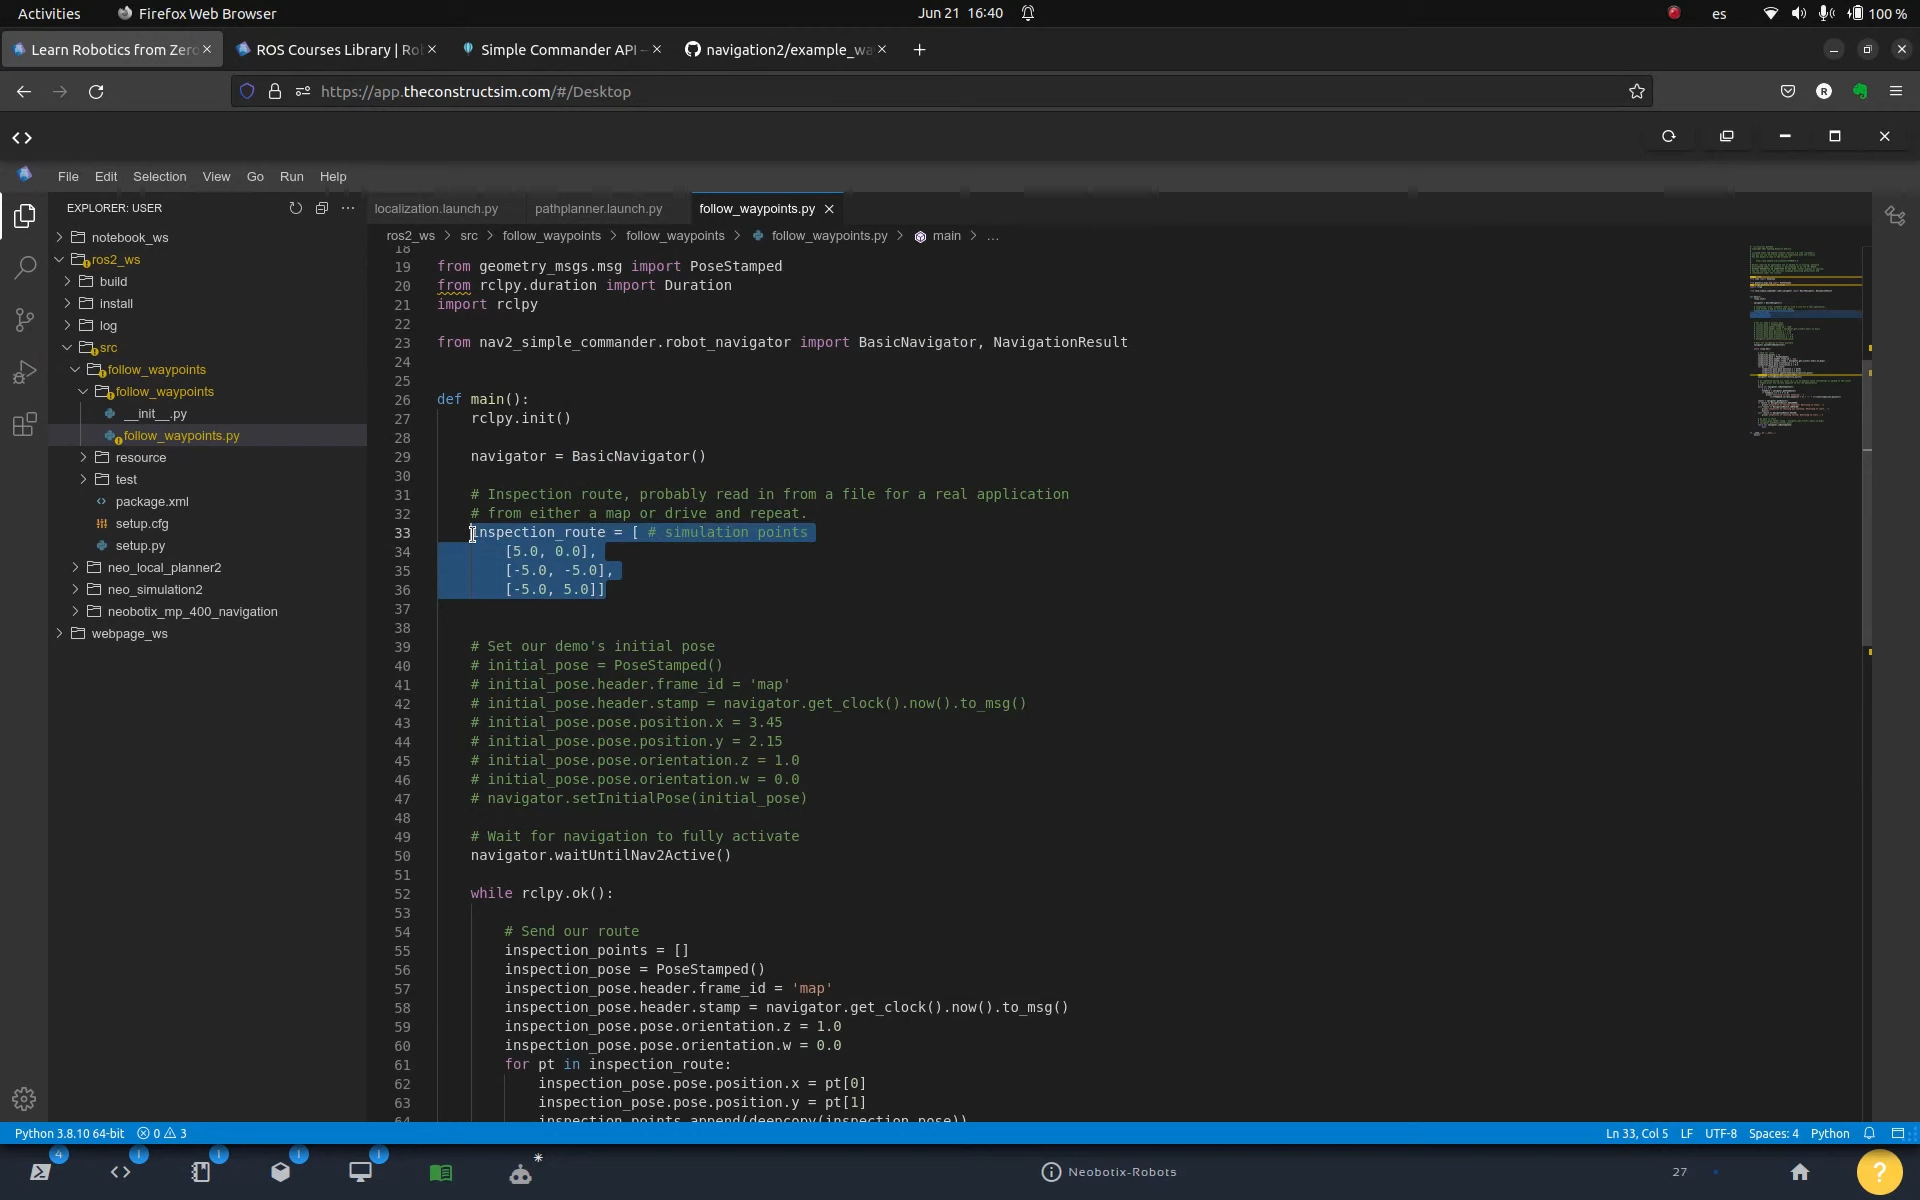
Inspection Route – To navigation to – How to follow waypoints using nav2
On lines 33 to 36 we define an inspection_route variable, which essentially is an array that defines the waypoints (positions in the map) that the robot has to go when patrolling.
#! /usr/bin/env python3
# Copyright 2021 Samsung Research America
#
# Licensed under the Apache License, Version 2.0 (the "License");
# you may not use this file except in compliance with the License.
# You may obtain a copy of the License at
#
#     http://www.apache.org/licenses/LICENSE-2.0
#
# Unless required by applicable law or agreed to in writing, software
# distributed under the License is distributed on an "AS IS" BASIS,
# WITHOUT WARRANTIES OR CONDITIONS OF ANY KIND, either express or implied.
# See the License for the specific language governing permissions and
# limitations under the License.

import time
from copy import deepcopy

from geometry_msgs.msg import PoseStamped
from rclpy.duration import Duration
import rclpy

from nav2_simple_commander.robot_navigator import BasicNavigator, NavigationResult


def main():
    rclpy.init()

    navigator = BasicNavigator()

    # Inspection route, probably read in from a file for a real application
    # from either a map or drive and repeat.
    inspection_route = [ # simulation points
        [5.0, 0.0],
        [-5.0, -5.0],
        [-5.0, 5.0]]


    # Set our demo's initial pose
    # initial_pose = PoseStamped()
    # initial_pose.header.frame_id = 'map'
    # initial_pose.header.stamp = navigator.get_clock().now().to_msg()
    # initial_pose.pose.position.x = 3.45
    # initial_pose.pose.position.y = 2.15
    # initial_pose.pose.orientation.z = 1.0
    # initial_pose.pose.orientation.w = 0.0
    # navigator.setInitialPose(initial_pose)

    # Wait for navigation to fully activate
    navigator.waitUntilNav2Active()

    while rclpy.ok():

        # Send our route
        inspection_points = []
        inspection_pose = PoseStamped()
        inspection_pose.header.frame_id = 'map'
        inspection_pose.header.stamp = navigator.get_clock().now().to_msg()
        inspection_pose.pose.orientation.z = 1.0
        inspection_pose.pose.orientation.w = 0.0
        for pt in inspection_route:
            inspection_pose.pose.position.x = pt[0]
            inspection_pose.pose.position.y = pt[1]
            inspection_points.append(deepcopy(inspection_pose))
        nav_start = navigator.get_clock().now()
        navigator.followWaypoints(inspection_points)

        # Do something during our route (e.x. AI to analyze stock information or upload to the cloud)
        # Simply print the current waypoint ID for the demonstation
        i = 0
        while not navigator.isNavComplete():
            i = i + 1
            feedback = navigator.getFeedback()
            if feedback and i % 5 == 0:
                print('Executing current waypoint: ' +
                    str(feedback.current_waypoint + 1) + '/' + str(len(inspection_points)))

        result = navigator.getResult()
        if result == NavigationResult.SUCCEEDED:
            print('Inspection of shelves complete! Returning to start...')
        elif result == NavigationResult.CANCELED:
            print('Inspection of shelving was canceled. Returning to start...')
            exit(1)
        elif result == NavigationResult.FAILED:
            print('Inspection of shelving failed! Returning to start...')

        # go back to start
        # initial_pose.header.stamp = navigator.get_clock().now().to_msg()
        # navigator.goToPose(initial_pose)
        while not navigator.isNavComplete:
            pass


if __name__ == '__main__':
    main()
In addition to that follow_waypoints.py file, we also had to create the ~/ros2_ws/src/follow_waypoints/config/follow_waypoints.yaml and ~/ros2_ws/src/follow_waypoints/setup.py files.
- Please check that files. If you want a deeper explanation about those files, please check the video available at the end of this post.
Alright, after having created that package and the required configuration files, the next was was compiling the package:
cd ~/ros2_ws

colcon build; source install/setup.bash
Then, to see the robot following the waypoints, we can run:
cd ~/ros2_ws

source install/setup.bash

ros2 run follow_waypoints follow_waypoints_exe
Looking at the simulation and at RViz, you should be able to see the robot moving.
Congratulations. You just learned how to make a robot follow waypoints using nav2 (the official ROS 2 Navigation package)
We hope this post was really helpful to you. If you want a live version of this post with more details, please check the video in the next section.
Youtube video
So this is the post for today. Remember that we have the live version of this post on YouTube. If you liked the content, please consider subscribing to our youtube channel. We are publishing new content ~every day.
Keep pushing your ROS Learning.
Related Courses & Training
If you want to learn more about ROS and ROS2, we recommend the following courses:
-
- ROS2 Basics in 5 Days Humble (Python): https://app.theconstructsim.com/Course/132
- ROS2 Basics in 5 Days Humble (C++): https://app.theconstructsim.com/Course/133
- Open-RMF / Fleet Management Training: https://www.theconstruct.ai/robot-fleet-management-ros2-open-rmf-training/

 2026 Brochure Header - 1")


0 Comments