Python is a good choice if you want to become a robotics developer (i.e. program robots), especially if you want to program your robots with ROS. On a previous post, I discussed about whether to learn ROS using C++ or using Python. On that post, I argued that if you know neither Python nor C++, nor ROS, then your best bet to get into robotics faster is to learn robotics using Python.
However, as a teacher of ROS at the Master of Robotics and Automation of the University of LaSalle in Barcelona, I find the same situation every year: the students that arrive to learn ROS have no knowledge of Python, or C++. If I have to teach them ROS, I have to start first by teaching them one of those languages.
If I convinced you to learn ROS using Python, then your next step must be to learn Python. Let’s dig in.
Python 2.7 or Python 3?
Ok, so you are fully into learning Python. Then you will hear that, at present, there are two versions of Python available and that they cannot be mixed. That means that programs written for Python 2.7 are not compatible with Python 3, and vice versa. So… which one?
In order to make a decision about this, I think that we have to concentrate on the goal we are trying to achieve. You are here because you want to become a robotics developer. Furthermore, you want to become a robotics developer based on ROS (here are some reasons why you should). So, let’s ask ROS what it thinks.
Which Python version uses ROS?
All previous ROS distributions up to today (ROS Melodic) have been based on Python 2.7. This means that all the code already available that runs for those distributions needs to run on Python 2.7.
However, the next distribution of ROS 1 (ROS Noetic, to be released in 2020) is going to be fully based on Python 3 (that is going to be a lot of fun!), as indicated by main ROS developer Tully Foot in this interview.
Additionally, the next generation of ROS, that is, ROS 2, works only on Python 3, so I think that the answer is clear from the point of view of ROS: learn Python 3.
Which Python version for other important libraries?
Apart from ROS, you will have to use many other libraries to build your robot programs.
For example, if you want to do image manipulation, then you will probably use OpenCV. If you want to use machine learning with the robot, you will probably use Scikit, OpenAI-Baselines, or Tensorflow/Keras. If you want to use numerical computation, you may use scipy, pandas, or numpy. Except for OpenAI-Baselines, all of them work with both Python versions.
Check this page for a complete list of the most important Python libraries ready for Python 3.
Additional considerations
On top of all that, Python 2.7 is going to reach the end of its life in 2020. That doesn’t mean that your Python 2.7 programs will stop working on that date! It just means that no additional development will be done by the organization that develops Python (that is, The Python Software Foundation). So, all the Python software already existing will continue to work, and you will still be able to develop for it, too, but no new bug fixing.
Finally, to clarify that from a beginner’s point of view, the differences between Python 2.7 and Python 3 are very small. My advice is, if you are a beginner, it will be a safe bet to start with Python 3, and then, learn the small differences that affect your personal case when they arise.
Python for Robotics Course
What to learn of Python
If you want to start quick with robotics and ROS, I would say that you only need to understand the following basic concepts of Python:
1. How to create and execute a Python program
This is the basic step that will allow you to run your Python programs and also the programs of third parties.
Included here are:
How to create a Python file
How to include (import) external libraries into your Python programs (and how to use them)
What is the role of indentation in Python
How to provide execution permissions to the Python files
An example of code that must be understood after this step is the following code:
#!/usr/bin/env python

import rospy

if __name__ == "__main__":
    rospy.init_node("my_node")

    print ("Keep pushing your ROS learning!")
You must understand how to create that program, how to provide permissions for execution, and how to actually execute it.
2. Basic Python language:
In this step, you must understand the types of variables (including lists and dictionaries), control loops, conditionals, and operators that Python provides to operate.
This is the typical basic knowledge that you must learn for each programming language. Not a lot to say here…
3. Functions
A function is a block of organized, reusable code that is used to perform a single, related action. Functions provide better modularity for your application and a high degree of code reusing. Python provides many built-in functions, like print(), etc., but you can also create your own.
The important points to understand about functions are:
How to create a function: definition
How to call a function
How to provide arguments
How to return values
After this step, you need to understand the following simple example of a function that receives a parameter and returns a value when called from the main program:
#!/usr/bin/env python

import rospy

def print_message(name):
    sentence = name + " keep pushing your ROS learning... "
    return sentence

if __name__ == "__main__":
    rospy.init_node("my_node")

    full_sentence = print_message ("Rick")
    print (full_sentence)
4. Classes and objects
A Python class (also called an object), is simply a collection of data (variables) and methods (functions) that act on those data. Classes are the basis of good robotics programming and you must master them if you want to create complex robotics programs that do not become spaghetti. The main concepts about classes that you must master are:
How to create (define) a class. Understand what the members of the class are and the constructor. Pay special attention to the word self, which indicates that that variable/function is a member of the class
How to instantiate a class
How to call the members of a class from an external program
After this section, you should be able to understand the following code, which makes a robot named Pepito move forward:
Once you know the aforementioned concepts, you are ready to move on to learning ROS. Of course, there is a lot more about Python than what I have indicated above, but you don’t need to master the language to start using it to learn ROS. Remember, the goal here is to learn and apply ROS to the control of robots.
Learn Python for robotics
In the previous section, I indicated that you must learn Python if you want to become a robotics developer. However, what I really recommend is that you learn Python while applying it to robot control.
I especially do not like learning about programming with simple examples of lists of names, conditionals based on stupid numbers, and so on. I do prefer to learn those programming concepts with a robotics application in mind. For example, I would like to know that a list allows me to include the full list of ranges obtained from the laser, which indicates distances to the closest obstacles. Or conditionals based on how close the obstacles are to the robot. Or loops for controlling the speed of the wheels on the robot.
What I mean is that the learning of Python concepts has to be done while applying it to a robotics situation. This method makes it possible to associate robotics concepts with the Python language. You become a robotics developer at the same time that you learn the language.
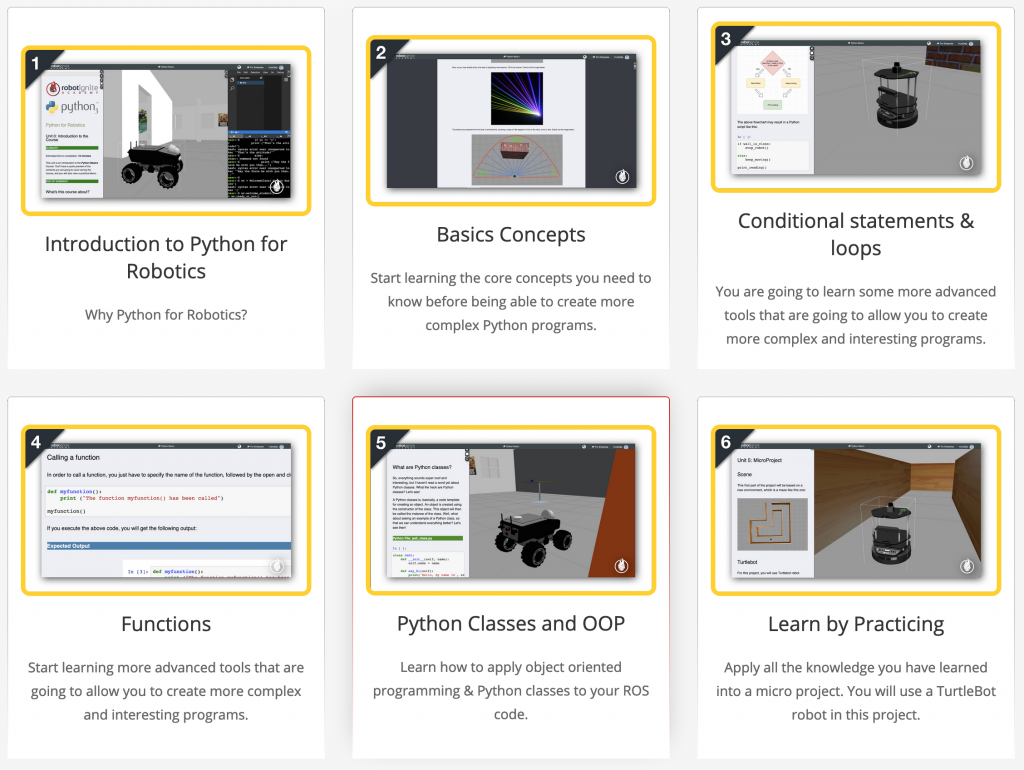
With this purpose in mind, we have created a specific course in which we teach Python while applying your learning to the control of robots. This is a completely free course where we teach all the Python 3 concepts discussed above while you apply it to simulated robots.
The course is available, entitled Python 3 for Robotics, and has the following chapters:
Some interesting questions before starting the course
Do I have to know about robotics?
No. You will be introduced to the required (simple) concepts of robotics while learning Python.
Do I have to know about ROS?
No. Even if you are going to control (simulated) robots throughout the course, you are not going to use ROS for it. The robots that you will use run ROS underneath, but it will be hidden from you. You will get data from the sensors and send commands to the wheels using pure Python classes provided by us.
Is Python the best language for robotics?
This is a very common question and the answer is that it depends on what you want to do, which type of robotics application you want to build, and which type of robot you want to use. In a general sense, I would say that if you are doing robotics research, then Python is your best bet. In case you are working for a company, then maybe C++ is better suited for you, even if using Python in that situation can help you to quickly build prototypes and test your ideas.
In this post, we are creating a new script to implement the Bug 0 behavior. This one that will drive our robot to a give position, switching between “go to point” and “wall follower” algorithms.
Step 1 – Introduction
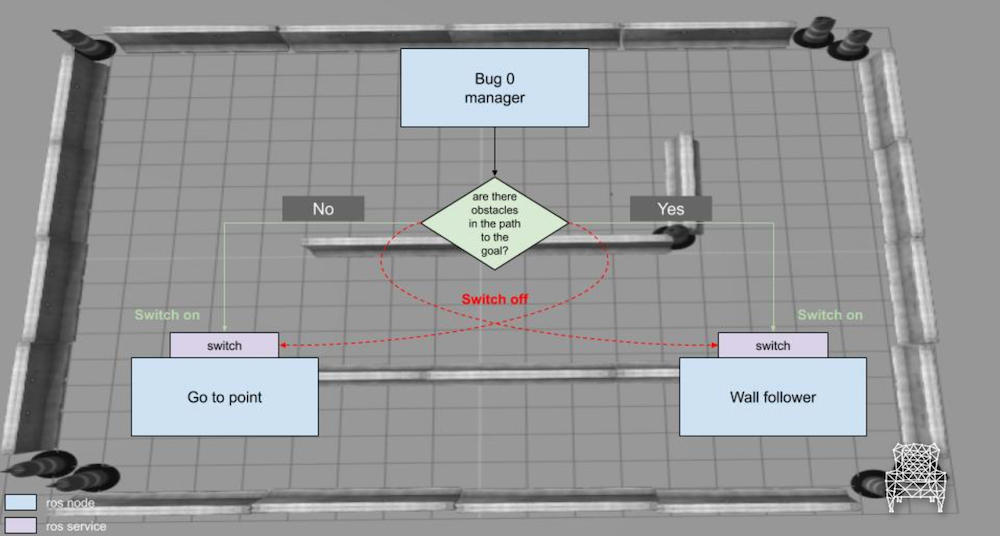
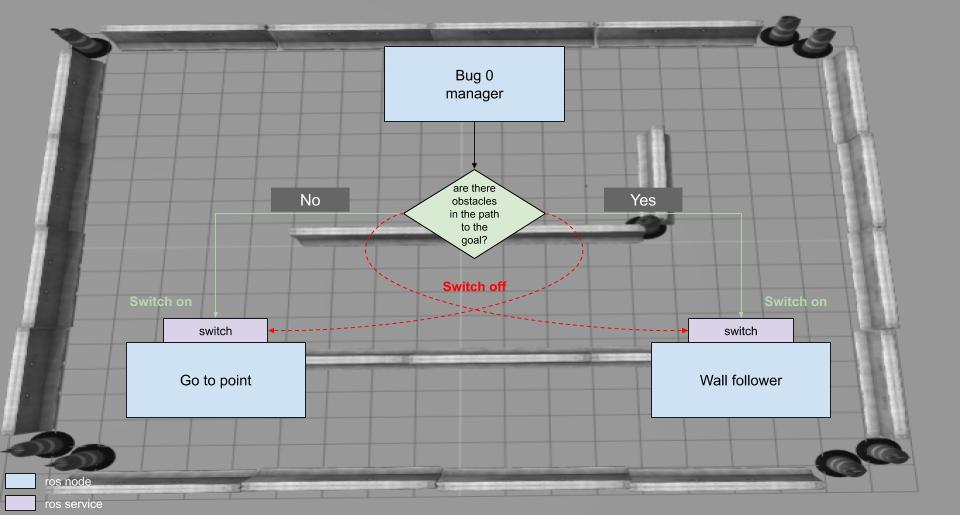
First, let’s check how it is going to work, in a top-down view, we show the proposed architecture below:
We are launching 3 different nodes: Bug 0, Go to point and Wall follower.
For the 2 nodes we have created before, we will adjust (create the switch service) in order to make them work together. Let’s go to code!
Step 2 – Go-to-point adjustments
I start here from the Go to point node, let’s check what we have to change!
We need to import a library for the service we are about to create:
from std_srvs.srv import *
And create a global variable to switch it to ON and OFF (starting by OFF)
active_ = False
The desired position is not anymore a fixed position, instead it comes from ROS parameter server:
# service callback
def go_to_point_switch(req):
    global active_
    active_ = req.data
    res = SetBoolResponse()
    res.success = True
    res.message = 'Done!'
    return res
And the main function is going to be changed a bit.
It’s basically considering the variable active_ before following its original rules.
Here it goes the code:
def main():
    global pub, active_

    rospy.init_node('go_to_point')
    pub = rospy.Publisher('/cmd_vel', Twist, queue_size=1)
    sub_odom = rospy.Subscriber('/odom', Odometry, clbk_odom)
    srv = rospy.Service('go_to_point_switch', SetBool, go_to_point_switch)

    rate = rospy.Rate(20)
    while not rospy.is_shutdown():
        if not active_:
            continue
        else:
            if state_ == 0:
                fix_yaw(desired_position_)
            elif state_ == 1:
                go_straight_ahead(desired_position_)
            elif state_ == 2:
                done()
            else:
                rospy.logerr('Unknown state!')

        rate.sleep()
Step 3 – Wall follower adjustments
For the wall follower, we have to do some similar modifications, let’s check:
Importing services library:
from std_srvs.srv import *
And create a global variable to switch it to ON and OFF (starting by OFF), as well:
active_ = False
Define the function to be called when the service is requested:
def wall_follower_switch(req):
    global active_
    active_ = req.data
    res = SetBoolResponse()
    res.success = True
    res.message = 'Done!'
    return res
And the main function must, also, take into account the _active global variable before publishing to the robot differential drive:
def main():
    global pub_, active_

    rospy.init_node('wall_follower')
    pub_ = rospy.Publisher('/cmd_vel', Twist, queue_size=1)
    sub = rospy.Subscriber('/m2wr/laser/scan', LaserScan, clbk_laser)
    srv = rospy.Service('wall_follower_switch', SetBool, wall_follower_switch)

    rate = rospy.Rate(20)
    while not rospy.is_shutdown():
        if not active_:
            rate.sleep()
            continue

        msg = Twist()
        if state_ == 0:
            msg = find_wall()
        elif state_ == 1:
            msg = turn_left()
        elif state_ == 2:
            msg = follow_the_wall()
            pass
        else:
            rospy.logerr('Unknown state!')

        pub_.publish(msg)

        rate.sleep()
Step 4 – Bug 0 – The Manager Node
We are done with our previous created nodes, now let’s create a new one to manage them:
Let’s start creating a new file ~/catkin_ws/src/motion_plan/scripts/bug0.py
First, let’s import the libraries:
#! /usr/bin/env python

# import ros stuff
import rospy
# import ros message
from geometry_msgs.msg import Point
from sensor_msgs.msg import LaserScan
from nav_msgs.msg import Odometry
from tf import transformations
# import ros service
from std_srvs.srv import *

import math
Then, we define some global variables, in charge of controlling the flow of the script:
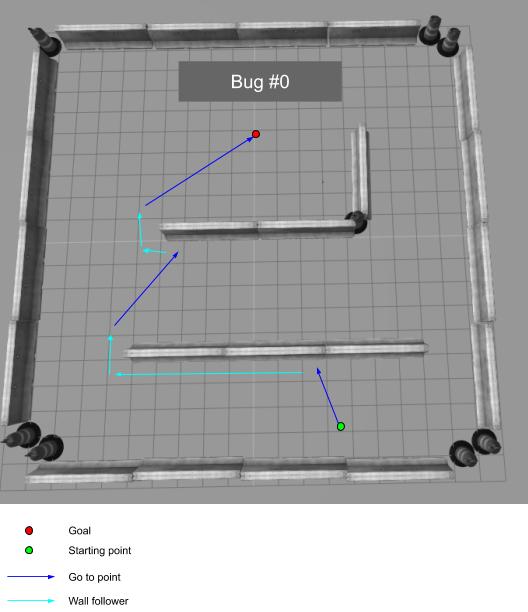
Below we see an image describing the steps and state changes during the Bug 0 motion:
It starts going to the point, finds a wall, circumnavigates it, go to the point again..
And this happens some times until it reaches the goal!
Step 7 – Conclusion
If you lost some step, you can always clone the ROSject generated from this series. Here it goes the one for the current one: http://www.rosject.io/l/a283a96/
In the next post, we will explore a failure case for Bug 0 and look to another solution: Bug 1 algorithm!
Cheers!
[irp posts=”13273″ name=”Exploring ROS with a 2 wheeled robot #7 – Wall Follower Algorithm”]
Hello ROS Developers! In this post number #7, as we continue on the track of the video series, we are going to go line-by-line in order to achieve the Wall Follower Algorithm.
In order to start, you can use the ROSject we generate in the previous post, by copying it here.
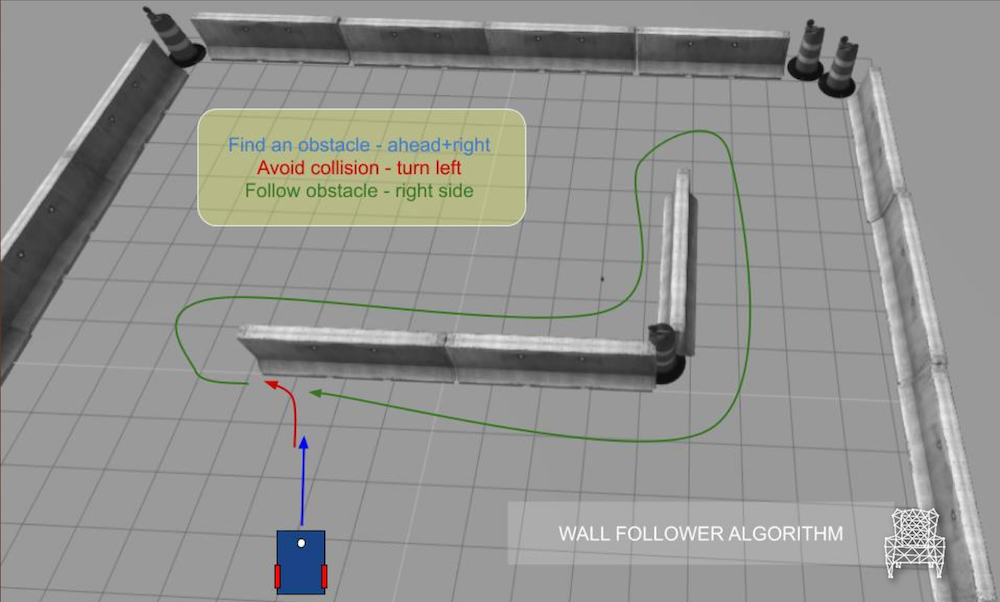
Our goal is to achieve the following behavior:
Find the wall – Go straight+right until it reaches an obstacle
Turn left, if there is no obstacle in front of the robot
Go straight ahead, if there is an obstacle in the right side
Which is described in the image below:
Let’s start!
STEP 1
First things first, creating a new script file for the algorithm. I’m calling it follow_wall.py, and it goes into the folder ~/catkin_ws/src/motion_plan/scripts/.
Some necessary libraries for our script:
#! /usr/bin/env python

# import ros stuff
import rospy
from sensor_msgs.msg import LaserScan
from geometry_msgs.msg import Twist
from nav_msgs.msg import Odometry
from tf import transformations

import math
We are again separating the laser regions (right, front-right, front, front-left and left)
And our state_dict, which defines 3 main states: find the wall, turn left and follow the wall
STEP 2
Further, two necessary functions, but no magic or business logic here:
def clbk_laser(msg):
    global regions_
    regions_ = {
        'right':  min(min(msg.ranges[0:143]), 10),
        'fright': min(min(msg.ranges[144:287]), 10),
        'front':  min(min(msg.ranges[288:431]), 10),
        'fleft':  min(min(msg.ranges[432:575]), 10),
        'left':   min(min(msg.ranges[576:713]), 10),
    }

    take_action()


def change_state(state):
    global state_, state_dict_
    if state is not state_:
        print 'Wall follower - [%s] - %s' % (state, state_dict_[state])
        state_ = state
In the callback, we assign the means of the laser reading to the regions we defined
And the change_state is just a formal way to change the state, log and change the value of the variable state_
STEP 3
And now, we define the main function, the one that contains the logic of the wall following algorithm. It’s called here take_action:
def take_action():
    global regions_
    regions = regions_
    msg = Twist()
    linear_x = 0
    angular_z = 0

    state_description = ''

    d = 1.5

    if regions['front'] > d and regions['fleft'] > d and regions['fright'] > d:
        state_description = 'case 1 - nothing'
        change_state(0)
    elif regions['front'] < d and regions['fleft'] > d and regions['fright'] > d:
        state_description = 'case 2 - front'
        change_state(1)
    elif regions['front'] > d and regions['fleft'] > d and regions['fright'] < d:
        state_description = 'case 3 - fright'
        change_state(2)
    elif regions['front'] > d and regions['fleft'] < d and regions['fright'] > d:
        state_description = 'case 4 - fleft'
        change_state(0)
    elif regions['front'] < d and regions['fleft'] > d and regions['fright'] < d:
        state_description = 'case 5 - front and fright'
        change_state(1)
    elif regions['front'] < d and regions['fleft'] < d and regions['fright'] > d:
        state_description = 'case 6 - front and fleft'
        change_state(1)
    elif regions['front'] < d and regions['fleft'] < d and regions['fright'] < d:
        state_description = 'case 7 - front and fleft and fright'
        change_state(1)
    elif regions['front'] > d and regions['fleft'] < d and regions['fright'] < d:
        state_description = 'case 8 - fleft and fright'
        change_state(0)
    else:
        state_description = 'unknown case'
        rospy.loginfo(regions)
We are treating 8 possibilities of the three region readings of the laser (Like in the previous post, but now for a different behavior)
Switch to state Find the wall when:
No obstacles detected
Obstacle on the left side
Obstacles on the left and right sides
For the state Turn left:
Obstacles in front of the robot
Obstacles in front and left of the robot
Obstacles in front and right of the robot
Obstacles in front, left and right of the robot
And finally, we change to the state Follow the wall when:
Obstacle detected only on the right side of the robot
STEP 4
The next thing is to define the behavior of each state:
This is quite basic, but pay attention to the conventions!! Here we defined to keep the wall on the right side, so if you want to change this convention, you need to play with the signal of the variables. It’s also important it can change depending on the gazebo version and gazebo plugins you are using!! (E.g: During the development of this series, the gazebo version was changed from 4 to 7 and the Z-axis of the driver was changed!)
STEP 5
Finally, we just define our main function, where the main node, publishers, subscribers, and a loop, are defined:
def main():
    global pub_

    rospy.init_node('reading_laser')

    pub_ = rospy.Publisher('/cmd_vel', Twist, queue_size=1)

    sub = rospy.Subscriber('/m2wr/laser/scan', LaserScan, clbk_laser)

    rate = rospy.Rate(20)
    while not rospy.is_shutdown():
        msg = Twist()
        if state_ == 0:
            msg = find_wall()
        elif state_ == 1:
            msg = turn_left()
        elif state_ == 2:
            msg = follow_the_wall()
            pass
        else:
            rospy.logerr('Unknown state!')

        pub_.publish(msg)

        rate.sleep()

if __name__ == '__main__':
    main()
After having it running, you may have the robot going around one of the walls. Don’t forget to spawn the robot near to a wall, or just spawn it anywhere and change its position manually, using Gazebo interface.
You must have something like the below:
I hope you liked this post!
If something went wrong in the process of following this tutorial, you can clone the ROSject generated here.
In the next post, we are gonna work with the Bug 0 algorithm using the previous scripts we have created: Wall following + Go to point!
Keep following our channels!
Cheers
[irp posts=”13235″ name=”Exploring ROS with a 2 wheeled Robot #6 – Robot Motion Planning”]
Hello ROS Developers! In this post we continue with the series Exploring ROS with a 2 wheeled Robot. In the previous post, we created an obstacle avoidance algorithm. Today we’ll start working with motion planning! We’re going create an algorithm to go from a point to another using the odometry data to localize the robot.
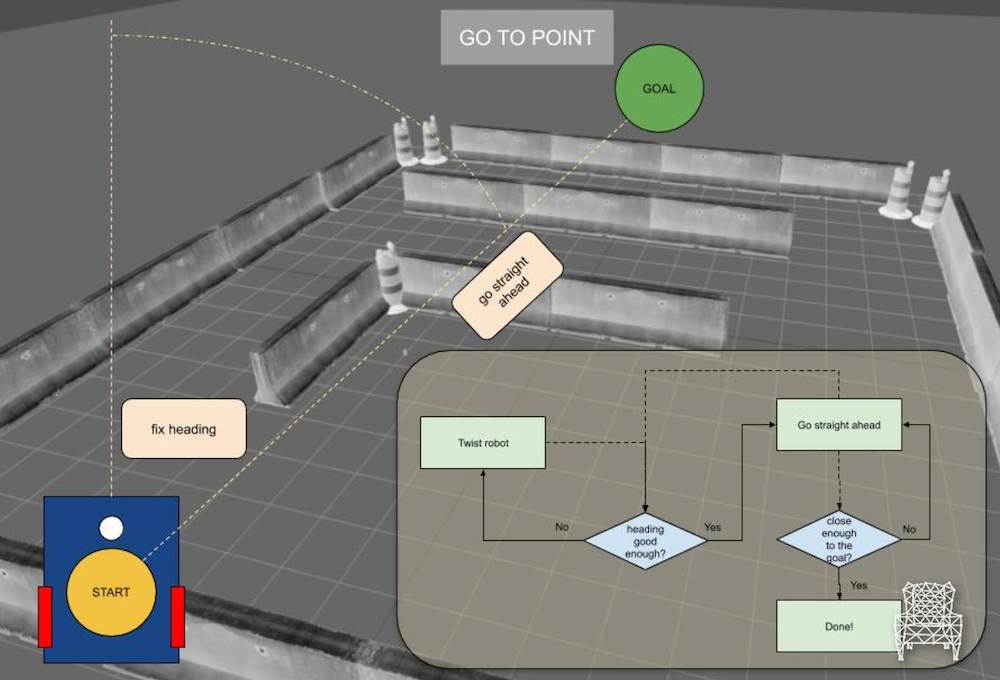
The behavior we want to program is basically going in a straight line from a point to another. We have 2 steps:
Twist robot until we achieve the best heading to the endpoint
Go in a straight line, until we are close enough to the final point
It’s a state machine, described by the diagram below:
The first status is Twist robot, until we reach a good enough heading value. The next status is Go straight ahead, this one can go back to Twist robot or Done.
Let’s start coding!
STEP 1
A new script is created: ~/catkin_ws/src/motion_plan/scripts/go_to_point.py. First thing is to add the necessary libraries:
#! /usr/bin/env python

# import ros stuff
import rospy
from sensor_msgs.msg import LaserScan
from geometry_msgs.msg import Twist, Point
from nav_msgs.msg import Odometry
from tf import transformations

import math
And also define some variables: publisher, robot state, machine state, goal position and some tune parameters:
We are using some global variables. Why? Because these values come from a callback, which will be written further (there is nothing new to us in a subscriber, it’s just something that we need, but not related to the motion planning algorithm, just ROS stuff)
There is a calculation of the yaw error, based on this value, we normalize this value in order to turn the robot always to the closest way (left or right).
Finally, publish the twist message and check if the yaw value is good enough (defined in yaw_precision_how much is good enough. You can see it as a tuning parameter)
STEP 3
What about going straight ahead? Seems to be easier, let’s check how we did it!
The change_state function, that provides us a log message and changes the global state var:
def change_state(state):
    global state_
    state_ = state
    print 'State changed to [%s]' % state_
And something we don’t program without! The callback for the odometry reading:
def clbk_odom(msg):
    global position_
    global yaw_

    # position
    position_ = msg.pose.pose.position

    # yaw
    quaternion = (
        msg.pose.pose.orientation.x,
        msg.pose.pose.orientation.y,
        msg.pose.pose.orientation.z,
        msg.pose.pose.orientation.w)
    euler = transformations.euler_from_quaternion(quaternion)
    yaw_ = euler[2]
Which is basically reading the messages and filling our vars. Notice how we are converting the quaternion to simple yaw value. That’s why we need to import tf library.
We are good to go!
STEP 5
Launch the same world we launched before!
Spawn the robot in a suitable position for this test:
roslaunch m2wr_description spawn.launch y:=8
Launch the script:
rosrun motion_plan go_to_point.py
You may notice the robot switches between go_straight_ahead and fix_yaw many times:
Yaw error: [-0.0682238880539]
State changed to [1]
Yaw error: [0.0698676056395]
State changed to [0]
Yaw error: [0.0683643359256]
State changed to [1]
Yaw error: [0.0708310727095]
State changed to [0]
Yaw error: [0.0579104782174]
State changed to [1]
Yaw error: [0.0718681960156]
State changed to [0]
Yaw error: [0.0595617709548]
State changed to [1]
Yaw error: [0.0717480008102]
State changed to [0]
Yaw error: [0.0627887992796]
State changed to [1]
Yaw error: [0.0718602150916]
State changed to [0]
Yaw error: [0.0662619015533]
State changed to [1]
Position error: [0.296183858313]
State changed to [2]
This’s because our robot model is not symmetric, so it lost the heading when it tries to go in a straight line. It can happen with real robots, not only because of the model, but also because of the environment. Something that must be expected!
That’s all for this post!
Remember to leave a comment, if you have doubts or suggestions!
If something went wrong up to here, you can always clone the ROSject produced with this post!
In this next tutorial, we’re going work with wall following robot algorithm. Cheers!
[irp posts=”13195″ name=”Exploring ROS using a 2 Wheeled Robot: Obstacle Avoidance”]
In this tutorial, we will learn what is an obstacle avoidance algorithm and how it works. Let’s go!
STEP 1
First thing, let’s open our ROSject finished in the previous post. If you don’t have it, just copy my own version from here: http://www.rosject.io/l/96491bc/
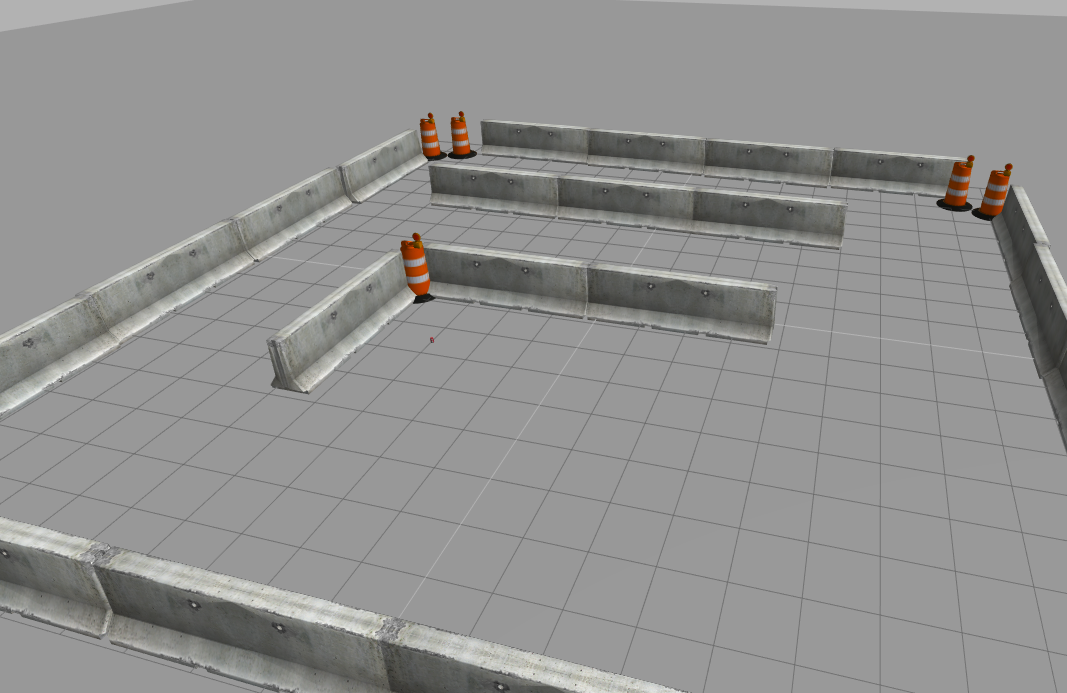
I start launching the new world (with obstacles) we created for this chapter. The file content is right here, you must copy and paste to the file ~/simulation_ws/src/my_worlds/worlds/world2.launch
And modify the launch file (~/simulation_ws/src/my_worlds/launch_world.launch)) in order to be like below:
Launch the world from ROSDS simulation launcher, as we did in the previous chapter/post. You must have the simulation below running:
STEP 2
Spawn the robot from a web shell, but this time passing some arguments, in order to avoid the wall (otherwise the robot will be spawned just over one of the obstacles right way):
roslaunch m2wr_description spawn.launch y:=8
This is the environment we start it from!
Since we will code with Python, let’s create one more script into the motion_plan package. It goes at ~/catkin_ws/src/motion_plan/scripts/obstacle_avoidance.py. !! Don’t forget to assign the necessary permission to it [chmod +x <name_of_the_file.py>] !!
Let’s go step-by-step!
We defined, in the previous chapter, 5 regions of the laser scan and we are going to use the same here. They are:
Right
Front-Right
Front
Front-Left
Left
For the sake of simplicity, we only use the 3 ones in the middle to do the obstacle avoidance algorithm.
STEP 3
In our code, let’s start importing the necessary libraries:
#! /usr/bin/env python

import rospy

from sensor_msgs.msg import LaserScan
from geometry_msgs.msg import Twist
Then, we define a global for the publisher in charge of setting the robot speed:
pub = None
At the end of the file, we define the main function and call it to initialize everything:
def main():
    global pub

    rospy.init_node('reading_laser')

    pub = rospy.Publisher('/cmd_vel', Twist, queue_size=1)

    sub = rospy.Subscriber('/m2wr/laser/scan', LaserScan, clbk_laser)

    rospy.spin()

if __name__ == '__main__':
    main()
STEP 4
Now, between the libraries and the main method, we define the method that receives the laser readings through the subscriber. The 5 regions are defined in a dictionary of Python.
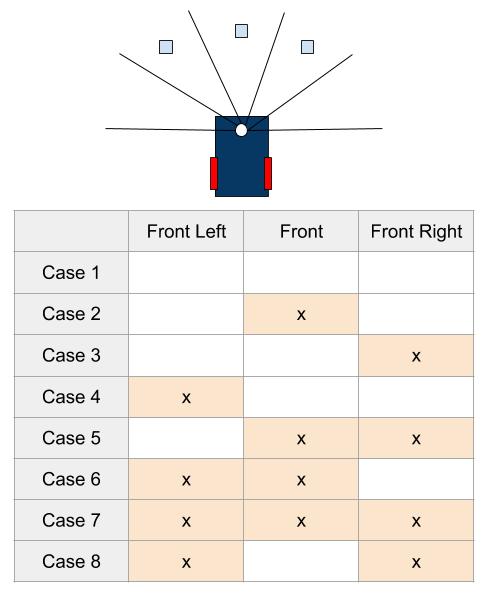
For the case “2”, “7” and “8”, there is something in front or all the regions. We just defined to turn left on these cases (positive angular value).
So, for the cases “3” and “5”, when there is something on the right side, we turn to the left again.
Finally, cases “4” and “6”, just turn to the right (negative angular value)
At the end of the function, we just log some data for debugging purposes, set the twist message and publish it.
Run the script and see the robot avoiding the obstacles!
I hope everything went well in your ROSject. If not, remember you can always leave a comment or contact us using any of our channels. If you need, you can also copy the final ROSject we generated from this post!
In this next post we are going create an algorithm to go from a point to another using the odometry data to localize the robot!