Still on the series of Markers and how to use them, in the previous Live Class we looked at the Basic RViz Markers and how they are created. Today’s class will delve deeper into other types of Markers available to us in RViz.
We will see:
▸ How to create dynamic BoundingBox Markers
▸ How to add Simple Overlays in ROS RVIZ
Every Tuesday at 18:00 CET/CEST.
This is a LIVE Class on how to develop with ROS. In Live Classes you practice with me at the same time that I explain, with the provided free ROS material.
IMPORTANT: Remember to be on time for the class because at the beginning of the class we will share the code with the attendants.
IMPORTANT 2: in order to start practicing quickly, we are using the ROS Development Studio for doing the practice. You will need a free account to attend the class. Go to http://rds.theconstructsim.com and create an account prior to the class.
Step 1. Create a project in ROS Development Studio(ROSDS)
ROSDS helps you follow our tutorial in a fast pace without dealing without setting up an environment locally. If you haven’t had an account yet, you can create a free account here. Let’s create a new project and call it edit_map_qa.
Step 2. Map generation
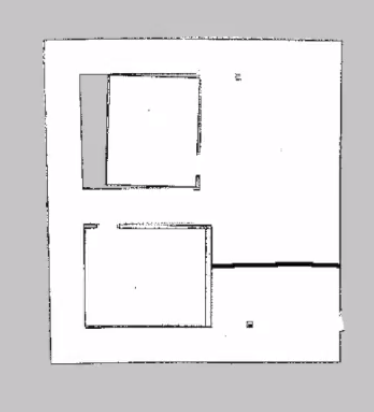
In ROS, you can generate a map with SLAM algorithm like gmapping. The map file normally has the .pgm and .yaml foramt where the .pgm is basically an image and .yaml file contains some information like origin, resolution and etc. In this tutorial, I a map is generated using the summit xl robot.
Step 3. Edit map
There are many edit tools available. As a demonstration, we use GIMP on mac to edit the .pgm image. For example, Add a wall in the map.
Step 4. Publish the new map to the map server
Now, you can launch the navigation package again, you’ll see that a new ‘wall’ appears on the map. If you do the path planning again, you should notice that the path is changed due to the wall is blocking the way now.
Want to learn more?
If you are interested in this topic and want to learn more about the navigation stack in ROS and how to use map sever, please check our ROS Navigation in 5 Days Online Course for more information.
Edit by: Tony Huang
Feedback
Did you like this video? Do you have questions about what is explained? Whatever the case, please leave a comment on the comments section below, so we can interact and learn from each other.
If you want to learn about other ROS topics, please let us know on the comments area and we will do a video about it.
In this video we are going to see how to tune and tweak the parameters required for navigation, using a graphical tool. This tool will enable us to modify parameters on-the-run, allowing us to quickly and painlessly test various parameter settings.
Step1. Create a project in Robot Ignite Academy(RIA)
We have the best online ROS course available in RIA. It helps you learn ROS in the easiest way without setting up ROS environment locally. The only thing you need is a browser! Create an account here and start to browse the trial course for free now! We’ll use the ROS Navigation in 5 days course as an example today. Please go to Unit 0: Guide for ROS Navigation in 5 Days.
Step2. Check the parameter
We use turtlebot 2 as an example. You can use the following command to navigate to the parameter file.
roscd turtlebot_navigation_gazebo
cd param
cat dwa_local_planner_params.yaml
Let’s launch the navigation stack with the following command
If you checked the parameters, you’ll see there are lots of different parameters. How can we tune them? Let’s use a built-in graphical tool called rqt_reconfigure with the following command.
rosrun rqt_reconfigure rqt_reconfigure
Step3. Tune the parameter
For example, the question is about the inflation_radius. You can find it under move_base->global_costmap->inflation_layer.
The best part of this graphical tool is that the change will apply to the simulation immediately, so you can run and tune your navigation stack at the same time. You can also save the parameter to a .yaml file if you click the button on the top left corner.
Want to learn more?
If you want to learn more about the navigation stack and what is the meaning of each parameter, please check our ROS navigation in 5 days course.
Edit by: Tony Huang
Feedback
Did you like this video? Do you have questions about what is explained? Whatever the case, please leave a comment on the comments section below, so we can interact and learn from each other.
If you want to learn about other ROS topics, please let us know on the comments area and we will do a video about it.
Head to http://rosds.online and create a project named “ros_message” or whatever you like. Please ensure you select “Ubuntu 16.04 + ROS Kinetic + Gazebo 7” under “Configuration”.
Step 2: Create source files
Pick a Shell from the Tools menu and run the following commands:
user:~$ cd catkin_ws/src
user:~/catkin_ws/src$ touch obiwan.py obiwan_pub.py obiwan_sub.py #create the files
user:~/catkin_ws/src$ chmod +x obiwan.py obiwan_pub.py obiwan_sub.py # make them executable
Pick the IDE from the Tools menu. Locate the folder catkin_ws/src in the IDE’s file navigator, locate the corresponding files and paste the following code into them.
obiwan.py
#! /usr/bin/env python

import rospy

rospy.init_node("sos_1")
rate = rospy.Rate(2)
while not rospy.is_shutdown():
    print "Help me Obi-Wan Kenobi, you're my only hope"
    rate.sleep()
obiwan_pub.py
#! /usr/bin/env python

import rospy
from std_msgs.msg import String

rospy.init_node("sos_2")
rate = rospy.Rate(2)
help_msg = String()
help_msg.data = "help me Obi-Wan Kenobi, you're my only hope"
pub = rospy.Publisher('/help_msg', String, queue_size = 1)
while not rospy.is_shutdown():
    pub.publish(help_msg)
    rate.sleep()
First, start the ROS master in the background. Then check the ROS topics currently available:
user:~/catkin_ws/src$ nohup roscore &
user:~/catkin_ws/src$ rostopic list
/rosout
/rosout_agg
obiwan.py
Run this command in the current terminal. You should see the following output:
ser:~/catkin_ws/src$ ./obiwan.py
Help me Obi-Wan Kenobi, you're my only hope
Help me Obi-Wan Kenobi, you're my only hope
...
Pick another Shell from the Tools menu and run the following command. You should see that no additional topic has been created:
user:~$ rostopic list
/rosout
/rosout_agg
obiwan_pub.py
Stop the obiwan.py program in the first terminal by pressing Ctrl + C. Then run the obiwan_pub.py program:
user:~/catkin_ws/src$ ./obiwan_pub.py
Program is doing nothing? Nah, we shall see shortly. In the second terminal, rerun the last command:
user:~$ rostopic list
/help_msg
/rosout
/rosout_agg
Ah, now we have a new topic: help_msg! But where’s the help message? We’ll see that in the third program.
obiwan_sub.py
In the second terminal, run the obiwan_sub program:
user:~$ cd catkin_ws/src
user:~/catkin_ws/src$ ./obiwan_sub.py
SOS received: 'Help me Obi-Wan Kenobi, you're my only hope'!
SOS received: 'Help me Obi-Wan Kenobi, you're my only hope'!
That’s the message being generated by the obiwan_pub.py program.
Now, let’s put everything together.
Step 4: Master the Concept: What is a ROS message?
The obiwan.py and obiwan_pub.py create similar messages. However, the message created by obiwan.py is NOT a ROS message because:
It didn’t use a recognized ROS message type.
It was not sent over a ROS channel (topic).
obiwan_pub.pypublishes a message on the /help_msg topic while obiwan_subsubscribes to that topic and therefore gets the message.
In summary,
ROS nodes communicate with one another through messages.
They communicate over channels called topics.
There are different types of messages for different tasks. For example, a node controlling a drone will tell the drone to take off using a ROS message type Empty over a topic that might be something like /drone/takeoff.
Extra: when you send a message to a robot via the command line, you are a n*** …or at least behaving like one 🙂 .
If you are interested in how this works in detail or even you want to create your own messages, please check our ROS Basics In 5 Days (Python) course!
In this video we are going to see how to rotate our robot based on data from odometry. We will subscribe to /odom topic to get the heading of our robot, process it, and then send a command over the /cmd_vel topic.
[irp posts=”7999″ name=”ROS Q&A – How to convert quaternions to Euler angles”]
Step 1. Create a project in ROS Development Studio(ROSDS)
We can do any ROS development we want easily, without setting up environment locally in ROSDS and that’s the reason why we will use ROSDS for this tutorial. If you haven’t had an account yet. You can create one here for free now. After logging in, let’s begin our journey by clicking on the create new project and call it rotate_robot.
Step 2. Create package
At first, we launch the simulation from Simulations->Turtlebot 2
We’ll create a package for the rotating robot task with the following command
cd ~/catkin_ws/src
catkin_create_pkg rotate_robot rospy
Then we’ll create a script folder and a main.py script inside it with the following content
#!/usr/bin/env python
import rospy
from nav_msgs.msg import Odometry
from tf.transformations import euler_from_quaternion, quaternion_from_euler

roll = pitch = yaw = 0.0

def get_rotation (msg):
    global roll, pitch, yaw
    orientation_q = msg.pose.pose.orientation
    orientation_list = [orientation_q.x, orientation_q.y, orientation_q.z, orientation_q.w]
    (roll, pitch, yaw) = euler_from_quaternion (orientation_list)
    print yaw

rospy.init_node('my_quaternion_to_euler')

sub = rospy.Subscriber ('/odom', Odometry, get_rotation)

r = rospy.Rate(1)
while not rospy.is_shutdown():
    quat = quaternion_from_euler (roll, pitch,yaw)
    print quat
    r.sleep()
Then we can run the script with the following command to see the topic publishing in quaternion and Euler angle.
cd rotate_robot/script
chmod +x main.py
rosrun rotate_robot main.py
You can also run the teleop script to move the robot and see the value changing with this command
We’ll use the easiest way to do it by applying the controller. Please save the script with a new name rotate.py and change it as the following content.
#!/usr/bin/env python
import rospy
from nav_msgs.msg import Odometry
from tf.transformations import euler_from_quaternion, quaternion_from_euler
from geometry_msgs.msg import Twist
import math

roll = pitch = yaw = 0.0
target = 90
kp=0.5

def get_rotation (msg):
    global roll, pitch, yaw
    orientation_q = msg.pose.pose.orientation
    orientation_list = [orientation_q.x, orientation_q.y, orientation_q.z, orientation_q.w]
    (roll, pitch, yaw) = euler_from_quaternion (orientation_list)
    print yaw

rospy.init_node('rotate_robot')

sub = rospy.Subscriber ('/odom', Odometry, get_rotation)
pub = rospy.Publisher('cmd_vel', Twist, queue_size=1)
r = rospy.Rate(10)
command =Twist()

while not rospy.is_shutdown():
    #quat = quaternion_from_euler (roll, pitch,yaw)
    #print quat
    target_rad = target*math.pi/180
    command.angular.z = kp * (target_rad-yaw)
    pub.publish(command)
    print("taeget={} current:{}", target,yaw)
    r.sleep()
After executing it, you should see the robot turn to the desired orientation.
Want to learn more?
Applying the controller is not the only way to do it. There are more advanced and better ways to do it. If you are interested, please check our ROS Basic and TF ROS 101 courses in Robot Ignite Academy for more information.
Edit by: Tony Huang
Feedback
Did you like this video? Do you have questions about what is explained? Whatever the case, please leave a comment on the comments section below, so we can interact and learn from each other.
If you want to learn about other ROS topics, please let us know on the comments area and we will do a video about it.
Step 1. Create a project in ROS Development Studio(ROSDS)
We’ll answer this question by walking you through an example with ROSDS. With ROSDS, we can focus on solving the problem directly instead of finding Linux pc, install ROS and etc. You can create an account here for free. After registering, let’s create a new project and call it q_a_callback_processing.
Step 2. Create package
Then, we’ll create a package with dependencies
cd catkin_ws/src
catkin_create_pkg my_pkg rospy std_msgs
Then create a folder called script under the package directory and a file called publisher.py under the script directory with the content
#!/usr/bin/env python

import rospy
from std_msgs.msg import Int32

def publisher():
    pub = rospy.Publisher('topic_name', Int32, queue_size=10)
    rospy.init_node('publisher')
    r = rospy.Rate(30)

    count = 1
    msg = Int32()
    while not rospy.is_shutdown():
        msg.data = count
        count = count+1 if count < 30 else 1
        pub.publish(msg)
        rospy.loginfo(msg)
        r.sleep()

if __name__ == '__main__':
    publisher()
You can see that the topic is publishing at 30 Hz.
To run it, you have to give it permission first with chmod +x publisher.py , then you can run it with rosrun my_pkg publisher.py . You’ll see the script starts to publishing message.
Now the publisher is working, let’s create a subscriber to subscribe to the topic. Let’s call it subscriber.py and fill it with the following content
#!/usr/bin/env python

import rospy
from std_msgs.msg import Int32

processing = False
new_msg = False
msg = None

def callback(data):
    global processing, new_msg, msg
    if not processing:
        new_msg = True
        msg = data

def listener():
    global processing, new_msg, msg
    rospy.init_node('subscriber')
    rospy.Subscriber('topic_name', Int32, callback)
    r = rospy.Rate(5)
    while not rospy.is_shutdown():
        if new_msg:
            #set processing to True
            processing = True
            new_msg = False
            #simulate a process that take 0.2 seconds
            rospy.loginfo(msg)
            r.sleep()
            #set processing to False
            processing = False

if __name__ == '__main__':
    listener()
Here in the subscriber, we only run it for 5 Hz. Now you have to give it permission and run it. You’ll see that the subscriber only get 5 messages every second. This is the answer!
Take away today:
You can specify different rates and r.sleep() function for publisher and subscriber in order to make sure the node has enough time to run your algorithm.
Edit by: Tony Huang
Feedback
Did you like this video? Whatever the case, please leave a comment on the comments section below, so we can interact and learn from each other.
If you want to learn about other ROS topics, please let us know on the comments area and we will do a video about it.
![[ROS in 5 mins] 018 – What is a ROS message? Part#1](https://www.theconstruct.ai/wp-content/uploads/2018/07/ROS-in-5-mins-018-–-What-is-a-ROS-message-Part1.jpg)