In this episode, I interview Enrico Mingo Hoffman, postdoc researcher at the Humanoids & Human Centered Mechatronics Lab of the Italian Institute of Technology. He will talk about their open implementation of the Stack of Tasks for the whole body control of humanoid (and non-humanoid) robots. He will also explain how their development environment at the lab works, and will discuss some differences between ROS and YARP, another framework for robot programming developed at Italy. He will end suggesting about the creation of an OSRF – Europe. Do not miss that!
Selected quote to from the interview
What I expect at the beginning is that the robot stands… without exploding!
OpenAI has released the Gym, a toolkit for developing and comparing reinforcement learning (RL) algorithms. That toolkit is a huge opportunity for speeding up the progress in the creation of better reinforcement algorithms, since it provides an easy way of comparing them, on the same conditions, independently of where the algorithm is executed.
The toolkit is mainly aimed at the creation of RL algorithms for a general abstract agent. Here, we are interested in applying it to the control of robots (of course!). Specifically, we are interested in ROS based robots. That is why, in this post we describe how to apply the OpenAI Gym to the control of a drone that runs with ROS
Let’s see an example of training.
The drone training example
In this example, we are going to train a ROS based drone to be able to go to a location of the space moving as low as possible (may be to avoid being detected), but avoiding obstacles in its way.
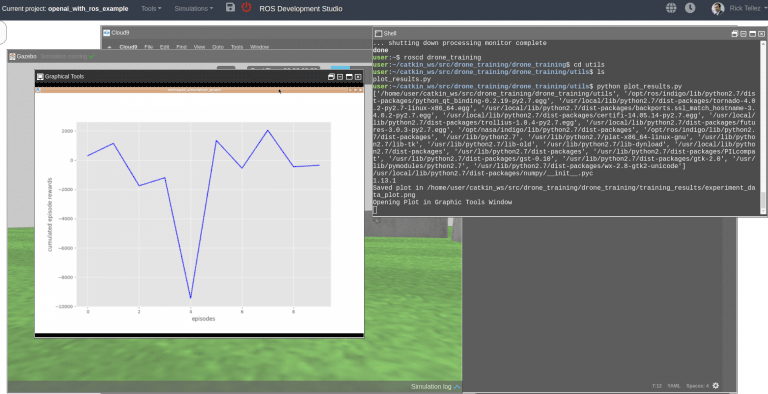
For developing the algorithm we are going to use the ROS Development Studio (RDS). That is an environment that allows to program with ROS and its simulations with a web browser, without having to install anything on the computer. So we have all the required packages for ROS and OpenAI Gym and Gazebo simulations already installed. You can follow the rest of the post you have two options:
Either you install everything in your computer. If you need to install those packages, have a look here for ROS installation, here for OpenAI installation, and here to download the Gazebo simulation (for Indigo + Gazebo 7).
What follows are the instructions for developing the training program with RDS, but as you can see, the steps are the same for your local installation.
Get the prepared code for drone training
We have prepared the training code already for you, so you don’t have to build everything from scratch. The goal of this post is to show you how this code works, and how you would modify it for your own case (different robot, or different task).
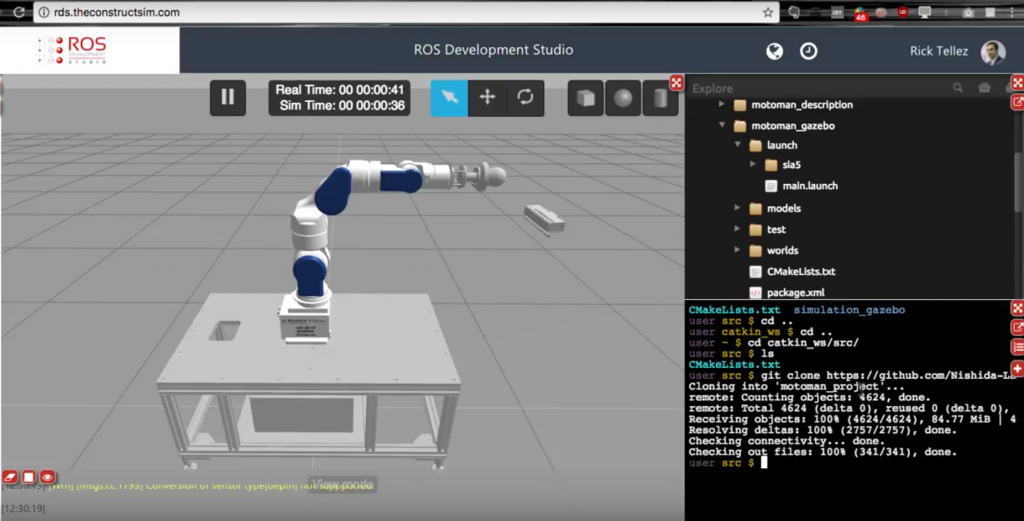
In order to get the code, just open the RDS (http://rds.theconstructsim.com) and create a new project. You can call it openai_with_ros_example. Then open the project by clicking on the Open Project button.
Once you have the environment open, go to the Tools menu and open a Linux Shell. Inside the shell go to the catkin_ws/src directory. This is the place where ROS code must be put in the RDS in order to build, test, debug and execute it against robot simulations. Once there, clone the following git repo which contains the code to train the drone with OpenAI:
Now, you should have a ROS package named drone_training inside the catkin_ws. Let’s test it right now!
Testing what you have installed
First thing would be to test what you got so we can see what we are trying to understand. For this, follow the next steps:
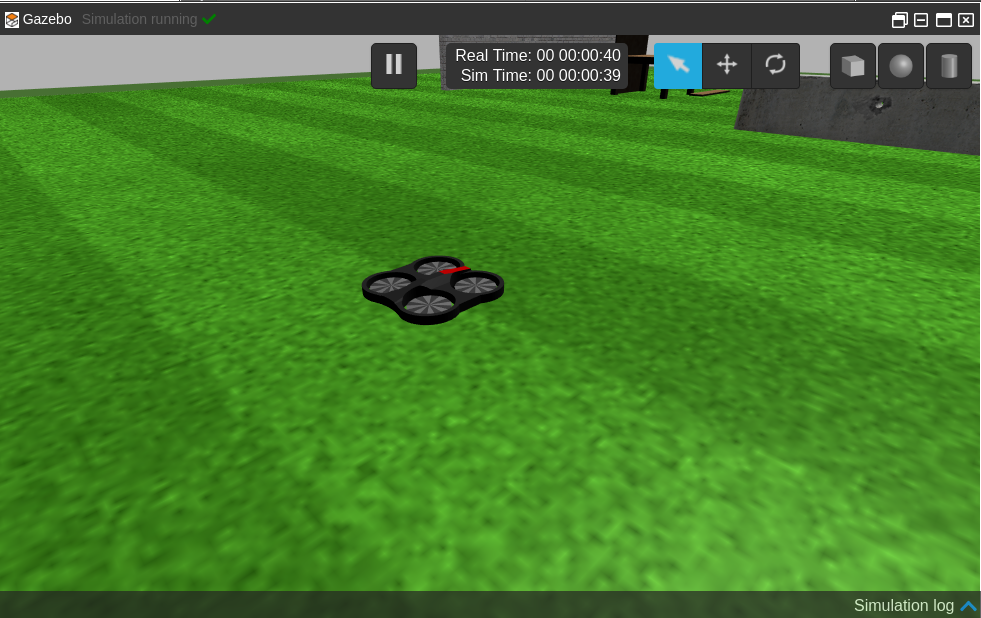
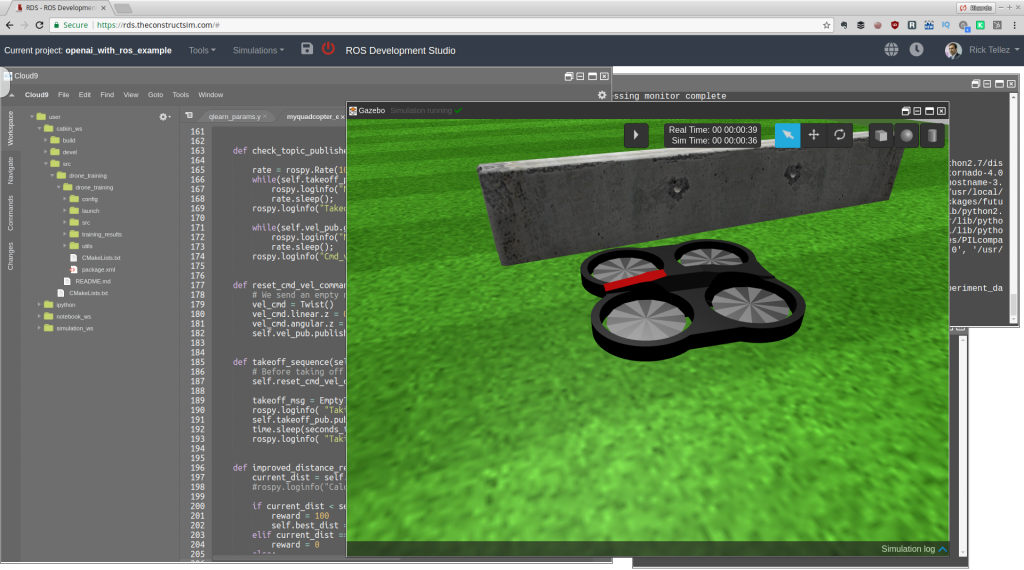
Launch the Parrot drone simulation. On RDS, you can find it as Parrot AR.Drone at the menu Simulations. After launching, you show see a window like this.
Parrot Drone with ROS simulation
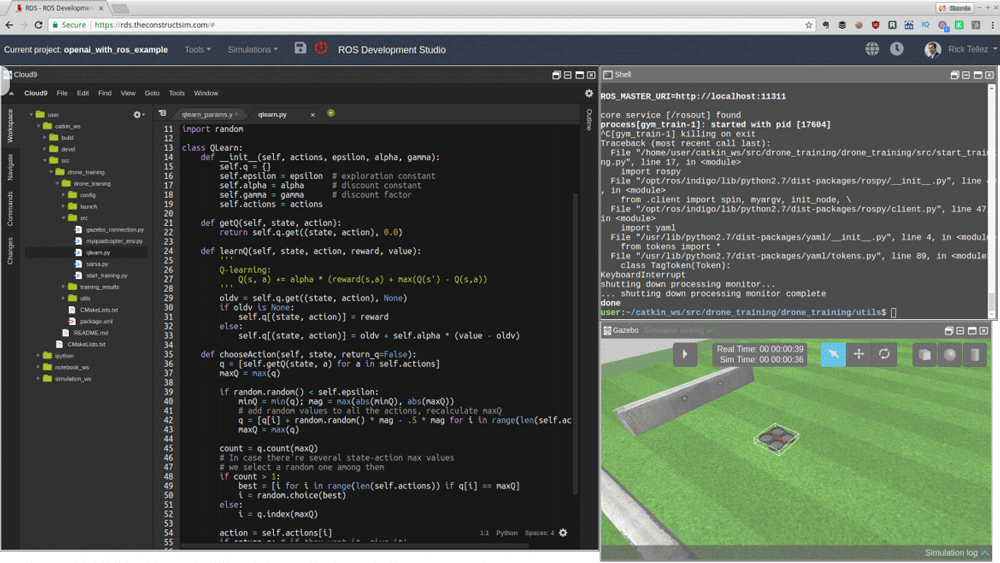
Let’s launch our package so it will start training the Parrot drone. For that, type the following in the previous shell:
> roslaunch drone_training main.launch
You should see the drone start moving doing some strange things. It actually looks like the drone is drunk! That makes perfect sense.
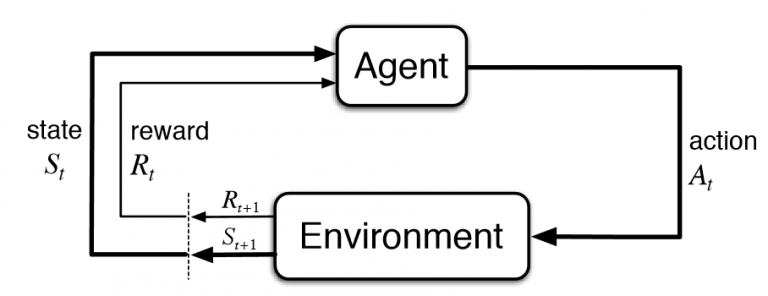
What is happening is that the robot is learning. It is exploring its space of actions and practicing what it will sense based on the actions that it takes. That is exactly how the reinforcement learning problem works. Basically, the robot is performing the classical RL loop o the figure:
How a reinforcement learning problem works (image from StackOverflow)
The agent (the drone plus the learning algorithm), decides to take an action from the pool of available actions (for example, move forward), and executes it in the environment (the drone moves forward). The result of that action, makes the agent closer or not to its target (to fly to a given location). If the robot is closer, it gets a good reward. If it is further away, it gets a bad reward. In any case, the agent perceives the current state of itself and the environment (where it is located now), and then feeds reward, previous state, new state and action taken to the learning algorithm (to learn the results based on its actions). Then the process repeats again for the number of steps the robot is allowed to experiment. When the number of steps is done, the final reward is obtained and the robot starts again from the initial position, now with an improved algorithm. The whole process is repeated again and again for a given number of episodes (usually high).
Now, let’s see how all that works together in the code. Let’s see its structure:
The drone_training package for OpenAI training with ROS
This package is just an example of how you can interface OpenAI with ROS robots. There are other ways of doing it, and in future posts we will explore them.
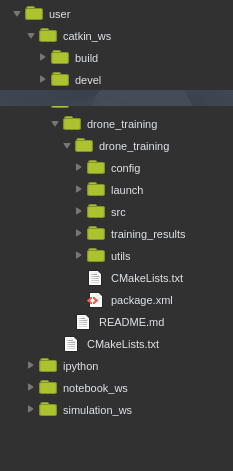
The package contains the following directories:
launch directory. It contains the main.launch file that we used to launch the whole training thing.
config directory. It contains a configuration file qlearn_params.yaml with the desired parameters for the training. Usually, you need to tune the parameters by trying several times, so it is a good practice to keep them structured on a file or files for easier modification/review.
training_results directory. It will contain the results of our training for later analysis.
utils directory. Contains a Python file plot_results.py that we will use to plot the training results.
src directory. The crux of the matter. It contains the code that makes possible the training of the drone. Let’s have a deeper look at this one.
The src directory
The launch file will launch the start_training.py file. That is the file that orchestrates the training. Let’s see what it does step by step:
Initializes the ROS node
rospy.init_node('drone_gym', anonymous=True)
Of course, first thing is to declare that code as a node of ROS.
Creates the Gym environment
env = gym.make('QuadcopterLiveShow-v0')
That is the main class that OpenAI provides. Every experiment of OpenAI must be defined within an environment. By organizing like that, different developers can test different algorithms always comparing against the same environment. Hence we can compare if an algorithm is better than another always on the same conditions.
The environment defines the actions available to the agent, how to compute the reward based on its actions and results, and how to obtain the state of the world of the agent.
Every environment in OpenAI must define the following things:
A function _reset that sets the training environment to its initial state.
A function _step that makes the changes in the environment based on the last action taken, and then observes what the new state of the environment is. Based on those two things, it generates a reward.
A function _seed used for initializing the random number generator.
A function render function used to show on screen what is happening in the environment.
What is the task that the agent has to solve in this environment.
The number of possible actions in the environment. In our case, we are allowing the robot to take 5 actions.
A way to compute the reward obtained by the agent. Those are the points provided to the agent on each step, based on how good or how bad has it done in the environment to solve the task at hands.
A way to determine if the task at hands has been solved.
We are going to see how to do the code of the environment below.
Loading the parameters of the algorithm from the ROS param server
In this case we are using a Qlearning reinforcement learning algorithm. But you can use any other of the available (including deep learning) or encode your own.
That is the key part that we want to test. How good is this algorithm for solving the task at hands.
Implementation of the training loop
The training loop is the one that repeats the learning cycle explained above. That is where the learning code is executed. It basically consists of two main loops:
First we have a loop with the number of episodes that the robot will be tested. Each episode means the number of times that we will allow the robot to try to solve the task.
Second, we have the loop with the number of steps. For each episode, we allow the robot to take a given number of actions, number of steps, number of loops into the reinforcement cycle. If the robot consumes all the steps, we consider it has not solved the task and hence, a new episode must start.
The number of episodes loop
It starts with the code:
for x in range(nepisodes):
Remember that the number of episodes is a parameter from the config file. The loop basically does is to reset the environment (initialize the robot) so a new trial can start from the original position. It also gets the initial state observation required by the learning algorithm to generate the first action.
observation = env.reset()
The number of steps loop
It starts with the code:
for i in range(nsteps):
and basically what it does is:
Make the learning algorithm choose an action based on the current state
action = qlearn.chooseAction(state)
Execute the action in the environment
observation, reward, done, info = env.step(action)
Get the new state after the action
nextState = ''.join(map(str, observation))
Learn from that result
qlearn.learn(state, action, reward, nextState)
And that is all. That simple. The loops will repeat based on the parameters values, and once they finish, the log files will generate in the training_results directory.
About the learning algorithm
In this example, we are using the Qlearn reinforcement learning algorithm. That is a classical algorithm of reinforcement learning. You can find here a description of it.
The code for the Qlearn algorithm is provided in the qlearn.py file. It has been taken from Victor Mayoral’s git, and you can find the original code here (thanks Victor for such a good work!).
You could change this algorithm for another one that you may have developed and that is going to be the next hit in artificial intelligence. Just create the code (like the qlearn.py) with the same inputs and outputs, and then substitute the call in the start_training.py file. That is the greatness of the OpenAI framework: that you can just plug your algorithm, and do not change anything of the rest, and the whole learning system will still work. By doing this, you can compare your algorithm with the others under the exact same conditions.
Additionally, we have included in the repo another classic reinforcement learning algorithm called Sarsa (sarsa.py).
Here your first homework!
Change the learning algorithm inside the start_training.py file by the Sarsa algorithm, and watch if there is any difference in learning speed or improved behavior.
The Gym environment
As I said, the environment defines the actions available to the agent, how to compute the reward based on its actions and results, and how to obtain the state of the world of the agent, after that actions have been performed.
OpenAI provides an standarized way of creating an environment. Basically, you must create an environment class which must inherit from gym.Env. That inheritance, entitles you to implement within that class the functions _seed,_reset and _step (explained above).
In our case, we have created a class named QuadCopterEnv. You can find the code in the myquadcopter_env.py file.
The code starts by registering the class into the pool of available environments of OpenAI. You register a new environment with the following code:
Then the class starts initializing the topics it needs to connect to, gets the configuration parameters from the ROS param server, and connects to the Gazebo simulation.
Now it is time for the definition of each of the mandatory functions for an environment.
In the function _seed, we initialize the random seed, required to generate random numbers. Those are used by the learning algorithm when generating random actions
In the function _reset we initialize the whole environment to a known initial state, so all the episodes can start with the same conditions. Very simple code. Just resets the simulation, and clears the topics. The only special thing is that at the end of the function we pause the simulation, because we do not want the robot be running while we are doing other computational tasks. Otherwise, we would not be able to guarantee the initial conditions for all the episodes, since it would largely depend on the execution time of other algorithms in the training computer.
The main function is the _step function. This is the one that is called during the loops of training. This function receives as a parameter the action selected by the learning algorithm. Remember that that parameter is just the number of the action select, not the actual action. The learning algorithm doesn’t know which actions we have for this task. It just knows the number of actions available and it picks one of them based on its current learning status. So what we receive here is just the number of the action selected by the learning algorithm.
The first thing we do is to convert that number into the actual action command for the robot. That is what this code does, it converts the number into the movement action that we will send to the ROS robot:
Next step is to send the action to the robot. For that, we need to unpause the simulator, send the command, wait for some time for the execution of the command, take an observation of the state of the environment after the execution, and pause again the simulator.
Then, we process the current state of the robot/environment to calculate the reward. For the reward, we are taking into account how close to the desired position the drone is, but also other factors like the inclination of the drone, or it height. Additionally, we promote moving forward against turning.
Finally, we return the current state, the reward obtained and a flag indicating if this episode must be considered done (either because the drone achieved the goal, or either because it went against the conditions of height or inclination).
 state = [data_pose.position.x]
 return state, reward, done, {}
Basically, that’s it. The code above calls additional functions that you can check by looking into the QuadCopterEnv class. Those are the functions that do the dirty job of calculating the actual values, but we don’t need to review them here, because they are out of the scope of this subject.
One function that we may need to cover, though, is the function that computes the reward. Its code is the following:
def process_data(self, data_position, data_imu):
 done = False
 euler = tf.transformations.euler_from_quaternion([data_imu.orientation.x,
                                                   data_imu.orientation.y,
                                                   data_imu.orientation.z,
                                                   data_imu.orientation.w])
 roll = euler[0]
 pitch = euler[1]
 yaw = euler[2]

 pitch_bad = not(-self.max_incl < pitch < self.max_incl)
 roll_bad = not(-self.max_incl < roll < self.max_incl)
 altitude_bad = data_position.position.z > self.max_altitude

 if altitude_bad or pitch_bad or roll_bad:
   rospy.loginfo ("(Drone flight status is wrong) >>> ("+str(altitude_bad)+","+str(pitch_bad)+","+str(roll_bad)+")")
   done = True
   reward = -200
 else:
   reward = self.improved_distance_reward(data_position)

 return reward,done
That code, basically does two things:
First, detects if the robot has surpassed the previously defined operation limits of height and inclination. If that is the case, it considers the episode done
Computes the reward based on the distance to the goal
How to configure the test
You can find a yaml file in the config directory containing the different parameters required to configure the learning task. I have divided the parameters in two types:
Parameters related to the learning algorithm being used: those are the parameters that my algorithm needs. In this case, are specifically for a Qlearn algorithm. You would define here the ones your algorithm needs, and then read them in the start_training.py file
Parameters related to the environment: those are parameters that affect the way the reward is obtained, and hence, they affect the environment. Those include the goal position or the conditions for which an episode can be considered aborted due to unstable drone conditions (too much altitude or too much inclination).
How to plot the results of the training
Plotting results is very important because you can visually identify if your system is learning or not, and how fast. If you are able to early identify that your system is not learning properly, then you can modify the parameters (or even the conditions of the experiment), so you can retry fast.
In order to plot the results, I have provided a Python script in the utils directory that does the job. I did not create the code myself, I took it from somewhere else, but I cannot remember from where (if you are the author and want to have the credit just contact me). To launch that code just type on the utils directory:
> python plot_results.py
The script will take the results generated in the training_results directory and generate a plot with all the rewards obtained for each episode. In order to watch the plot, you must open the Graphic Tools window (Tools->Graphic Tools). You must see something like this:
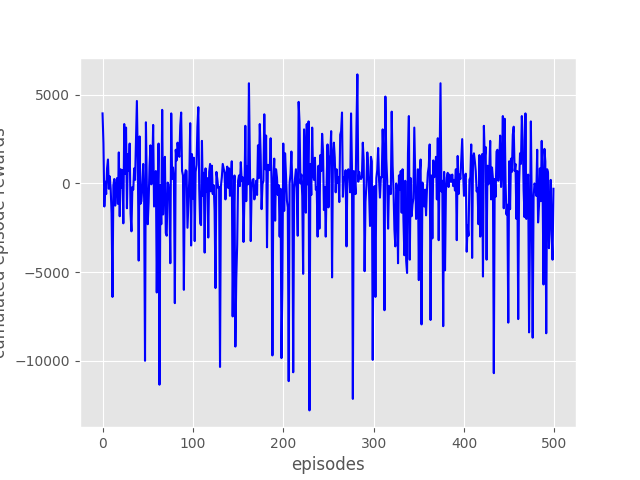
For this post, I have run the code provided to you (as the version of 8 Feb2018) for 500 episodes, and the results are not very good, as you can see in the following figure
In that figure, you can see that there is no progress in the reward, episode after episode. Furthermore, the variations in the reward values look completely random. This means that the algorithm is actually not learning at all about the problem trying to solve. What can be the reasons for that? Well, I can figure out a few. The goal for the engineer is to devise ways to modify the learning situation so the learning can actually be accomplished. Some possible reasons why is not learning:
The reward function is not properly created. If the reward is too complex, the system may not be able to capture small baby steps of improvement.
The state provided to the learning algorithm is continuous, and Qlearning is not well suited for that. As you can see in the code, we are returning the current robot position in the x axis as the state of the environment. That is a continuous value. I would suggest to discretize the state into different zones (let’s say 10 zones). Each zone meaning getting closer and closer to the goal point.
The parameters of the learning algorithm are not correct.
The experiment is not completely sound per se. Take into account that the goal position of the robot is fixed, and that the obstacles cannot be detected by the robot (he can only infer their position after crashing many times against it in several episodes).
What is clear is that the structure of the training environment is correct (by structure, I mean the organization of the whole learning system). That is a good point, since it allow us to start looking for ways to improve the learning from within a learning structure that already works.
How to improve the learning
This example is massively improvable (as the plot of the results are showing ;-). Here a list of suggestions where you can improve the system to make it learn quickly and better solutions:
Take the observations/state in (x,y, z) instead of only x. Also, discretize the state space.
Make the robot detect obstacles with sonar sensor and use it to avoid obstacles.
Make the robot go to random points, not only to a fixed point
That is your homework!
Apply any of those improvements, and send me your plots of the improved reward evolution, and videos showing how the drone has learnt to do the task. We will publish them in our social channels giving you credit about it.
ROS Developers Live Show about this example OpenAI with ROS
We recently did a live class showing how all the explained above works in real time with many people attending at the same time and doing the exercises with me. It may clarify you all the content above. Have a look here:
We do a ROS Developers Live Show every Wednesday at 18:00 CET. You may want to subscribe to our Youtube channel in order to stay notified of our future Live Show.
Additionally, we have created an online course where to learn all the material above and other things about OpenAI for robotics. It is online with all the simulations integrated and requires just a web browser (you can do the exercises with ROS even from Windows!). You can find it here: OpenAI Gym for Robotics 101 (additionally, in case you like it, you can use the discount coupon 2AACEE38 for a 10% discount).
Conclusion
OpenAI is a very good framework for training robots to do things using the latest techniques in artificial intelligence. Also, as you have seen, it is not difficult to integrate with ROS based robots. This makes the tandem OpenAI+ROS a killer combination for robot development!
If you still have doubts, write your questions below the post and we will try to answer them all. Happy robot training!
Last week I was talking to one lead engineer of a Singapore company which is building a benchmarking system for robot solutions. Having seen my presentation at ROSCON2016 about robot benchmarking, he asked me how would I benchmark solutions that are non-ROS compatible. I said that I wouldn’t. I would not dedicate time to benchmark solutions that are not ROS based. Instead, I suggested, I would use the time to polish the ROS-based benchmarking and suggest the vendors to adopt that middleware in their products.
Benchmarks are necessary and they need standards
Benchmarks are necessary in order to improve any field. By having a benchmark, different solutions to a single problem can be compared and hence a direction for improvement can be traced. Up to the present, robotics lacks such benchmarking system.
I strongly believe that in order to create a benchmark for robotics we need a standard at the level of programming.
By having a standard at the level of programming, manufacturers can build their own hardware solutions at will, as far as they are programmable with the programming standard. That is the approach taken by devices that can be plugged into a computer. Manufacturers create the product on their own terms, and then provide a Windows driver that allows any computer in the world (that runs on the Windows standard) to communicate with the product. Once this communication computer-to-product is made, you can create (Windows) programs that compare the same type of devices (from different manufacturers) for performance, quality, noise, whatever your benchmark is trying to compare.
You see? Different types of devices, different types of hardware. But all of them can be compared through the same benchmarking system that relies on the Windows standard.
Software development for robots also needs standards
The need for standards is not only required for comparing solutions but also to speed robotics development. By having a robotics standard, developers can concentrate on building solutions that do not have to be re-implemented whenever the robot hardware changes. Actually, given the middleware structure, developers can disassociate so much from the hardware that they can almost rely 100% of its time in the software realm while developing for robotics (something that software developers like very much, to be away from the hardware. Actually, this is one of the reasons why so few good software developers exists in robotics (most of us are a mix of hardware and software… now you understand the current state of AI for robotics ;-)).
We need the same type of standard for robotics. We need a kind of operating system that allows us to compare different robotics solutions. We need the Windows of the PCs, the Android of the phones, the CAN of the buses…
A few standard proposals and a winner
But you already know that. I’m not the first one to state this. Actually, there have been many people already that tried to create such standard. Some examples include Player, ROS, YARP, OROCOS, Urbi, MIRA or JdE Robot, to name a few.
Personally, I actually don’t care which the standard is. It could be ROS, it could be YARP or it could be any other that still has not been created. The only thing I really care is that we adopt a standard as soon as possible.
And it looks like the developers have decided. Robotics developers prefer ROS as their common middleware to program robots with.
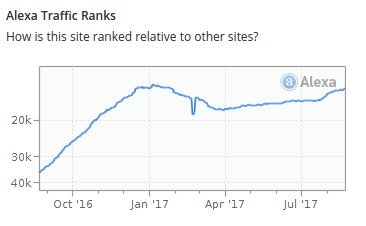
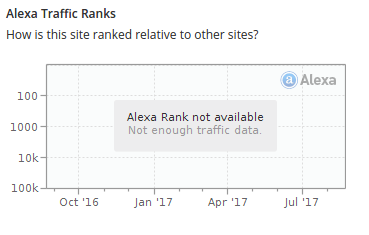
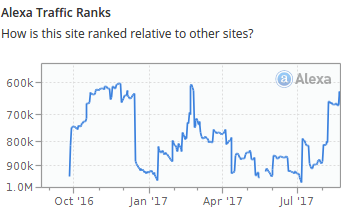
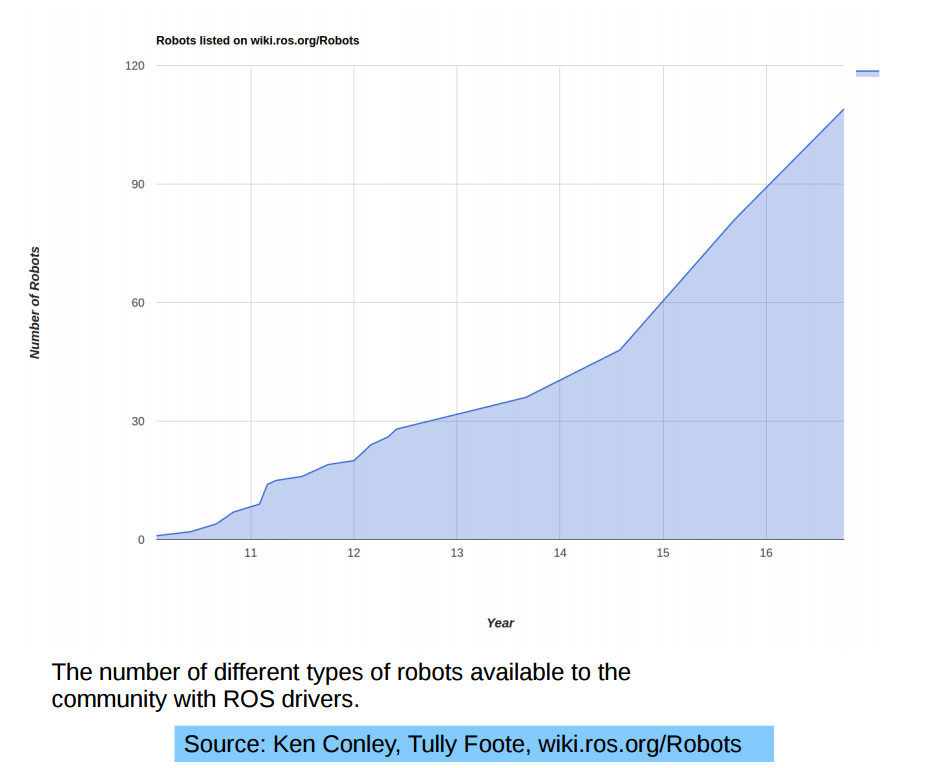
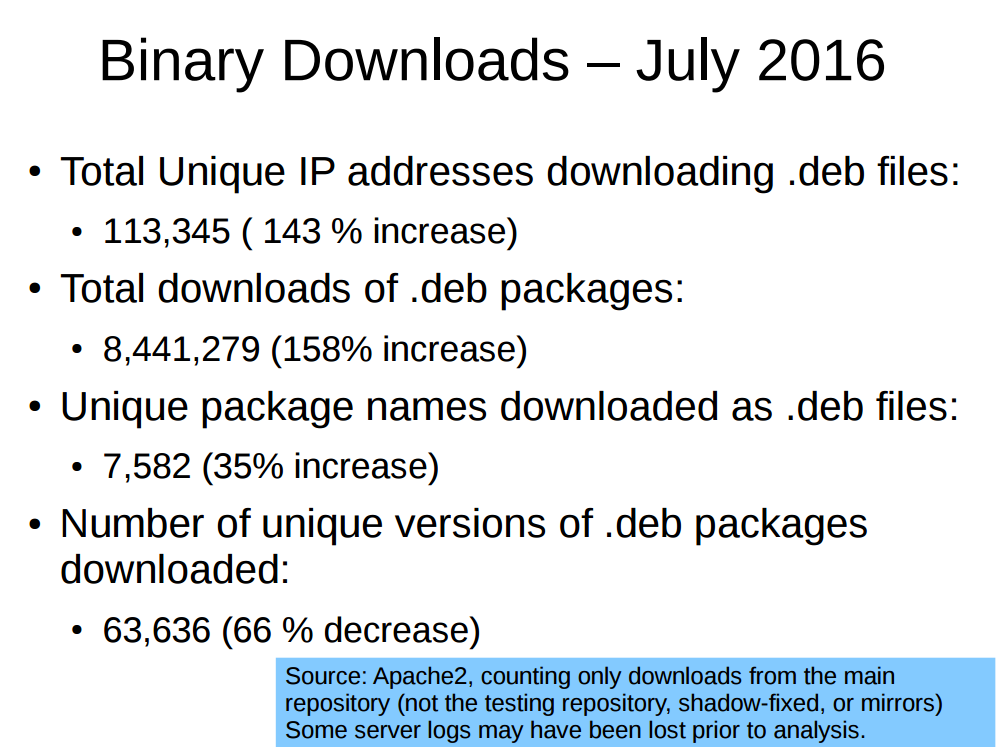
No other middleware for robotics has had so large adoption. Some data about it:
Note 1: Only showing the current big three players
Note 2: Very simple comparison. Difficult to compare in other terms since data is not available
Note 3: Data measured in August 2017. May vary at the time you are reading this. Links provided on the numbers themselves, so you can check by yourself.
So it is not only the feeling that we, roboticists, have. Also the numbers indicate that ROS is becoming that standard for robotics programming.
Why ROS?
The question is then, why has ROS emerged on top of all the other possible contestants. None of them is worst than ROS in terms of features. Actually you can find some feature in all the other middlewares that outperform ROS. If that is so, why or how has ROS achieved the status of becoming the standard ?
A simple answer from my point of view: excellent learning tutorials and debugging tools.
Here there is a video where Leila Takayama, early developer of ROS, explains when she realized that the key for having ROS used worldwide would be to provide tools that simplify the reuse of ROS code. None of the other projects have such a set of clear and structured tutorials. Even less, those other middlewares provide debugging tools into their packages. Lacking those two essential points are preventing new people to use their middlewares (even if I understand the developers of OROCOS and YARP for not providing it… who wants to write tutorials or build debugging tools… nobody! 😉 )
Additionally, it is not only about Tutorials and Debugging-Tools. ROS creators also managed to create a good system of managing packages. The result of that is that developers worldwide could use others packages in a (relatively) easy way. This created an explosion in ROS packages available, providing off-the-shelf almost anything for your brand new ROSified robot.
Now, the rate at which contributions to the ROS ecosystem are made is so big that makes ROS almost unstoppable in terms of growing.
What about companies?
At the beginning, ROS was mostly used by students at Universities. However, as ROS becomes more mature and the number of packages increases, companies are realizing that adopting ROS is also good for them because they will be able to use the code developed by others. On top of that, it will be easier for them to hire new engineers already knowing the middleware (otherwise they would need to teach the newcomers their own middleware).
To bring things further, two Spanish companies have revolutioned the standarization of robotics products towards the ROS middleware: in one side, Robotnik has created the ROS Components shop. A shop where anyone can buy ROS compatible devices, starting from mobile bases to sensors or actuators. On the other side, Erle Robotics (now Acutronic Robotics) is in the process of developing Hardware ROS. The H-ROS is a standardized software and hardware infrastructure to easily create reusable and reconfigurable robot hardware parts. ROS is taking the hardware standarization too! But this time is made by companies, not research! That must mean something…
Finally, it looks like industrial robots manufacturers have understood the value that a standard can provide to their business. Even if they do not build their industrial robots ROS enabled from scratch, they are adopting the ROS Industrial flavour of ROS, which allows them to ROSify their industrial robots and re-use all the software created for manipulators in the ROS ecosystem.
But are all companies getting into the ROS bus? Not all of them!
Some companies like Jibo, Aldebaran or Google still do not rely on ROS for their robots programming. Some of them rely on their own middleware created previously to the existence of ROS (that is the case of Aldebaran). Some others, though, are creating their own middleware from scratch. Their reasons: do not believe ROS is good, they have already created a middleware, or do not want to develop their products depending on the middleware of others. Those companies have very fair reasons to go their way. However, will that make them competitive? (if we have to judge from previous history, mobiles, VCRs, the answer may be no).
So is ROS the standard for programming robots?
That is a question still too soon to be answered. It looks like it is becoming the standard, but many things can change. It is unlikely that another middleware takes the current number one middleware title from ROS. But it may happen something that wipes ROS out of the map (may be Google will release its middleware to the public (like they did with Android) and take the sector by storm?).
Still, ROS has its problems, like a total lack of security or the instability of some important packages. Even if the OSRF group are working hard to build a better ROS system (for instance ROS2 is in beta phase with many root improvements), some hard work is still required for some basic things (like the ROS controllers for real robots).
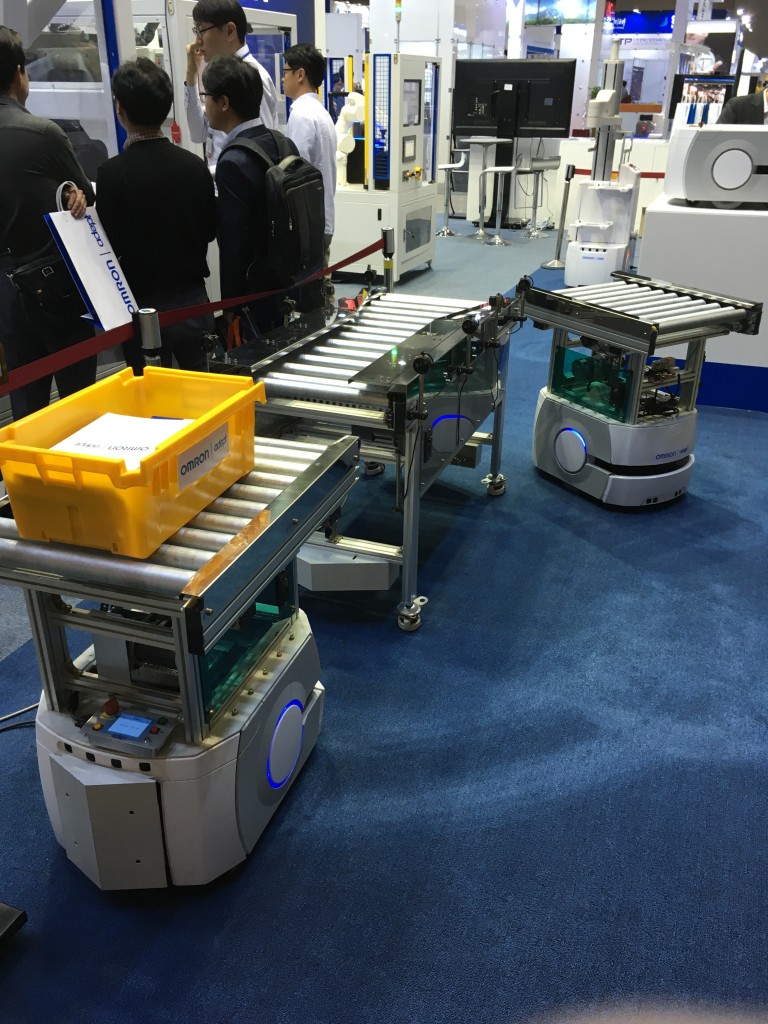
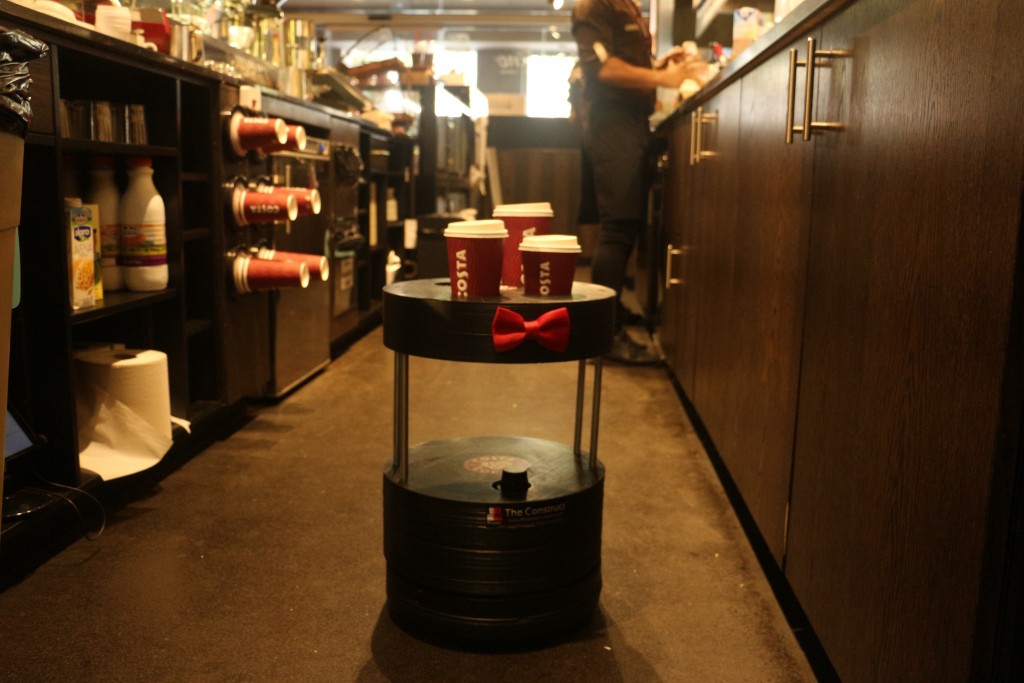
Given those numbers, at The Construct we believe that ROS IS THE STANDARD (that is why we are devoted to creating the best ROS learning tutorials of the world). Actually, it was thanks to this standardization that two Barcelona students were able to create an autonomous robot product for coffee shops in only three months from zero knowledge of robotics (see Barista robot).
This is the future that is coming, and it is good. On that future, thanks to standards, almost anyone will be able to build, design and program their own robotics product, in a similar way as PC stores are building computers today.
So my advice, as I said to the Singapore engineer, is to bet for ROS. Right now, it is the best option for a robotics standard.
In the last years, unit testing has become more popular in a lot of programming languages. It’s a very useful practice to any kind of program or project. The problem is “How do I start testing?”. If you have already a project that has not being tested from it’s beginning, it becomes hard to start, but not impossible!
Unit testing requires some practices from the developer. If you want to follow the TDD (Test Driven Development), you have to create your tests before coding the logic of your functions and methods. Unit testing is a way to test small parts of a project, in order to help you integrating all of them, or even understand why the whole project is not working the way you expected.
In this post, you’ll see a simple example of unit testing using C++, for a very simple ROS Package. The logic itself is not meaningful in a robotic application, but the configuration of the class and the unit testing is valuable for using in other projects. So, let’s start!
Are you having problems to make your robot navigate because of the kind of data you have to treat? It’s very common to get stuck when we have to work with quaternions, instead of RPY angles. Quaternions are used in robotics to represent the rotation, in 3 axis, of a rigid body in respect with a coordinate frame. But sometimes it’s too much for what we want to do.
In this post, we are going to see how to get only the necessary data from a quaternion for a 2D application. It is very helpful, since robotics algorithms works with quaternions, but user’s interface, RPY angles.
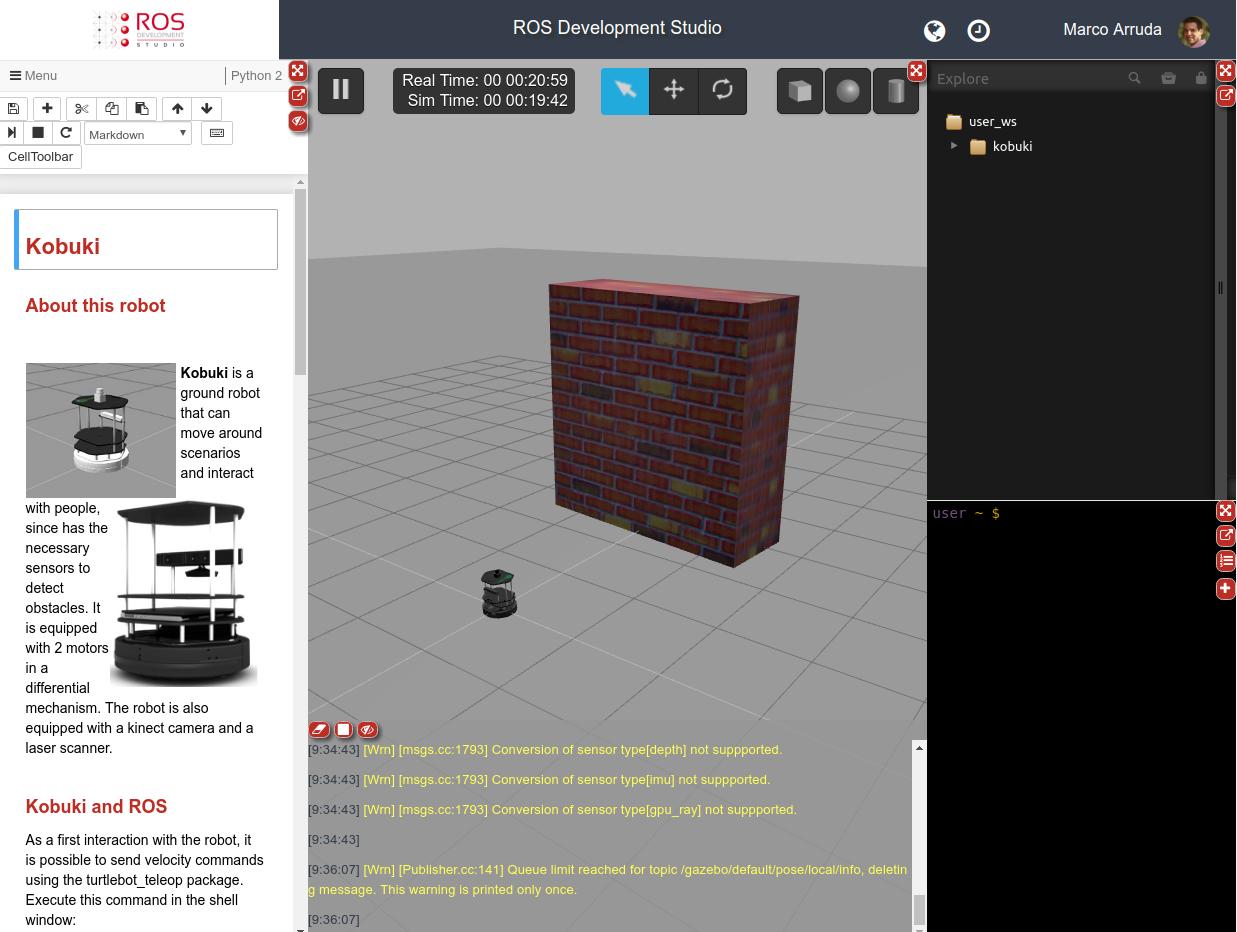
Let’s start with a robot, to make it clear. In this post, we are going to use the Turtlebot simulation, available in ROS Development Studio (RDS).
Turtlebot Simulation
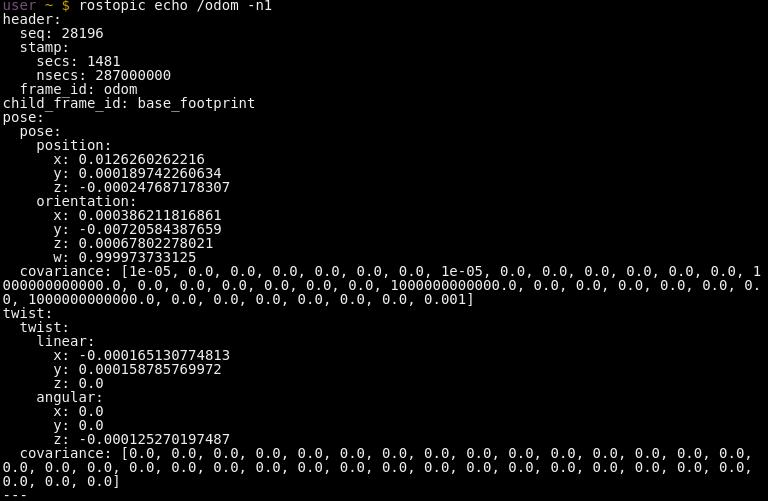
We have provided by the robot sensors a /odom topic, which publishes messages of the nav_msgs/Odometry type. See below a single message example:
Odometry message
Now, unless you have a path described using quaternions, we need to convert this quaternion to RPY. To do the following, we will use the TF library. In the image below, you can see the program in charge of this task:
First, we are creating a node and subscribing the /odom topic. In the callback of this subscriber, we are getting the information that matters for us, which are the X, Y and Yaw data. To have the Yaw angle, we are using the quaternion data and converting to RPY (We need a Matrix3x3 object in the middle process). Since our robot has only three degrees of freedom (linear in X and Y, angular in Z), we are not considering Roll and Pitch, the Pose2D message type is enough for us. This is a simplification for a ground robot navigating in a planar scenario.