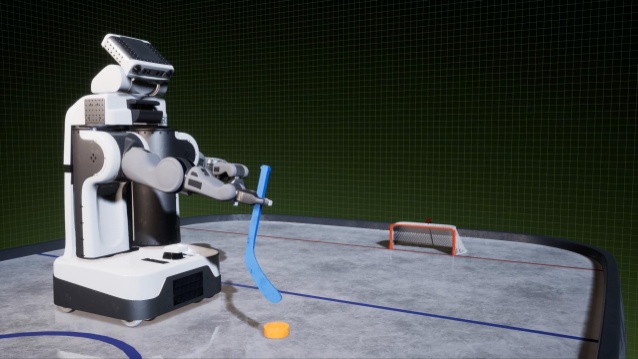
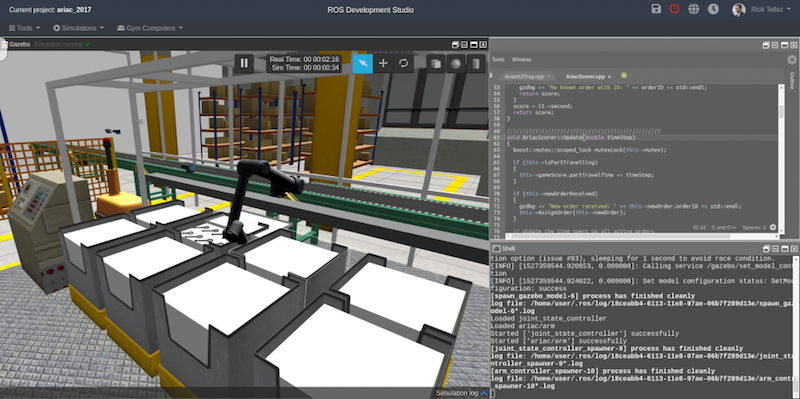
In this docs you are going to find necessary information to make the most of ROSDS – ROS Development Studio.
From creating scripts for the robot simulations we provide to testing an artificial intelligence algorithm for a specific problem you are working on. ROSDS is the tool that can help you on robotics development.
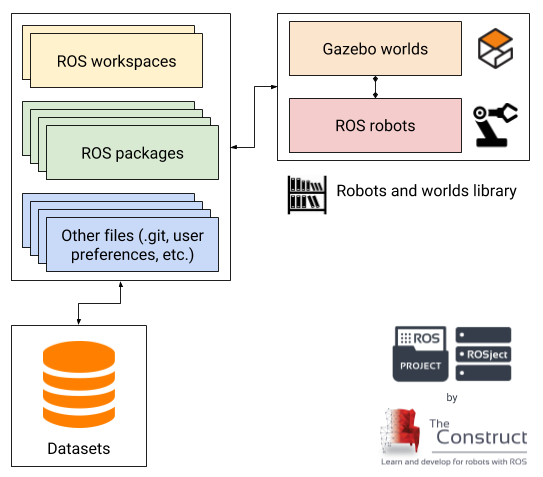
Organized ROS projects – ROSjects!
What is a ROSject?
Starting from the drama ROS developers have in life, how to separate scripts, packages or even workspaces in a manner I can reuse programs and simulations organized? Our team of engineers agreed to provide different workspaces, one for simulations and another for scripts (navigation, control, perception, etc.). All included in a single ROSject!
Basically, in ROSDS you have a Dashboard where you can see the list of ROSjects (ROS project). And each ROSject is a fresh new home directory (like the one you have in a common local computer: /home/user/). Inside of each ROSject a developer can create as many workspaces as needed. Any other file will be kept in your ROSject. Since it is saved properly, all of your development area will be restored next time you open a ROSject in our environment.
Finally, a ROSject is easily connected to any simulation and gazebo worlds chosen by our team of engineers. Furthermore, developers can create datasets. A bucket to save massive data, for example, pack of images for artificial intelligence learning!
In order to start using ROSDS, go to http://rosds.online sign up and create a new ROSject!
When you click in the ROSject link, you will get a copy of the ROSject. You can then download it if you want to use it on our local computer, or you can just click Open to have it opened in ROSDS.
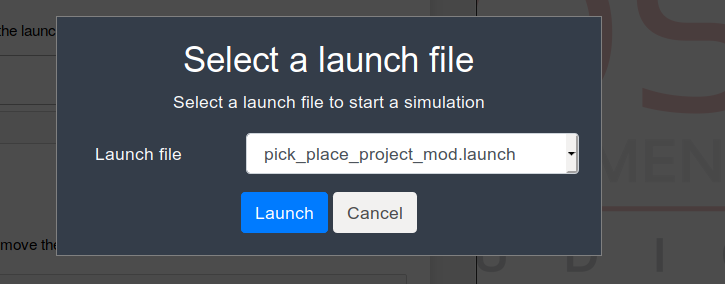
Once you have it open, you launch the simulation through the Simulation -> Select a launch file button. Then, in the pr2_description package select the pick_place_project_mod.launch launch file.
pr2_description pick_and_place_project_mod.launch in ROSDS
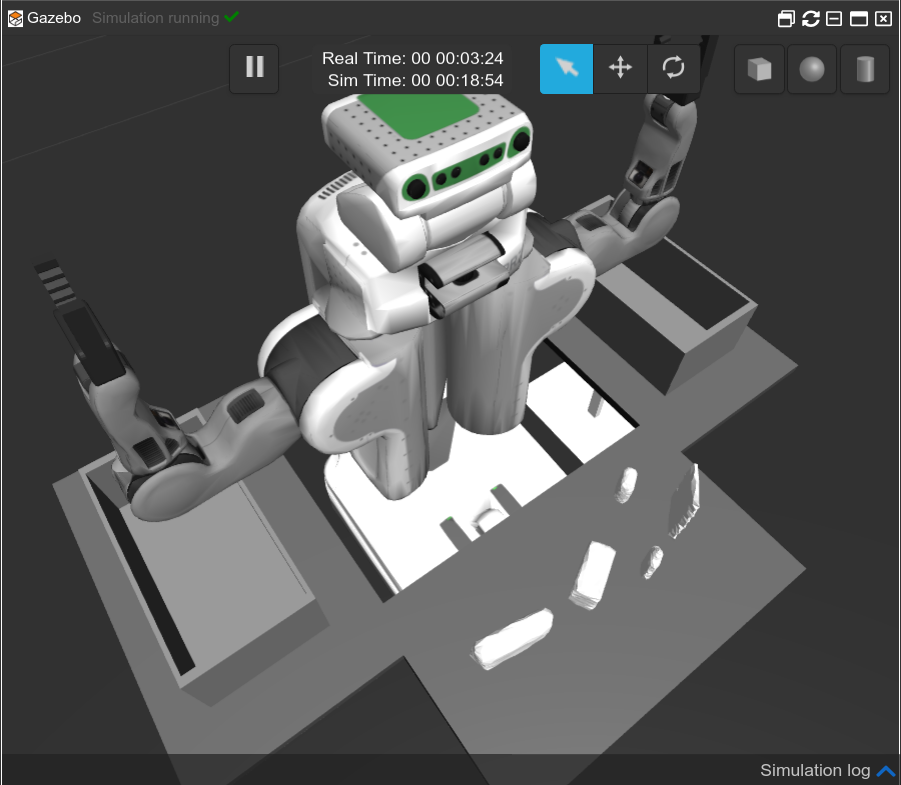
The following simulation should appear in your screen after a few seconds:
pr2 robot up and running in ROSDS
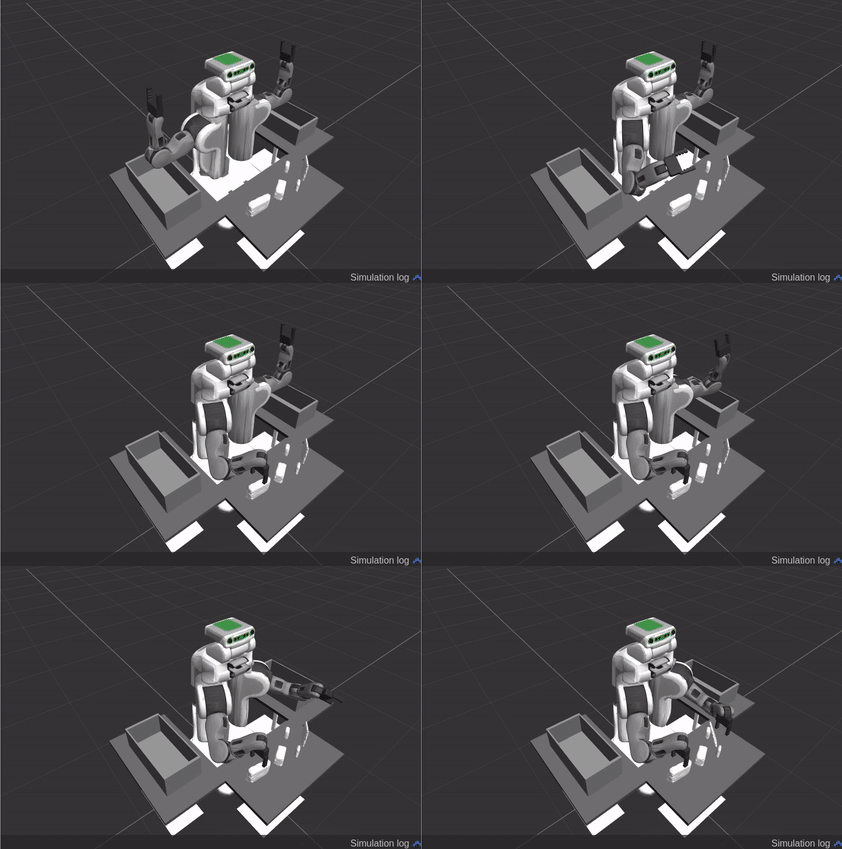
Launch a Moveit Arms test
Now that the simulation is running, you can run the demo that moves the arms of the robot using MoveIt!. For that, you can open a web shell (Tools->shell) and then type the following command:
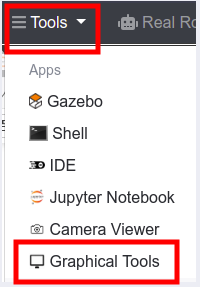
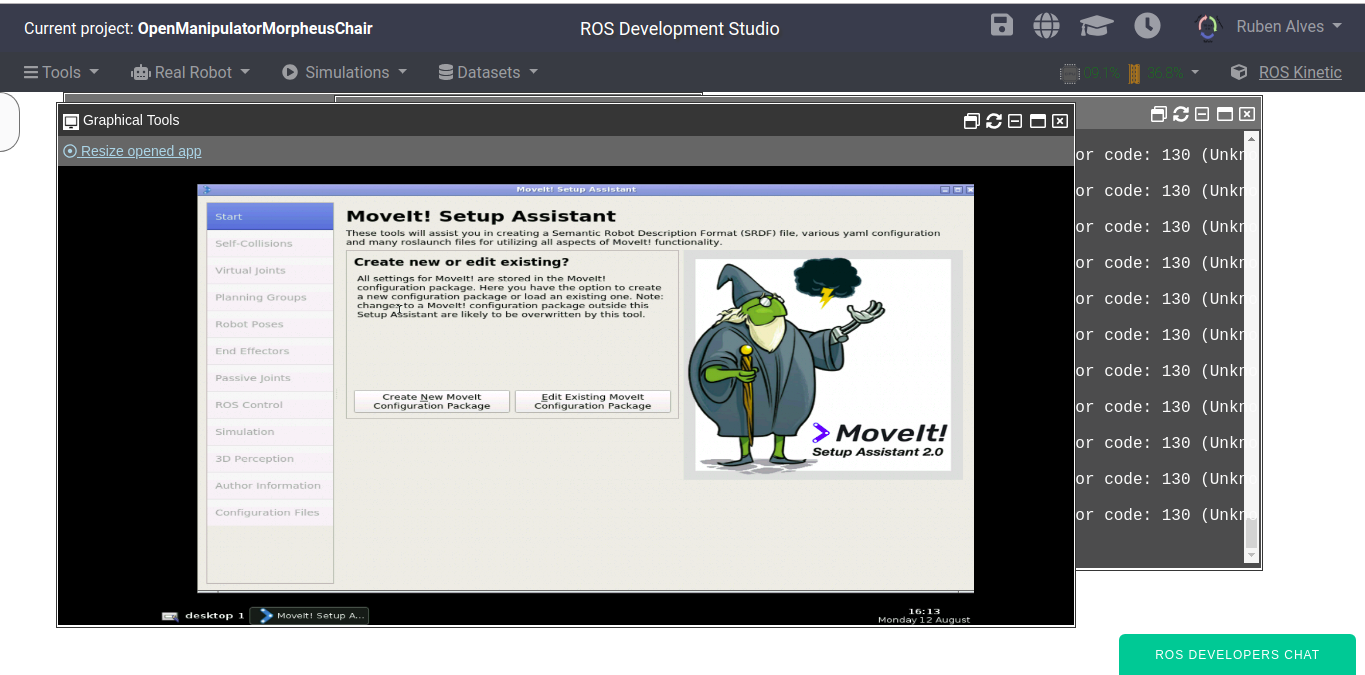
Once launched that command, in order to see the window of the setup assistant, you need to open the Graphical Tools by clicking (Tools->Graphical Tools):
Launching Graphical Tools in ROSDS
then the Setup Assistant will appear:
To better understand how to setup MoveIt!, now we recommend you check the video (https://youtu.be/wNGIrYtidME?t=277) that contains detailed explanation. In the video, we also give a detailed explanation about the file used to move the arms.
Youtube Video
So this is today’s post. Remember that we have the live version of this post on YouTube. If you liked the content, please consider subscribing to our youtube channel. We are publishing new content ~every day.
A couple of months ago I interviewed Joel Esposito about the state of robotics education for the ROS Developers Podcast #21 (Joel Esposito is a Professor in the System Engineering Department at the United States Naval Academy). On that podcast, Joel talks about his deep research on how robotics is taught around the world. He identifies a set of common robotics subjects that need to be explained in order to make students know about robotics, and a list of resources that people are using to teach them. But most important than that, he points out the importance of practicing with robots what students learn.
From my point of view, robotics is about doing, not about reading. A robotics class cannot be about learning how to compute the Jacobian of a matrix to find the inverse kinematics. Computing the Jacobian has nothing to do with robotics, it is just a mathematical tool that we use to solve a robotics problem. That is why a robotics class should not be focused on how to compute the Jacobian but on how to move the end effector to a given location.
👨🎓:I want to move this robotic arm’s end effector to that point, how do I do it? 👨🏫:Well, you need to represent the current configuration of the arm in a matrix! 👨🎓:Ah, ok, how do I do that? 👨🏫:You need to use a matrix to encode its current state. Let’s do it. Take that simulated robot arm and create a ROS node that subscribes to the /joint_states and captures the joint values. From those values, create a matrix storing it. It has to be able to modify the matrix at any time step, so if I move the arm, the matrix must change. […] 👨🎓:Done it! So what do I have to do now if I want to make the robot put the gripper close to this bottle? 👨🏫:Then you need to compute the Jacobian. Let’s do it! Create a program that allows to manually introduce a desired position for the end effector. Then based on that data, compute the Jacobian. 👨🎓:How do I compute the Jacobian? 👨🏫:I love that you ask me that!☺️ …
I understand that learning and studying theory is a big part of robotics, but not the biggest. The biggest should be practicing and doing with robots. For that, I propose to use ROS as the base system, the enabler, that allows practical practice (does that exist?!?!) while learning the robotics subjects.
The proposal
Teaching subjects as complex as inverse kinematics or robot navigation should not be (just) a theoretical matter. Practice should be embedded into the teaching of those complex robotics subjects.
I propose to teach ROS at the same time that we teach robotics, and use the former along the whole robotics semester as a tool to build an implement the robotics subject we are teaching. The idea is that we use ROS to allow the student to actually practice what he is learning. For instance, if we are talking about the different algorithms of obstacle avoidance, we also provide a simulated robot and make the student create a ROS program that actually implements the algorithm for that robot. By following this approach, the learning of the student is not only theoretical but instead includes the practice of what is being told.
The advantage of using ROS in this procedure is that ROS already provides a lot of material already done that we can use to provide a working infrastructure, where you as a teacher, can concentrate on teaching the student how to create the small part that is required for the specific subject you are teaching.
We have so many tools at present that were not available just 5 years ago… Let’s make use of them to increase the student quality and quantity of learning! Instead of using Powerpoint slides, let’s use interactive Python notebooks. Instead of using a single robot for the whole class, let’s provide a robot simulation to each student. Instead of providing an equation on the screen, let’s provide students and the implementation of it in a ROS node for them to modify.
Not a new method
What I preach is what I practice. This is the method that I am using on my class of Robot Navigation at the University of LaSalle in Barcelona. In this class, I teach the basics about how to make a robot autonomously move from one point of the space to another while avoiding obstacles. You know, SLAM, particle filters, Dynamic Window Approaches and the like. As part of the class, students must learn ROS and use it to implement some of the theoretical concepts I explain to them, like for example, how to compute the odometry based on the values provided by the encoders.
However, I’m not alone on the use of this method for teaching robotics. For example, professor Ross Knepper from Cornell University explained to me on Using ROS to teach the foundations of robotics for the ROS Developers podcast #23. On that interview, Ross explained how he parallelizes the teaching of ROS with the robotics subject. He even goes further, forbidding students to use many ROS software like the ROS navigation stack or MoveIt! His point is very good: he wants the students to actually learn how to do it, not just how to use something that somebody else has done (like the navigation stack). But he uses the ROS infrastructure anyway.
How to teach robotics with ROS
The method would involve the following steps:
You start with a ROS class that explains the most basic topics of ROS, just what is required to start working.
Then you start explaining the robotics subject of your choice, making the students implement what you are teaching in a ROS program, using robots. I advise using simulated robots.
Whenever a new ROS concept is required for continuing the implementation of some algorithm, then a class dedicated to that subject would be given.
Continue with the next robotics subject.
Add a real robot project where students must apply all that they have learned in a single project with a real ROS-based robot.
Add an exam.
1. Explain the basic ROS concepts
For this step, you should describe the basic subjects of ROS that would allow a student to create ROS programs. Those subjects would include the following:
ROS Packages
Launching ROS Nodes
Basic ROS Line Commands
ROS Topic Subscribers
Rviz for Visualization and Debugging
It is not necessary to dedicate too much time to those subjects, just the necessary amount for a basic understanding. Deeper knowledge and understanding of ROS will be learned by practicing during the different classes of the semester. While they are trying to create the software for the implementation of the theoretical concepts, they will have to practice those concepts, and ingrain them deeply into their brains.
Importantly, explain those concepts by using simulated robots and making the students apply the concepts to the simulated robot. For example, make the students read from a topic, in order to get the distance to the closest obstacle. Or make them write to a topic to make the robot move around. Do not just explain what a topic is and provide a code on a slide. Make them actually connect to a producer of data, that is, the simulated robot.
I would also recommend that at this step you forget teaching about creating custom messages, or what are services or action clients. That is too much for such an introductory class and it is very unlikely that you are going to need it in your next robotics class.
* Resource: As a reference, you can check the syllabus of this ROS Basics In 5 Days course we created. Through our many years of ROS training, we summarized this ROS basics course, including the essential concepts and tools that can help the user understand and create any basic project related to ROS.
2. Explain and implement robotics subject
You can now proceed to teaching your robotics subject. I recommend dividing the class into two parts:
The first part will be to explain the theory of the robotics subject
The second part is to actually implement that theory. Create a program that actually does what you explained.
It may happen that in order to implement that theoretical part, the student needs a lot of pre-made code that supports the specific point you are teaching. That will mean that you have to prepare your class even harder and provide each student with all that support code. The good news is that, by using ROS, it is very likely that you will find that code already done by someone. Hence, find or develop that code, and provide it as a ROS package to your students. More about where to find the code and how to provide it to your students below.
An interesting point to include here is what Professor Knepper indicated: He creates some exercises with deliberate errors, so the students learn to recognize situations where the system is not performing correctly, and, more importantly, to create the skills necessary to figure out how to solve those errors. Take that point into consideration as well.
3. Add the new ROS concept
At some point in time, you may need to create a custom ROS message for the robotics subject that you are teaching. Or you may need to use a ROS service because you need to provide a service for face recognition. Whatever you need to explain about ROS, now is the best moment. Use that necessity to explain the concept. What I mean is that explaining a concept like ROS action servers when the student has no idea what they would be used for is a bad idea. The optimal moment to explain that new ROS concept is when it is so clear for everyone that the concept is needed.
I have found that explaining complex concepts like ROS services when the students don’t need them makes it very difficult for them to understand, even if you provide good usage examples. They cannot feel the pain of not using those concepts in their programs. Only when they are in a situation where they actually need to apply the concept, when they are feeling the pain, will the knowledge be integrated into their heads.
4. Continue with the next robotics subject
Keep pushing this way. Move to the next subject. Provide a different robot simulation. Request that the students implement. And keep going this way until you finish the whole course.
5. Real robots project
Testing with simulators is good because it provides a real life-like experience. However, the real test is when you use a real robot. Usually, universities do not have the budget for a robot for each student. That is why we have been promoting the use of simulations so much. However, some real robot experience is necessary, and most universities can afford to have a few robots for the whole class. That is the point where the robotics projects come into action.
Define a robotics project that encapsulates all the knowledge of the whole course. Make the students create groups that will test their results on the real robot. This approach has many advantages: students will have to summarize all the lessons into a single application. They will have to make it work in a real robot. Additionally, they will have to work in teams.
In order to provide this step to the students, you will need to prepare the following:
A simulation of the environment where the real robot will be executing. This allows the students to practice most of the code in the simulator, in a faster way. It also allows you to have some rest (otherwise, the students may require your presence all the time at the real robot’s lab). 😉
You cannot escape providing some hours per week for the students to practice with the real robot. So schedule that.
Finally, decide on a day when you will evaluate the project from each team. That is going to be called demo day. On demo day, each group has to show how their code is able to make the robot perform as it is supposed to.
For example, at LaSalle University, we use two Turtlebots for 15 students. The students must do teams of two people in order to do the project. Then, on demo day, their robot has to be able to serve coffee at a real coffee shop in Barcelona (thank you, Costa Coffee, for your support!). All the students go to the coffee shop with their programs, and we bring the two robots. Then, while one team is demonstrating on one robot, the other is preparing.
In case you need ROS certified robots, let me recommend you the online shop of my friends: ROS Components shop. There is where I buy robots or pieces when I need them. No commission for me for recommending it! I just think they are great.
* Resources: If your course is affected by the coronavirus and you need to move your course online, then I suggest that you check out this article, in which I share how I teach robotics from home to students.
6. Evaluation
One very important point in the whole process is how to evaluate the students. In my opinion, the evaluation must be continuous, otherwise, the students just do nothing until the day before the exam. Afterward, all are lamentations.
At LaSalle University, I do a one-hour exam every month, covering the topics I have taught during that month, and the previous months, too.
In our case, the exams are completely practical. They have to have the robot perform something related to the subjects taught. For example, they have to make the robot create a map of the environment using an extended Kalman filter. I may provide the implementation of the extended Kalman filter for straight usage, but the student must know how to use it, how to capture the proper data from the robot, how to provide that to the filter, and how to use the output to build the map.
Just as a matter of example, here you can find a ROSject containing the last exam I gave to the students about dead reckoning navigation. The ROSject contains everything they needed to do the exam, including instructions, scores, and robot simulations. That leads us to the next point.
How to provide the material to the students
If I have convinced you to use a practical method to teach robotics using ROS, at this point, you must be concerned about two points:
How the hell am I going to create all that material?!
How the hell can I provide my students with a running environment where they can execute those simulations and ROS code?
Very good concerns.
Preparing the material is a lot of work. And more importantly, there is a lot of risks. When you prepare such material, there are a lot of probabilities that what you prepare does not work with the student’s computer. That is why I propose using an online platform for preparing all that material, and sharing the material inside the same platform, so you will be 100% sure that it will work no matter who is going to use it.
I propose that you use the ROS Development Studio. This is a platform that we have developed at our company, The Construct, for the easy creation, testing, and distribution of ROS code.
The ROS Development Studio (or ROSDS, for short) allows you to create the material using a web browser on any type of computer. It already provides the simulations you may need (and you can also add your own). It also provides a Python notebook structure that you can fill with the material for the students. It allows you to include any code that your students may require in the form of ROS packages.
But the most interesting point of the ROSDS is that it allows you to share all your material by sending a simple web link to the students. That is what we call a ROSject. A ROSject is a complete ROS project that includes simulations, notebooks, and code in a single web link. Whenever you provide this link to anybody, they will get a copy of the entire content, and they will be able to execute it in the exact same conditions in which you created the ROSject.
This sharing feature makes it very easy for the students to share their programs with you for evaluation, in case of exams, or for help in case they are stuck while studying. Since the ROSject contains all the material, it will be very easy for you to correct the exam in the conditions the student created the program, without requiring you to copy files or set up your computer environment. Just tell the students to share the ROSject link with you.
We use the ROSjects at LaSalle to provide different lessons and practices. For example, we have a ROSject with the simulation of the coffee shop where the students will do the project evaluation. Also, we use a ROSject to create the exams (as you can see in the previous section).
Summarizing: ROSjects allow you to encapsulate your lessons in a complete unit that includes the explanations with the simulations and the code. And all that for free.
Still, you will have to create your ROSjects for your classes. This is something that is going to end in the near future as more and more universities are creating their ROSjects and publishing them online for everybody.
However, if you do not want to wait until they are created, I can recommend our online academy, the Robot Ignite Academy, where we provide ready-made ROS-based courses about ROS basics, ROS2, robot navigation, deep learning, manipulation, robot perception, and more. The only drawback is that the academy has a certain cost per student. However, it is highly recommended because it simplifies your preparation. We use the Robot Ignite Academy at LaSalle, but many other universities use it around the world, like Clarkson University (USA), University of Michigan (USA), Chukyo University (Japan), University of Sydney (Australia), Universite of Luxembourg (Luxembourg), Universite de Reims (France), and University of Alicante (Spain).
Additional topics you may need to cover
Finally, I would like to make a point on a problem that I have identified when using this method.
I find that most of the people that come to our Robot Navigation class have zero knowledge about programming in either Python or C++, nor any knowledge on how to use Linux shell. After interviewing several robotics teachers around the world, I found that this is the case for other countries as well.
If that is your situation, first I would recommend that you reduce the scope of the programming you teach to just the use of Python. Do not go into C++. C++ is too complex to start teaching along with robotics. Also, Python is very, very powerful and easy to learn.
I usually create an initial class about Python and Linux shell. I do this class and immediately, the very next week, I give an exam to the students about Python and Linux shell. The purpose of the exam is to stress to the students the importance of mastering those programming skills. They are the basis for all the rest.
Additional problems that you may find is that the students have problems understanding English(if you are not in an English-speaking country). Most of ROS documentation is in English. The way to communicate in the ROS community is in English (whether we like it or not). You may be feeling tempted to lower the bar for your students and create the course notes in your mother language, and only provide documentary resources in your own language. I suggest not doing it. Push your students in English learning! The community needs a common language, and at present, it is English. Take this chance to push your students to grow and force them to read the documentation sources in English.
Conclusion
I started this post talking about the findings of Joel Esposito. Even if you listed to the podcast interview, you will see that his final conclusion is that not to use ROS for teaching robotics. I’m sure there are other teachers with the same opinion. Other teachers like professor Knepper do advocate for just the opposite. Those are points of view, like mine in this article. I recommend you to listen to the podcast interview to Joel so you can understand why he suggests that.
It is up to you to decide. Now you have several opinions here. Which one is best for you? Please leave your answer into the comments so we can start a debate about it.
This post was written by Miguel A. Rodriguez and Ricardo Tellez
In this post we are going to see how to test different reinforcement learning (RL) algorithms from the OpenAI framework in the same robot trying to solve the same task. We are going to use the openai_ros package, which allows to change algorithms very easily and hence compare performances.
For the whole process, we are going to use the ROS Development Studio (ROSDS), which you can use for free. Also you can reproduce the results in your own local computer following these instructions.
The task to solve
We are going to use for this post the typical example in reinforcement learning of the cartpole. On the cartpole task, a pole mounted on top of a cart has to be balanced by the cart by moving left or right.
This problem is defined in the OpenAI Gym in the following links:
However, the OpenAi Gym just solves the problem on a 2D flat simulated environment with no real controllers for the cart and very limited physics simulation. That environment and its training looks something like the following video.
In this post, we are going to solve the same problem but using a 3D Gazebo simulation which includes full ROS controllers. The simulation includes physics and controllers behavior which makes the problem to solve even more complicated, but closer to reality.
Remember that the same thing we are doing in this post can be applied to ANY ROS BASED ROBOT.
The ROSject containing the simulation and pre-made code
We have created a ROSject containing the Gazebo simulation we are going to use, as well as some classes that interconnect the simulation to OpenAI. Those classes use the openai_ros package for easy definition of the RobotEnvironment (defines the connection of OpenAI to the simulated robot) and the TaskEnvironment (defines the task to be solved). This is already provided by the openai_ros package, so we’ll have to do nothing.
We provide all that work already done because in this post we want to concentrate only on comparing RL algorithms on the same robot and the same task.
You can get the code up and running on the ROSDS by getting this ROSject (click on the link to get the code). You can create a free account on ROSDS if you don’t have one. From the rest of tutorial we will assume you have the ROSject open in ROSDS (click on the link, then press Open ROSject on the ROSDS screen).
The Cartpole Simulation
You can launch the simulation inside the ROSDS going to the Simulations Drop Down Menu select Select Launch File and then select:
cartpole_description main.launch
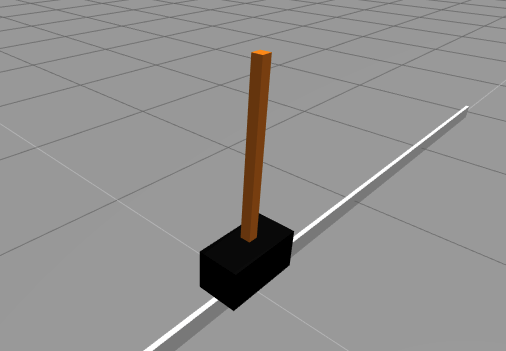
You should get something like this:
That is the simulation we are going to use. Remember that you have to have it launched for the rest of the tutorial.
The algorithms we are going to test
We took several of the best algorithms posted by the users on the OpenAI Gym website to solve the 2D cartpole system:
We adapted them for ROS and to use our Cartpole3D environment. For that we just had to do mainly 2 things:
Load the learning parameters from a yaml file instead of loading them from global variables. This allows us to change the values easily and fast. So we are going to create a yaml file for each algorithm that will be loaded before the algorithm is launched.
We have changed the OpenAI environment from the 2DCartpole provided by OpenAI (see video above) to the one provided by openai_ros package which interfaces with ROS and Gazebo.
Create the training code
First let’s create the ROS package that will contain everything
Create the ROS package for training
Let’s first create a ROS package where to put all the code we are going to develop. For that, open a shell (Tools->Shell) and type:
$ cd catkin_ws/src
$ catkin_create_pkg cartpole_tests rospy
Create the config files
Here you have an example of of the yaml file for the n1try. Its divided in two main parts:
Parameters for Reinforcement Learning algorithm: Values to needed by your learning algorithm, in this case would be n1try, but could be any.
Parameters for the RobotEnvironment and TaskEnvironment: These variables are used to tune the task and simulation during setup. These variables have already been set up for you to be optimum, and if you are asking where you would get them from the first place, you can just copy paste the ones in the git example for openai_ros, where you can find examples for all the supported simulations and tasks. https://bitbucket.org/theconstructcore/openai_examples_projects/src/master/
Now open the IDE of the ROSDS (Tools->IDE), navigate to the config directory and create there the config file with name cartpole_n1try_params.yaml
Then paste the following content to it and save it:
cartpole_v0: #namespace

    #qlearn parameters

    alpha: 0.01 # Learning Rate
    alpha_decay: 0.01
    gamma: 1.0 # future rewards value 0 none 1 a lot
    epsilon: 1.0 # exploration, 0 none 1 a lot
    epsilon_decay: 0.995 # how we reduse the exploration
    epsilon_min: 0.01 # minimum value that epsilon can have
    batch_size: 64 # maximum size of the batches sampled from memory
    episodes_training: 1000
    n_win_ticks: 250 # If the mean of rewards is bigger than this and have passed min_episodes, the task is considered finished
    min_episodes: 100
    #max_env_steps: None
    monitor: True
    quiet: False


    # Cartpole3D environment variables
    control_type: "velocity"
    min_pole_angle: -0.7 #-23°
    max_pole_angle: 0.7 #23°
    max_base_velocity: 50
    max_base_pose_x: 1.0
    min_base_pose_x: -1.0

    n_observations: 4 # Number of lasers to consider in the observations
    n_actions: 2 # Number of actions used by algorithm and task

    # those parameters are very important. They are affecting the learning experience
    # They indicate how fast the control can be
    # If the running step is too large, then there will be a long time between 2 ctrl commans
    # If the pos_step is too large, then the changes in position will be very abrupt
    running_step: 0.04 # amount of time the control will be executed
    pos_step: 1.0     # increment in position/velocity/effort, depends on the control for each command
    init_pos: 0.0 # Position in which the base will start
    wait_time: 0.1 # Time to wait in the reset phases
Modify the learning algorithm for openai_ros
On the IDE create the following file on the scripts folder of your package: cartpole3D_n1try_algorithm_with_rosparams.py
#!/usr/bin/env python
import rospy

# Inspired by https://keon.io/deep-q-learning/
import random
import gym
import math
import numpy as np
from collections import deque
from keras.models import Sequential
from keras.layers import Dense
from keras.optimizers import Adam

# import our training environment
from openai_ros.task_envs.cartpole_stay_up import stay_up

class DQNRobotSolver():
    def __init__(self, environment_name, n_observations, n_actions, n_episodes=1000, n_win_ticks=195, min_episodes= 100, max_env_steps=None, gamma=1.0, epsilon=1.0, epsilon_min=0.01, epsilon_log_decay=0.995, alpha=0.01, alpha_decay=0.01, batch_size=64, monitor=False, quiet=False):
        self.memory = deque(maxlen=100000)
        self.env = gym.make(environment_name)
        if monitor: self.env = gym.wrappers.Monitor(self.env, '../data/cartpole-1', force=True)

        self.input_dim = n_observations
        self.n_actions = n_actions
        self.gamma = gamma
        self.epsilon = epsilon
        self.epsilon_min = epsilon_min
        self.epsilon_decay = epsilon_log_decay
        self.alpha = alpha
        self.alpha_decay = alpha_decay
        self.n_episodes = n_episodes
        self.n_win_ticks = n_win_ticks
        self.min_episodes = min_episodes
        self.batch_size = batch_size
        self.quiet = quiet
        if max_env_steps is not None: self.env._max_episode_steps = max_env_steps

        # Init model
        self.model = Sequential()

        self.model.add(Dense(24, input_dim=self.input_dim, activation='tanh'))
        self.model.add(Dense(48, activation='tanh'))
        self.model.add(Dense(self.n_actions, activation='linear'))
        self.model.compile(loss='mse', optimizer=Adam(lr=self.alpha, decay=self.alpha_decay))


    def remember(self, state, action, reward, next_state, done):
        self.memory.append((state, action, reward, next_state, done))

    def choose_action(self, state, epsilon):
        return self.env.action_space.sample() if (np.random.random() <= epsilon) else np.argmax(self.model.predict(state)) def get_epsilon(self, t): return max(self.epsilon_min, min(self.epsilon, 1.0 - math.log10((t + 1) * self.epsilon_decay))) def preprocess_state(self, state): return np.reshape(state, [1, self.input_dim]) def replay(self, batch_size): x_batch, y_batch = [], [] minibatch = random.sample( self.memory, min(len(self.memory), batch_size)) for state, action, reward, next_state, done in minibatch: y_target = self.model.predict(state) y_target[0][action] = reward if done else reward + self.gamma * np.max(self.model.predict(next_state)[0]) x_batch.append(state[0]) y_batch.append(y_target[0]) self.model.fit(np.array(x_batch), np.array(y_batch), batch_size=len(x_batch), verbose=0) if self.epsilon > self.epsilon_min:
            self.epsilon *= self.epsilon_decay

    def run(self):

        rate = rospy.Rate(30)

        scores = deque(maxlen=100)

        for e in range(self.n_episodes):

            init_state = self.env.reset()

            state = self.preprocess_state(init_state)
            done = False
            i = 0
            while not done:
                # openai_ros doesnt support render for the moment
                #self.env.render()
                action = self.choose_action(state, self.get_epsilon(e))
                next_state, reward, done, _ = self.env.step(action)
                next_state = self.preprocess_state(next_state)
                self.remember(state, action, reward, next_state, done)
                state = next_state
                i += 1


            scores.append(i)
            mean_score = np.mean(scores)
            if mean_score >= self.n_win_ticks and e >= min_episodes:
                if not self.quiet: print('Ran {} episodes. Solved after {} trials'.format(e, e - min_episodes))
                return e - min_episodes
            if e % 1 == 0 and not self.quiet:
                print('[Episode {}] - Mean survival time over last {} episodes was {} ticks.'.format(e, min_episodes ,mean_score))

            self.replay(self.batch_size)


        if not self.quiet: print('Did not solve after {} episodes'.format(e))
        return e

if __name__ == '__main__':
    rospy.init_node('cartpole_n1try_algorithm', anonymous=True, log_level=rospy.FATAL)

    environment_name = 'CartPoleStayUp-v0'

    n_observations = rospy.get_param('/cartpole_v0/n_observations')
    n_actions = rospy.get_param('/cartpole_v0/n_actions')

    n_episodes = rospy.get_param('/cartpole_v0/episodes_training')
    n_win_ticks = rospy.get_param('/cartpole_v0/n_win_ticks')
    min_episodes = rospy.get_param('/cartpole_v0/min_episodes')
    max_env_steps = None
    gamma =  rospy.get_param('/cartpole_v0/gamma')
    epsilon = rospy.get_param('/cartpole_v0/epsilon')
    epsilon_min = rospy.get_param('/cartpole_v0/epsilon_min')
    epsilon_log_decay = rospy.get_param('/cartpole_v0/epsilon_decay')
    alpha = rospy.get_param('/cartpole_v0/alpha')
    alpha_decay = rospy.get_param('/cartpole_v0/alpha_decay')
    batch_size = rospy.get_param('/cartpole_v0/batch_size')
    monitor = rospy.get_param('/cartpole_v0/monitor')
    quiet = rospy.get_param('/cartpole_v0/quiet')


    agent = DQNRobotSolver(     environment_name,
                                n_observations,
                                n_actions,
                                n_episodes,
                                n_win_ticks,
                                min_episodes,
                                max_env_steps,
                                gamma,
                                epsilon,
                                epsilon_min,
                                epsilon_log_decay,
                                alpha,
                                alpha_decay,
                                batch_size,
                                monitor,
                                quiet)
    agent.run()
As you can see the main differences are the rosparam gets and the rosnode init. Also one element that has to be removed is the render method. Just because in Gazebo Render makes no sense, unless is for recording purposes, that will be supported in OpenAI_ROS RobotEnvironments in the future updates.
Create a launch file
And now you have to create a launch file thats loads those paramateres from the YAML file and starts up your script. Go to the launch directory and create the file start_training_n1try.launch
<?xml version="1.0" encoding="UTF-8"?>
<launch>
    <rosparam command="load" file="$(find cartpole_tests)/config/cartpole_n1try_params.yaml" />
    <!-- Launch the training system -->
    <node pkg="cartpole_tests" name="cartpole3D_mbalunovic_algorithm" type="cartpole3D_n1try_algorithm_with_rosparams.py" output="screen"/>
</launch>
Adapt the algorithm to work with openai_ros TaskEnvironment
And this is the easiest part. You just have to change the name of the OpenAI Environment to load, and in this case import the openai_ros module. And that is, you change the 2D cartpole by the 3D gazebo realistic cartpole. That SIMPLE
This at the top in the import section:
# import our training environment
from openai_ros.task_envs.cartpole_stay_up import stay_up
And this line
self.env = gym.make('CartPole-v0')
To a different Task and its loaded through a variable of the class:
After a few seconds you should see the cartpole start moving and trying to learn.
Results you may obtain
These are tests made with 1000 epsidoes maximum and it will stop the learning if:
We depleat our episodes ( more than 1000 )
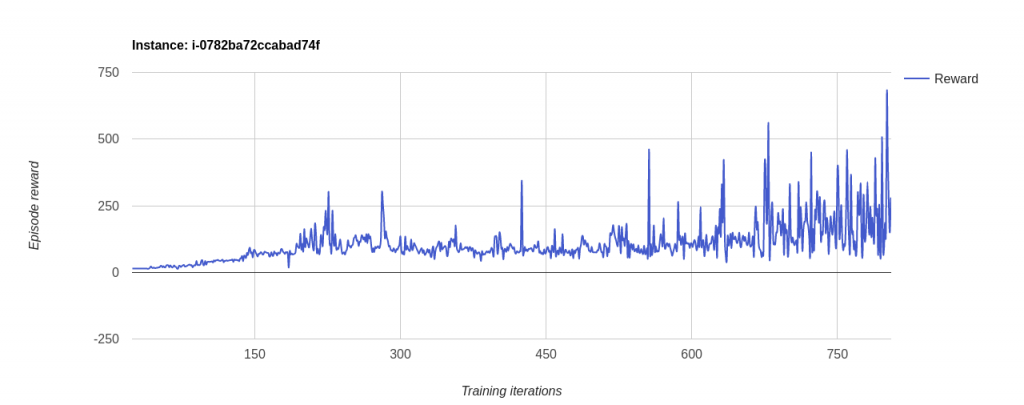
We Get a Mean Episode Reward bigger than n_win_ticks and we have executed more than min_episodes number of episodes. In this case of n_win_ticks = 250 and min_episodes = 100. This is the reason why the 3D version stoped before the 1000 episodes had ended. Because the mean value of the episode rewards was bigger then 250. While the 2D had values not exceeding 200.
Note: to see the reward chart, got to Tools->OpenAI Reward Chart
How to change the learning algorithm
What if you want to change your algorithm for the same TaskEnvironment, like the CartPoleStayUp-v0? Well, with openai_ros is really fast. You just have to change the following:
Change the ROS Param YAML file loaded in the Launch file
Change the algorithm python script to be launched in the launch file to your new one.
Inside your new algorithm main script, place the same TaskEnvironment you had in the previous algorithm script.
For example lets say you need to change from the n1try to the mbalunovic or the ruippeixotog.
You will have to create new YAML files with the RL algorithm parameters you need, but with the same simulation parameters
For the mbalunovic algorithm
Create the config file cartpole_mbalunovic_params.yaml
cartpole_v0: #namespace

    #qlearn parameters
    state_size: 4 # number of elements in the state array from observations.
    n_actions: 2 # Number of actions used by algorithm and task
    learning_rate: 0.001
    #num_epochs: 50
    replay_memory_size: 1000
    target_update_freq: 100
    initial_random_action: 1
    gamma: 0.99 # future rewards value, 0 none 1 a lot
    epsilon_decay: 0.99 # how we reduse the exploration
    done_episode_reward: -200 # Reward given when episode finishes before interations depleated.
    batch_size: 32 # maximum size of the batches sampled from memory
    max_iterations: 1000 # maximum iterations that an episode can have
    episodes_training: 1000

    # Environment variables
    control_type: "velocity"
    min_pole_angle: -0.7 #-23°
    max_pole_angle: 0.7 #23°
    max_base_velocity: 50
    max_base_pose_x: 1.0
    min_base_pose_x: -1.0

    # those parameters are very important. They are affecting the learning experience
    # They indicate how fast the control can be
    # If the running step is too large, then there will be a long time between 2 ctrl commans
    # If the pos_step is too large, then the changes in position will be very abrupt
    running_step: 0.04 # amount of time the control will be executed
    pos_step: 1.0     # increment in position/velocity/effort, depends on the control for each command
    init_pos: 0.0 # Position in which the base will start
    wait_time: 0.1 # Time to wait in the reset phases
Create the launch file start_training_mbalunovic.launch
<?xml version="1.0" encoding="UTF-8"?>
<launch>
    <rosparam command="load" file="$(find cartpole_tests)/config/cartpole_mbalunovic_params.yaml" />
    <!-- Launch the training system -->
    <node pkg="cartpole_tests" name="cartpole3D_mbalunovic_algorithm" type="cartpole3D_mbalunovic_algorithm_with_rosparams.py" output="screen"/>
</launch>
Create the script file cartpole3D_mbalunovic_algorithm_with_rosparams.py (modification from original learning algorithm)
#!/usr/bin/env python
import rospy

import gym
import keras
import numpy as np
import random

from gym import wrappers
from keras.models import Sequential
from keras.layers import Dense
from keras.optimizers import Adam

from collections import deque

# import our training environment
from openai_ros.task_envs.cartpole_stay_up import stay_up


class ReplayBuffer():

  def __init__(self, max_size):
    self.max_size = max_size
    self.transitions = deque()

  def add(self, observation, action, reward, observation2):
    if len(self.transitions) > self.max_size:
      self.transitions.popleft()
    self.transitions.append((observation, action, reward, observation2))

  def sample(self, count):
    return random.sample(self.transitions, count)

  def size(self):
    return len(self.transitions)

def get_q(model, observation, state_size):
  np_obs = np.reshape(observation, [-1, state_size])
  return model.predict(np_obs)

def train(model, observations, targets, actions_dim, state_size):

  np_obs = np.reshape(observations, [-1, state_size])
  np_targets = np.reshape(targets, [-1, actions_dim])

  #model.fit(np_obs, np_targets, epochs=1, verbose=0)
  model.fit(np_obs, np_targets, nb_epoch=1, verbose=0)

def predict(model, observation, state_size):
  np_obs = np.reshape(observation, [-1, state_size])
  return model.predict(np_obs)

def get_model(state_size, learning_rate):
  model = Sequential()
  model.add(Dense(16, input_shape=(state_size, ), activation='relu'))
  model.add(Dense(16, input_shape=(state_size,), activation='relu'))
  model.add(Dense(2, activation='linear'))

  model.compile(
    optimizer=Adam(lr=learning_rate),
    loss='mse',
    metrics=[],
  )

  return model

def update_action(action_model, target_model, sample_transitions, actions_dim, state_size, gamma):
  random.shuffle(sample_transitions)
  batch_observations = []
  batch_targets = []

  for sample_transition in sample_transitions:
    old_observation, action, reward, observation = sample_transition

    targets = np.reshape(get_q(action_model, old_observation, state_size), actions_dim)
    targets[action] = reward
    if observation is not None:
      predictions = predict(target_model, observation, state_size)
      new_action = np.argmax(predictions)
      targets[action] += gamma * predictions[0, new_action]

    batch_observations.append(old_observation)
    batch_targets.append(targets)

  train(action_model, batch_observations, batch_targets, actions_dim, state_size)

def main():


  state_size = rospy.get_param('/cartpole_v0/state_size')
  action_size = rospy.get_param('/cartpole_v0/n_actions')
  gamma = rospy.get_param('/cartpole_v0/gamma')
  batch_size = rospy.get_param('/cartpole_v0/batch_size')
  target_update_freq = rospy.get_param('/cartpole_v0/target_update_freq')
  initial_random_action = rospy.get_param('/cartpole_v0/initial_random_action')
  replay_memory_size = rospy.get_param('/cartpole_v0/replay_memory_size')
  episodes_training = rospy.get_param('/cartpole_v0/episodes_training')
  max_iterations = rospy.get_param('/cartpole_v0/max_iterations')
  epsilon_decay = rospy.get_param('/cartpole_v0/max_iterations')
  learning_rate = rospy.get_param('/cartpole_v0/learning_rate')
  done_episode_reward = rospy.get_param('/cartpole_v0/done_episode_reward')

  steps_until_reset = target_update_freq
  random_action_probability = initial_random_action

  # Initialize replay memory D to capacity N
  replay = ReplayBuffer(replay_memory_size)

  # Initialize action-value model with random weights
  action_model = get_model(state_size, learning_rate)

  env = gym.make('CartPoleStayUp-v0')
  env = wrappers.Monitor(env, '/tmp/cartpole-experiment-1', force=True)

  for episode in range(episodes_training):
    observation = env.reset()

    for iteration in range(max_iterations):
      random_action_probability *= epsilon_decay
      random_action_probability = max(random_action_probability, 0.1)
      old_observation = observation

      # We dont support render in openai_ros
      """
      if episode % 1 == 0:
        env.render()
      """

      if np.random.random() < random_action_probability: action = np.random.choice(range(action_size)) else: q_values = get_q(action_model, observation, state_size) action = np.argmax(q_values) observation, reward, done, info = env.step(action) if done: print 'Episode {}, iterations: {}'.format( episode, iteration ) # print action_model.get_weights() # print target_model.get_weights() #print 'Game finished after {} iterations'.format(iteration) reward = done_episode_reward replay.add(old_observation, action, reward, None) break replay.add(old_observation, action, reward, observation) if replay.size() >= batch_size:
        sample_transitions = replay.sample(batch_size)
        update_action(action_model, action_model, sample_transitions, action_size, state_size, gamma)
        steps_until_reset -= 1


if __name__ == "__main__":
    rospy.init_node('cartpole_mbalunovic_algorithm', anonymous=True, log_level=rospy.FATAL)
    main()
Create the config file cartpole_ruippeixotog_params.yaml
cartpole_v0: #namespace

    #qlearn parameters
    state_size: 4 # number of elements in the state array from observations.
    n_actions: 2 # Number of actions used by algorithm and task
    gamma: 0.95 # future rewards value, 0 none 1 a lot
    epsilon: 1.0 # exploration, 0 none 1 a lot
    epsilon_decay: 0.995 # how we reduse the exploration
    epsilon_min: 0.1 # minimum value that epsilon can have
    batch_size: 32 # maximum size of the batches sampled from memory
    episodes_training: 1000
    episodes_running: 500

    #environment variables
    control_type: "velocity"
    min_pole_angle: -0.7 #-23°
    max_pole_angle: 0.7 #23°
    max_base_velocity: 50
    max_base_pose_x: 1.0
    min_base_pose_x: -1.0

    # those parameters are very important. They are affecting the learning experience
    # They indicate how fast the control can be
    # If the running step is too large, then there will be a long time between 2 ctrl commans
    # If the pos_step is too large, then the changes in position will be very abrupt
    running_step: 0.04 # amount of time the control will be executed
    pos_step: 1.0     # increment in position/velocity/effort, depends on the control for each command
    init_pos: 0.0 # Position in which the base will start
    wait_time: 0.1 # Time to wait in the reset phases
Create the launch file start_training_ruippeixotog.launch
<?xml version="1.0" encoding="UTF-8"?>
<launch>
    <rosparam command="load" file="$(find cartpole_tests)/config/cartpole_ruippeixotog_params.yaml" />
    <!-- Launch the training system -->
    <node pkg="cartpole_tests" name="cartpole3D_ruippeixotog_algorithm" type="cartpole3D_ruippeixotog_algorithm.py" output="screen"/>
</launch>
Create the training script cartpole_ruippeixotog_algorithm.py
#!/usr/bin/env python
import rospy

import os

from keras.models import Sequential
from keras.layers import Dense
from keras.optimizers import Adam

from gym_runner import GymRunner
from q_learning_agent import QLearningAgent

# import our training environment
from openai_ros.task_envs.cartpole_stay_up import stay_up

class CartPoleAgent(QLearningAgent):
    def __init__(self):

        state_size = rospy.get_param('/cartpole_v0/state_size')
        action_size = rospy.get_param('/cartpole_v0/n_actions')
        gamma = rospy.get_param('/cartpole_v0/gamma')
        epsilon = rospy.get_param('/cartpole_v0/epsilon')
        epsilon_decay = rospy.get_param('/cartpole_v0/epsilon_decay')
        epsilon_min = rospy.get_param('/cartpole_v0/epsilon_min')
        batch_size = rospy.get_param('/cartpole_v0/batch_size')


        QLearningAgent.__init__(self,
                                state_size=state_size,
                                action_size=action_size,
                                gamma=gamma,
                                epsilon=epsilon,
                                epsilon_decay=epsilon_decay,
                                epsilon_min=epsilon_min,
                                batch_size=batch_size)

        #super(CartPoleAgent, self).__init__(4, 2)

    def build_model(self):
        model = Sequential()
        model.add(Dense(12, activation='relu', input_dim=4))
        model.add(Dense(12, activation='relu'))
        model.add(Dense(2))
        model.compile(Adam(lr=0.001), 'mse')

        # load the weights of the model if reusing previous training session
        # model.load_weights("models/cartpole-v0.h5")
        return model


if __name__ == "__main__":
    rospy.init_node('cartpole3D_ruippeixotog_algorithm', anonymous=True, log_level=rospy.FATAL)

    episodes_training = rospy.get_param('/cartpole_v0/episodes_training')
    episodes_running = rospy.get_param('/cartpole_v0/episodes_running')
    max_timesteps = rospy.get_param('/cartpole_v0/max_timesteps', 10000)

    gym = GymRunner('CartPoleStayUp-v0', 'gymresults/cartpole-v0', max_timesteps)
    agent = CartPoleAgent()

    gym.train(agent, episodes_training, do_train=True, do_render=False, publish_reward=False)
    gym.run(agent, episodes_running, do_train=False, do_render=False, publish_reward=False)

    agent.model.save_weights("models/cartpole-v0.h5", overwrite=True)
    #gym.close_and_upload(os.environ['API_KEY'])
Do the same process we did for the cartpole but for a Turtlebot robot that has to learn how to move around a round maze. Check the openai_ros package for the required RobotEnvironment and TaskEnvironment to use. You will see how easy it is to change what we have developed for the cartpole into a different robot and task!
I read an article entitled Games Hold the Key to Teaching Artificial Intelligent Systems, by Danny Vena, in which the author states that computer games like Minecraft, Civilization, and Grand Theft Auto have been used to train intelligent systems to perform better in visual learning, understand language, and collaborate with humans. The author concludes that games are going to be a key element in the field of artificial intelligence in the near future. And he is almost right.
In my opinion, the article only touches the surface of artificial intelligence by talking about games. Games have been a good starting point for the generation of intelligent systems that outperform humans, but going deeper into the realm of robots that are useful in human environments will require something more complex than games. And I’m talking about simulations.
Using games to bootstrap intelligence
The idea behind beating humans at games has been in artificial intelligence since its birth. Initially, researchers created programs to beat humans at Tic Tac Toe and Chess (like, for example, IBM’s DeepBlue). However, those games’ intelligence was programmed from scratch by human minds. There were some people writing the code that decided which move should be the next one. However, that manual approach to generating intelligence reached a limit: intelligence is so complex that we realized that it may be too difficult to manually write a program that emulates it.
Then, a new idea was born: what if we create a system that learns by itself? In that case, the engineers will only have to program the learning structures and set the proper environment to allow intelligence to bootstrap by itself.
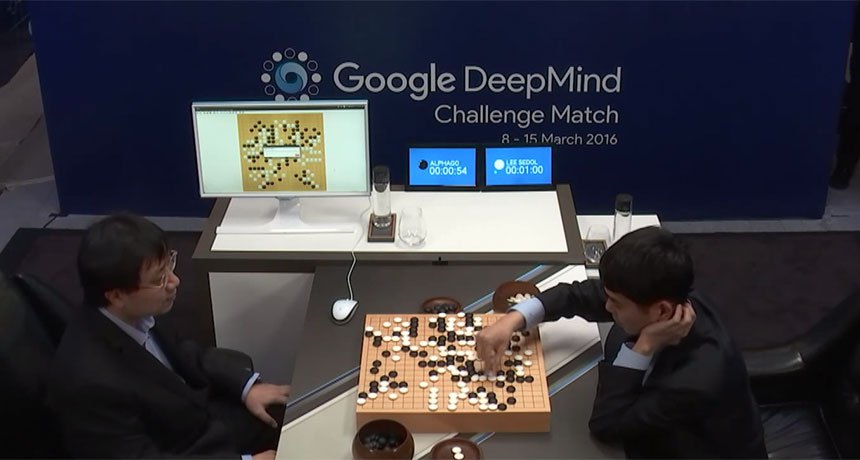
AlphaGo beats Lee Sedol (photo credit: intheshortestrun)
The results of that idea are programs that learn to play the games better than anyone in the world, even if nobody explains to the program how to play in the first place. For example, Google’s DeepMind company created AlphaGo Zero program using that approach. The program was able to beat the best players of Go in the world. The same company used the same approach to create programs that learnt to play Atari games, starting from zero knowledge. Recently, OpenAI used this approach for their bot program that beats pro players of the Dota 2 game. By the way, if you want to reproduce the results of the Atari games, OpenAI released the OpenAI Gym, containing all the code to start training your system with Atari games, and compare the performance against other people.
What I took from those results is that the idea of making an intelligent system generate the intelligence by itself is a good approach, and that the algorithms used for teaching can be used for making robots learn about their space (I’m not so optimistic about the way to encode the knowledge and to set the learning environment and stages, but that is another discussion).
From games to simulations
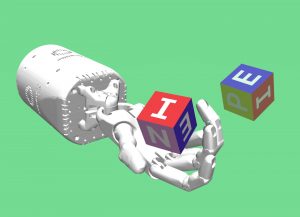
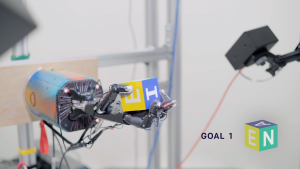
OpenAI wanted to go further. Instead of using games to generate programs that can play a game, they applied the same idea to make a robot do something useful: learn to manipulate a cube on its hand. In this case, instead of using a game, they used a simulation of the robot. The simulation was used to emulate the robot and its environment as if it were a real one. Then, they allowed the algorithm to control the simulated robot and make the robot learn about the task to solve by using domain randomization. After many trials, the simulated robot was able to manipulate the block in the expected way. But that was not all! At the end of the article, the authors successfully transferred the learned control program of the simulated robot to a real robot, which performed in a way similar to the simulated one. Except it was real.
Simulated Hand OpenAI Manipulation Experiment (image credit: OpenAI)
Real Hand OpenAI Manipulation Experiment (photo credit:OpenAI)
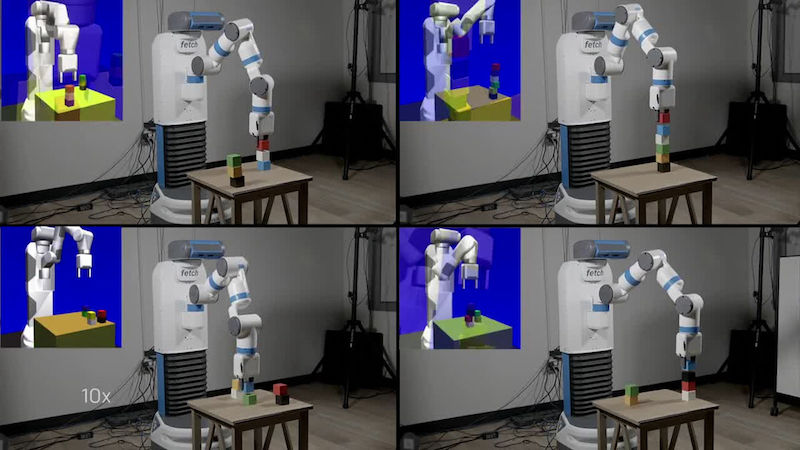
A similar approach was applied by OpenAI to the case of a Fetch robot trained to grasp a spam box off of a table filled with different objects. The robot was trained in simulation and it was successfully transferred to the real robot.
OpenAI teaches Fetch robot to grasp from table using simulations (photo credit: OpenAI)
We are getting close to that holy grail in robotics that is a complete self-learning system!
Training robots
However, in their experiments, engineers from OpenAI discovered that training for robots is a lot more complex than training algorithms for games. Meanwhile, in games, the intelligent system has a very limited list of actions and perceptions available; robots face a huge and continuous spectrum in both domains, actions and perceptions. We can say that the options are infinite.
That increase in the number of options diminishes the usefulness of the algorithms used for RL. Usually, the way to deal with that problem is with some artificial tricks, like discarding some of the information completely or discretizing the data values artificially, reducing the options to only a few.
OpenAI engineers found that even if the robots were trained in simulations, their approach could not scale to more complex tasks.
Massive data vs. complex learning algorithms
As Andrew Ng indicated, and as an engineer from OpenAI personally indicated to me based on his results, massive data with simple learning algorithms wins over complicated algorithms with a small amount of data. This means that it is not a good idea to try to focus on getting more complex learning algorithms. Instead, the best approach for reaching intelligent robotics would be to use simple learning algorithms trained with massive amounts of data (which makes sense if we observe our own brain: a massive amount of neural networks trained over many years).
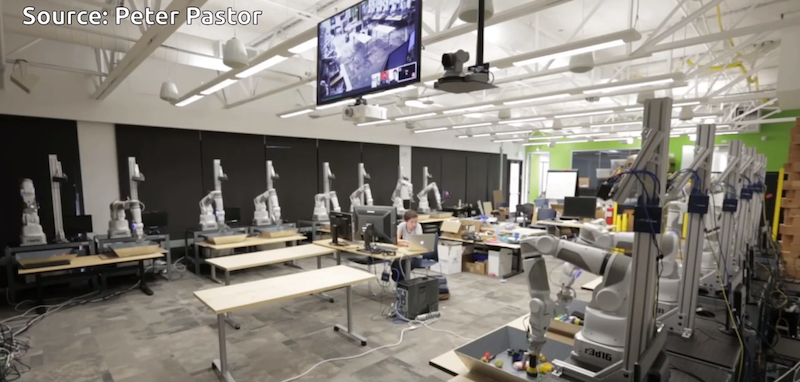
Google has always known that. Hence, in order to obtain massive amounts of data to train their robots, Google created a real life system with real robots, training all day long in a large space. Even if it is a clever idea, we can all see that this is not practical in any sense for any kind of robot and application (breaking robots, limited to execution in real time, a limited amount of robots, a limited amount of environments, and so on…).
Google robots training for grasping
That leads us to the same solution again: to use simulations. By using simulations, we can put any robot in any situation and train them there. Also, we can have virtually an infinite number of them training in parallel. and generate massive amounts of data in record time.
Even if that approach looks very clear right now, it was not three years ago when we created our company, The Construct, around robot simulations in the cloud. I remember exhibiting at the Innorobo 2015 exhibition and finding, after extensive interviews among all the other exhibitors, that only two among them all were using simulations for their work. Even more, roboticists considered simulations to be something nasty to be avoided at all cost, since nothing can compare with the real robot (check here for a post I wrote about it at the time).
Thankfully, the situation has changed since then. Now, using simulations for training real robots is starting to become the way.
Transferring to real robots
We all know that it is one thing to get a solution with the simulation and another for that solution to work on the real robot. Having something done by the robot in the simulation doesn’t imply that it will work the same way on the real robot. Why is that?
Well, there is something called the reality gap. We can define the reality gap as the difference between the simulation of a situation and the real-life situation. Since it is impossible for us to simulate something to a perfect degree, there will always be differences between simulation and reality. If the difference is big enough, it may happen that the results obtained in the simulator are not relevant at all. That is, you have a big reality gap, and what applies in the simulation does not apply to the real world.
That problem of the reality gap is one of the main arguments used to discard simulators for robotics. And in my opinion, the path to follow is not to discard the simulators and find something else, but instead to find the solutions to cross that reality gap. As for solutions, I believe we have two options:
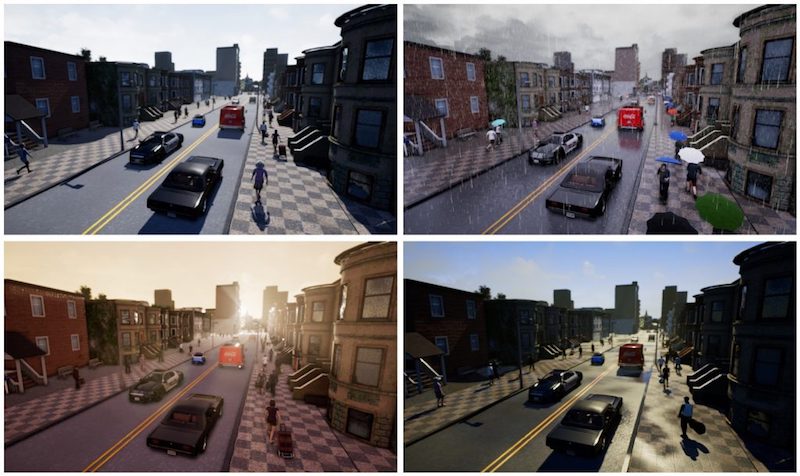
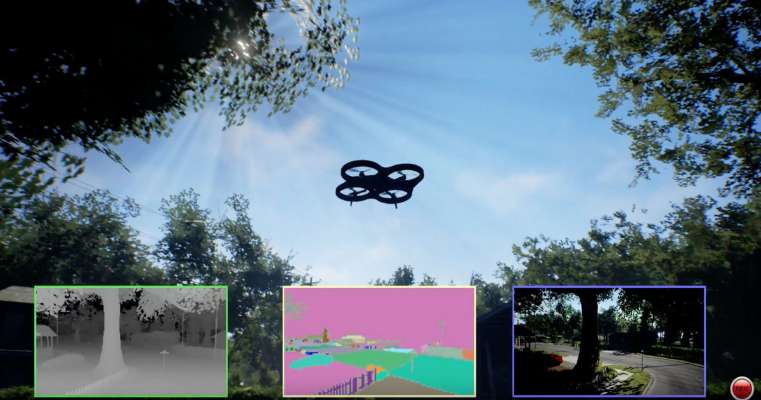
1. Create more accurate simulators. That is on its way. We can see efforts in this direction. Some simulators concentrate on better physics (Mujoco); others on a closer look at reality (Unreal or Unity-based simulators, like Carla or AirSim). We can expect that as computer power continues to increase, and cloud systems become more accessible, the accuracy of simulations is going to keep increasing in both senses, physics and looks.
2. Build better ways to cross the reality gap. In its original work, Noise and the reality gap, Jakobi (the person who identified the problem of the reality gap) indicated that one of the first solutions is to make a simulation independent of the reality gap. His idea was to introduce noise in those variables that are not relevant to the task. The modern version of that noise introduction is the concept of domain randomization, as described in the paper Domain Randomization for Transferring Deep Neural Networks from Simulation to the Real World.
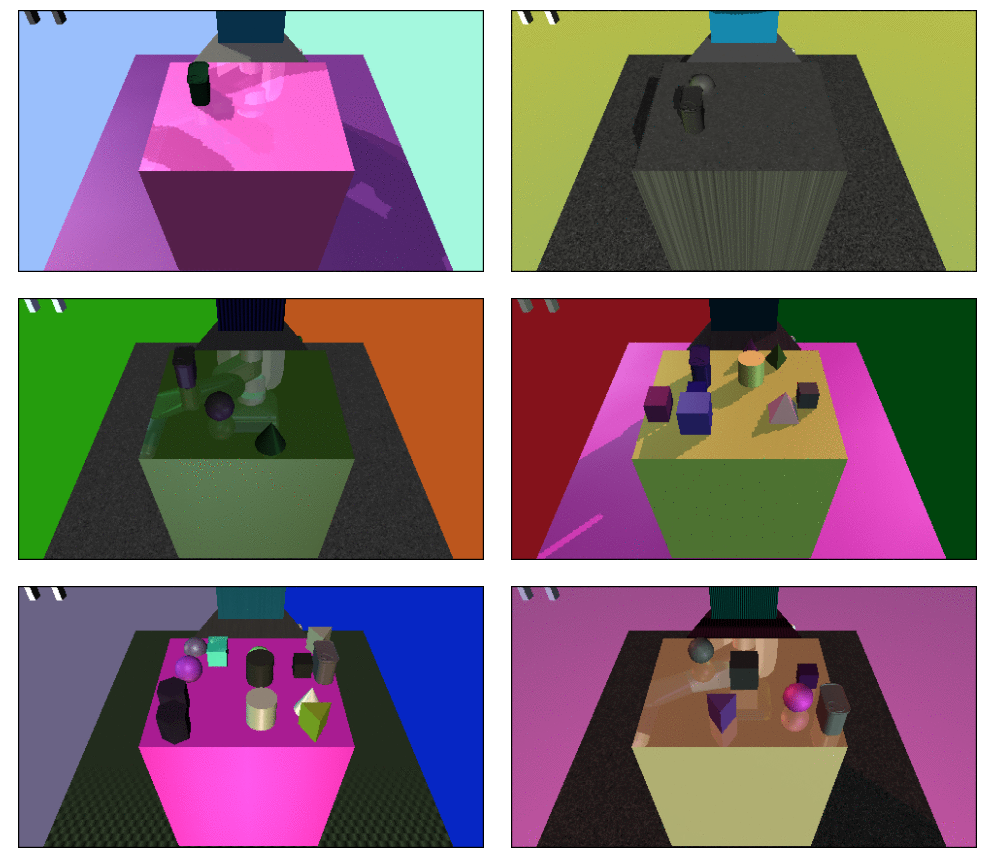
Domain randomization basically consists of performing the training of the robot in a simulated environment where its non-relevant-to-the-task features are changed randomly, like the colors of the elements, the light conditions, the relative position to other elements, etc.
The goal is to make the trained algorithm be unaffected by those elements in the scene that provide no information to the task at hand, but which may confuse it (because the algorithm doesn’t know which parts are the relevant ones to the task). I can see domain randomization as a way to tell the algorithm where to focus its attention, in terms of the huge flow of data that it is receiving.
Domain randomization applied by OpenAI to train a Fetch robot in simulation (photo credit: OpenAI)
In more recent works, the OpenAI team has released a very interesting paper that improves domain randomization. They introduce the concept of dynamics randomization. In this case, it is not the environment that is changing in the simulation, but the properties of the robot (like its mass, distance between grippers, etc.). The paper is Sim-to-real transfer of robotic control with dynamics randomization. That is the approach that OpenAI engineers took to successfully achieve the manipulation robot.
Some software that goes on the line
What follows is a list of software that allows the training of robots in simulations. I’m not including just robotics simulators (like Gazebo, Webots, and V-Rep) because they are just that, robot simulators in the general sense. The software listed here goes one step beyond that and provides a more complete solutions for doing the training in simulations. Of course, I have discarded the system used by OpenAI (which is Mujoco) because it requires the building of your own development environment.
Carla
Carla is an open source simulator for self-driving cars based on Unreal Engine. It has recently included a ROS bridge.
Carla simulator (photo credit Carla)
Microsoft Airsim
Microsoft Airsim drones simulator follows a similar approach to Carla, but for drones. Recently, they updated the simulator to also include self-driving cars.
Airsim (photo credit: Microsoft)
Nvidia Isaac
Nvidia Isaac aims to be a complete solution for training robots on simulations and then transferring to real robots. There is still nothing available, but they are working on it.
Isaac (photo credit: Nvidia)
ROS Development Studio
The ROS Development Studio is the development environment that our company created, and it has been conceived from the beginning to simulate and train any ROS-based robot, requiring nothing to be installed in your computer (cloud-based). Simulations for the robots are already provided with all the ROS controllers up and running, as well as the machine learning tools. It includes a system of Gym cloud computers for the parallel training of robots on an infinite number of computers.
ROS Development Studio showing an industrial environment
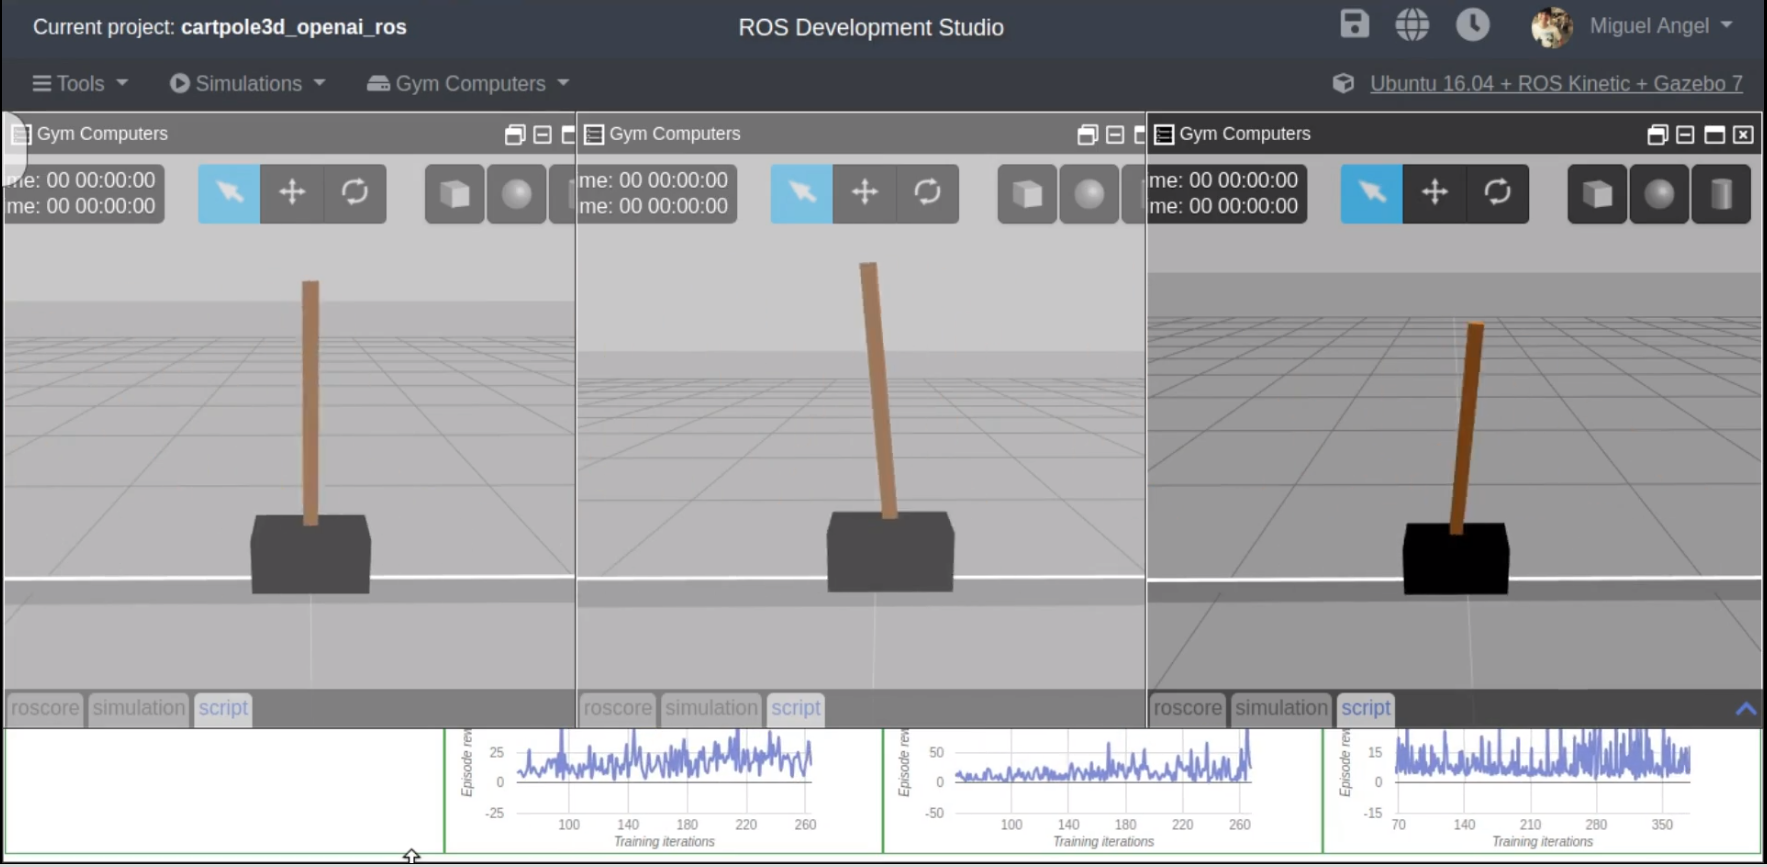
Here is a video showing a simple example of training two cartpoles in parallel using the Gym computers inside the ROS Development Studio:
(Readers, if you know other software like this that I can add, let me know.)
Conclusion
Making all those deep neural networks learn in a training simulation is the way to go, and as we may see in the future, this is just the tip of the iceberg. My personal opinion is that intelligence is yet more embodied than current AI approaches admit: you cannot have intelligence without a body. Hence, I believe that the use of simulated embodiments will be even higher in the future. We’ll see.

![[ROSDS] 008 – Use MoveIt with PR2 robot in ROS Kinetic Gazebo Easy Guide](https://www.theconstruct.ai/wp-content/uploads/2019/01/Use-MoveIt-with-PR2-robot-in-ROS-Kinetic-Gazebo-Easy-Guide.jpg)