

What we are going to learn
- How to create a ROS2 package
- How to create a package with some dependencies
- How to create many packages in a ros project
- How to compile a ros2 workspace
List of resources used in this post
- Use this rosject: https://app.theconstructsim.com/l/5bda8c95/
- The Construct: https://app.theconstructsim.com/
- ROS2 Courses –▸
- ROS2 Basics in 5 Days Humble (Python): https://app.theconstructsim.com/Course/132
- ROS2 Basics in 5 Days Humble (C++): https://app.theconstructsim.com/Course/133
Overview
ROS (Robot Operating System) is becoming the de facto standard “framework” for programming robots. In this post, let’s learn how to create a ROS2 package, essential for giving instruction to robots, using the ros2 command.
ROS Inside!

ROS Inside
Before anything else, if you want to use the logo above on your own robot or computer, feel free to download it and attach it to your robot. It is really free. Find it in the link below:
Opening the rosject
In order to follow this tutorial, we need to have ROS2 installed in our system, and ideally a ros2_ws (ROS2 Workspace). To make your life easier, we have already prepared a rosject for that: https://app.theconstructsim.com/l/5bda8c95/.
Just by copying the rosject (clicking the link above), you will have a setup already prepared for you.
After the rosject has been successfully copied to your own area, you should see a Run button. Just click that button to launch the rosject (below you have a rosject example).

ROS2 package creation – Run rosject (example of the RUN button)
After pressing the Run button, you should have the rosject loaded. Now, let’s head to the next section to get some real practice.
Creating a ros2 package
In order to create a ROS2 package, we need to have a ROS2 Workspace, and for that, we need a terminal.
Let’s open a terminal by clicking the Open a new terminal button.
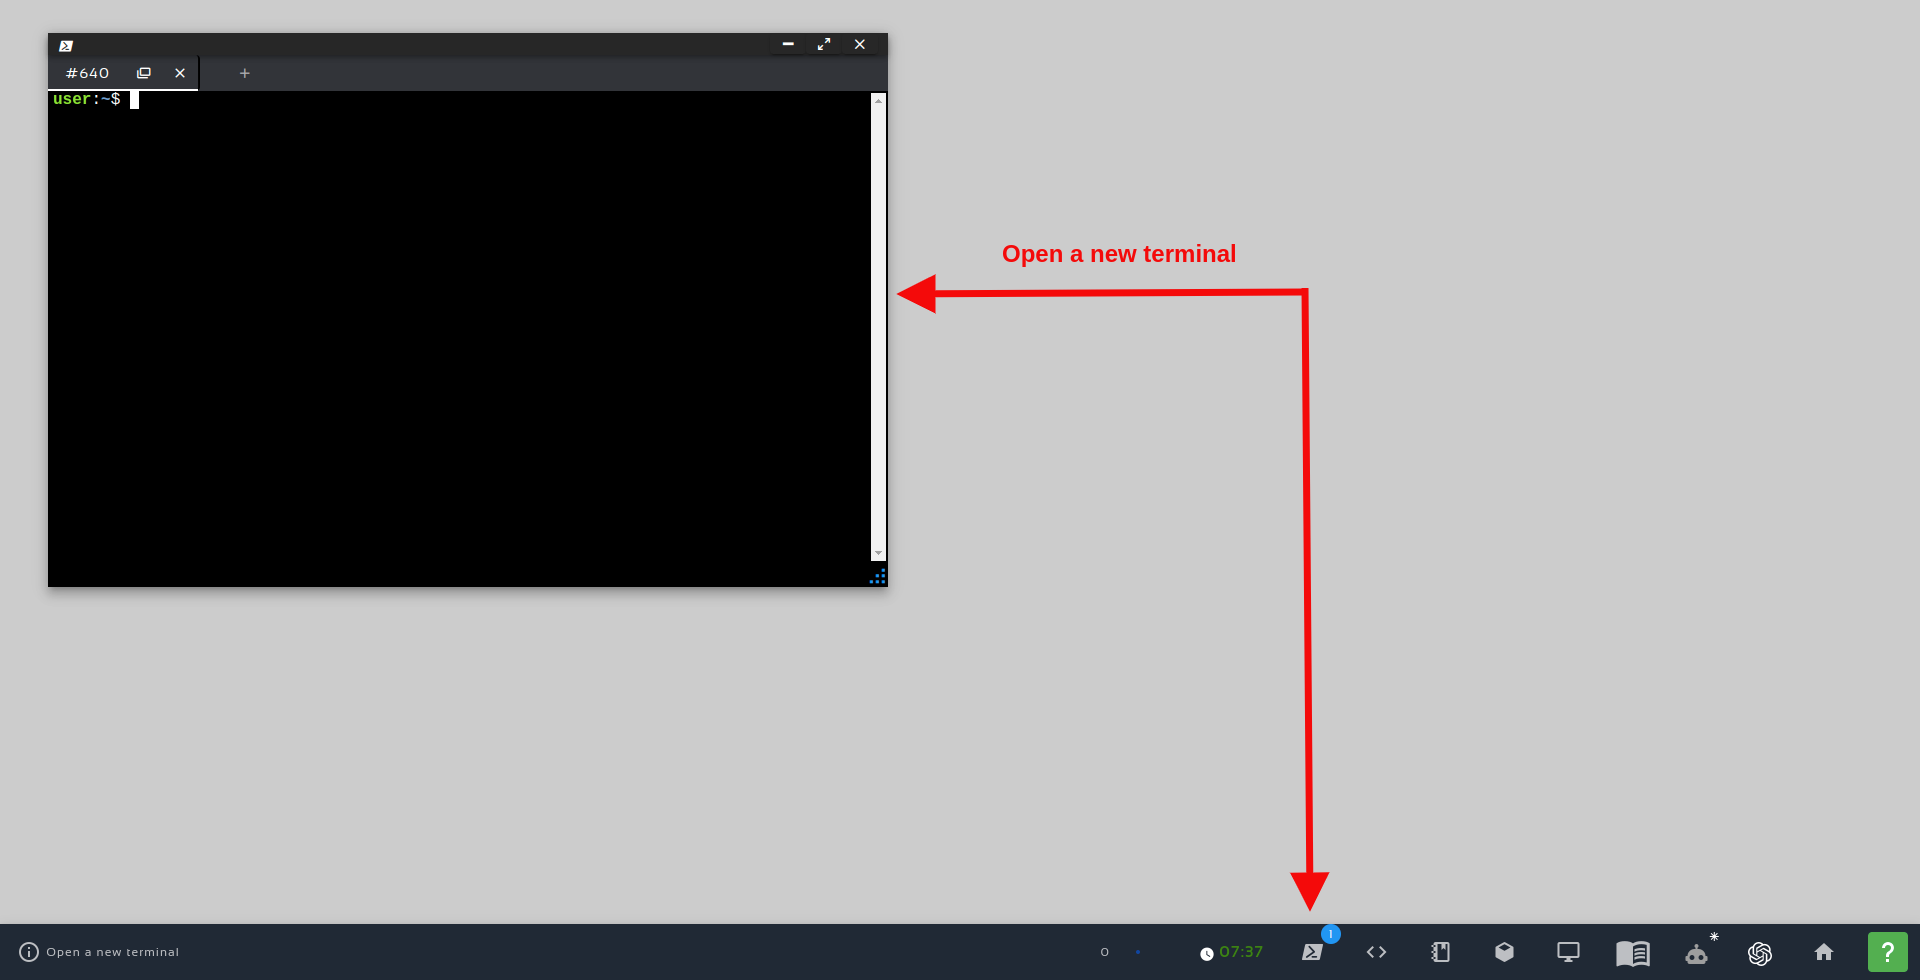
Open a new Terminal
Once inside the first terminal, let’s first run a command that shows the list of available options for ros2:
ros2 -h
ros2 is an extensible command-line tool for ROS 2.
options:
  -h, --help            show this help message and exit

Commands:
  action     Various action related sub-commands
  bag        Various rosbag related sub-commands
  component  Various component related sub-commands
  daemon     Various daemon related sub-commands
  doctor     Check ROS setup and other potential issues
  interface  Show information about ROS interfaces
  launch     Run a launch file
  lifecycle  Various lifecycle related sub-commands
  multicast  Various multicast related sub-commands
  node       Various node related sub-commands
  param      Various param related sub-commands
  pkg        Various package related sub-commands
  run        Run a package specific executable
  security   Various security related sub-commands
  service    Various service related sub-commands
  topic      Various topic related sub-commands
  wtf        Use `wtf` as alias to `doctor`

  Call `ros2 <command> -h` for more detailed usage.
ros2 pkg -h
Various package related sub-commands
options:
  -h, --help            show this help message and exit

Commands:
  create       Create a new ROS 2 package
  executables  Output a list of package specific executables
  list         Output a list of available packages
  prefix       Output the prefix path of a package
  xml          Output the XML of the package manifest or a specific tag
ros2 pkg create -h
usage: ros2 pkg create [-h] [--package-format {2,3}] [--description DESCRIPTION] [--license LICENSE] [--destination-directory DESTINATION_DIRECTORY] [--build-type {cmake,ament_cmake,ament_python}]
                       [--dependencies DEPENDENCIES [DEPENDENCIES ...]] [--maintainer-email MAINTAINER_EMAIL] [--maintainer-name MAINTAINER_NAME] [--node-name NODE_NAME] [--library-name LIBRARY_NAME]
                       package_name

Create a new ROS 2 package

positional arguments:
  package_name          The package name

options:
  -h, --help            show this help message and exit
  --package-format {2,3}, --package_format {2,3}
                        The package.xml format.
  --description DESCRIPTION
                        The description given in the package.xml
  --license LICENSE     The license attached to this package; this can be an arbitrary string, but a LICENSE file will only be generated if it is one of the supported licenses (pass '?' to get a list)
  --destination-directory DESTINATION_DIRECTORY
                        Directory where to create the package directory
  --build-type {cmake,ament_cmake,ament_python}
                        The build type to process the package with
  --dependencies DEPENDENCIES [DEPENDENCIES ...]
                        list of dependencies
  --maintainer-email MAINTAINER_EMAIL
                        email address of the maintainer of this package
  --maintainer-name MAINTAINER_NAME
                        name of the maintainer of this package
  --node-name NODE_NAME
                        name of the empty executable
  --library-name LIBRARY_NAME
                        name of the empty library
cd ~/ros2_ws/src

ros2 pkg create my_superbot
Assuming that everything went as expected, we should see something like this:
going to create a new package
package name: my_superbot
destination directory: /root/ros2_ws/src
package format: 3
version: 0.0.0
description: TODO: Package description
maintainer: ['root <root@todo.todo>']
licenses: ['TODO: License declaration']
build type: ament_cmake
dependencies: []
creating folder ./my_superbot
creating ./my_superbot/package.xml
creating source and include folder
creating folder ./my_superbot/src
creating folder ./my_superbot/include/my_superbot
creating ./my_superbot/CMakeLists.txt
tree .
.
└── my_superbot
    ├── CMakeLists.txt
    ├── include
    │   └── my_superbot
    ├── package.xml
    └── src

4 directories, 2 files
sudo apt-get update

sudo apt-get install -y tree
Creating a ros2 package with some dependencies
Most of the times, when we create a package, we basically want to reuse or leverage existing tools (or packages).
cd ~/ros2_ws/src

rm -rfv my_superbot
...

--dependencies DEPENDENCIES [DEPENDENCIES ...]
     list of dependencies

...
cd ~/ros2_ws/src


ros2 pkg create my_superbot --dependencies rclcpp std_msgs
ls

tree .
Creating many ros2 packages
There is a principle in Software Development called DRY (Don’t repeat yourself). It basically tells us that we have to reuse code, making code easier to maintain.
There is also the Separation of Concerns (SoC) design principle that manages complexity by partitioning the software system so that each partition is responsible for a separate concern, minimizing the overlap of concerns as much as possible.
In a robotics project, we should ideally have different packages for different purposes. Let’s remove again the package we just created, and rather than creating the package directly on the ros2_ws/src folder, let’s create a project folder there, and then create the packages inside that project folder. Start by removing the existing package:
cd ~/ros2_ws/src

rm -rfv my_superbot
cd ~/ros2_ws/src

mkdir superbot_project
Inside the project folder, we can now create different packages.
cd superbot_project

ros2 pkg create superbot_description

ros2 pkg create superbot_detection

ros2 pkg create superbot_audio
tree .
├── superbot_audio
│   ├── CMakeLists.txt
│   ├── include
│   ├── package.xml
│   └── src
├── superbot_description
│   ├── CMakeLists.txt
│   ├── include
│   │   └── superbot_description
│   ├── package.xml
│   └── src
└── superbot_detection
    ├── CMakeLists.txt
    ├── include
    │   └── superbot_detection
    ├── package.xml
    └── src

12 directories, 6 files
Building our ros2 packages
Now that we have created the packages, even though they don’t contain any meaning code, let’s learn how to compile the workspace, which contains the packages.
For that, we use the “colcon build” command on the main workspace folder:
cd ~/ros2_ws/

colcon build
source install/setup.bash
Starting >>> superbot_audio
Starting >>> superbot_description
Starting >>> superbot_detection
Finished <<< superbot_description [0.67s]
Finished <<< superbot_audio [0.69s]
Finished <<< superbot_detection [0.68s]

Summary: 3 packages finished [0.83s]
ls

# build  install  log  src
Congratulations. Now you know how to create your own packages in ROS2, and how to compile them.
We hope this post was really helpful to you. If you want a live version of this post with more details, please check the video in the next section.
Youtube video
So this is the post for today. Remember that we have the live version of this post on YouTube. If you liked the content, please consider subscribing to our YouTube channel. We are publishing new content ~every day.
Keep pushing your ROS Learning.
Related Courses & Training
If you want to learn more about ROS and ROS2, we recommend the following courses:
-
- ROS2 Basics in 5 Days Humble (Python): https://app.theconstructsim.com/Course/132
- ROS2 Basics in 5 Days Humble (C++): https://app.theconstructsim.com/Course/133
- Open-RMF / Fleet Management Training: https://www.theconstruct.ai/robot-fleet-management-ros2-open-rmf-training/

Get ROS2 Industrial Ready- Hands-On Training by The Construct cover.png
 2026 Brochure Header - 1")

0 Comments