

What we are going to learn
- Learn how to export a robot model from OnShape to URDF so that we can integrate it with ROS2
List of resources used in this post
- Use this rosject: https://app.theconstructsim.com/l/5ee7cc96/
- The Construct: https://app.theconstructsim.com/
- ROS2 Courses –▸
- URDF for Robot Modeling in ROS2: https://app.theconstructsim.com/courses/83/
- ROS2 Basics in 5 Days (Python): https://app.theconstructsim.com/Course/132
- ROS2 Basics in 5 Days (C++): https://app.theconstructsim.com/Course/133
- OnShape: https://www.onshape.com/en/
Do you want to master robotics? Robotics Developer Master Class: https://www.theconstruct.ai/robotics-developer/
Overview
ROS2 (Robot Operating System version 2) is widely used in robotics, and it uses robot models in a format called URDF (Unified Robotics Description Format).
OnShape is a 3D CAD (3-dimensional computer-aided design) tool that allows anyone to easily create 3D models using only a Web Browser.
In this post, we are going to learn how to export models from OnShape to URDF, so that the model can be used in ROS2 programs.
ROS Inside!

ROS Inside
Before anything else, if you want to use the logo above on your own robot or computer, feel free to download it, print it, and attach it to your robot. It is really free. Find it in the link below:
Creating an OnShape account
Alright, since we are going to export a model from OnShape, the first thing that you need is an OnShape account.
Feel free to create an account at: https://www.onshape.com/en/
On OnShape you can create your own design, or use any existing design already provided by OnShape.
Opening the rosject
In order to follow this tutorial, we need to have ROS2 installed in our system, and ideally a ros2_ws (ROS2 Workspace). To make your life easier, we have already prepared a rosject for that: https://app.theconstructsim.com/l/5ee7cc96/.
Just by copying the rosject (clicking the link above), you will have a setup already prepared for you.
After the rosject has been successfully copied to your own area, you should see a Run button. Just click that button to launch the rosject (below you have a rosject example).

How to Export a 3D Robot Model to ROS2 | Onshape CAD to URDF – Run rosject (example of the RUN button)
After pressing the Run button, you should have the rosject loaded. Now, let’s head to the next section to get some real practice.
Installing the onshape-to-robot package
In order to install a package (and interact with ROS2), we need a terminal.
Let’s open a terminal by clicking the Open a new terminal button.
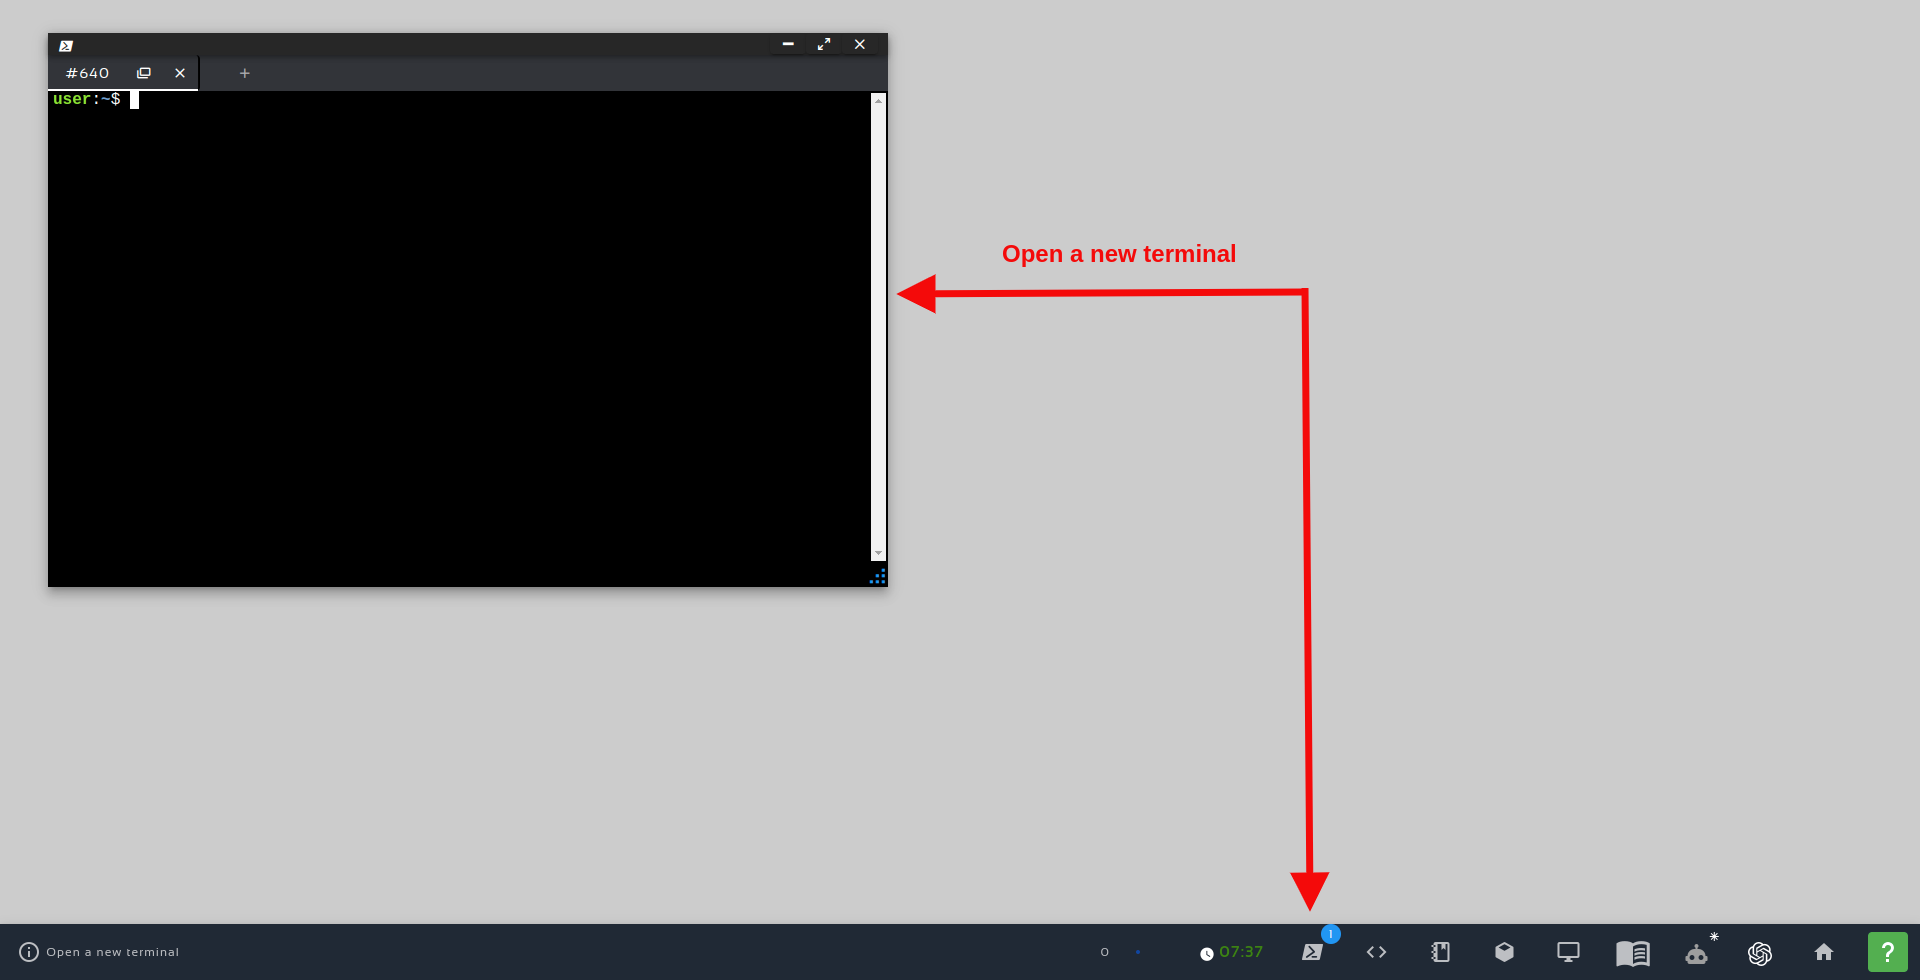
Open a new Terminal
In order to install onshape-to-robot, please run the following command in the terminal:
sudo pip install onshape-to-robot
If you want to install it in a virtual environment
cd

python -m venv onshape_venv
source onshape_venv/bin/activate
pip install onshape-to-robot
Install dependencies
To make the export from OnShape to URDF work, we also need to add openscad and meshlab. We can instal theml with the following commands:
sudo add-apt-repository ppa:openscad/releases
sudo apt-get update
sudo apt-get install openscad -y
sudo apt-get install meshlab -y
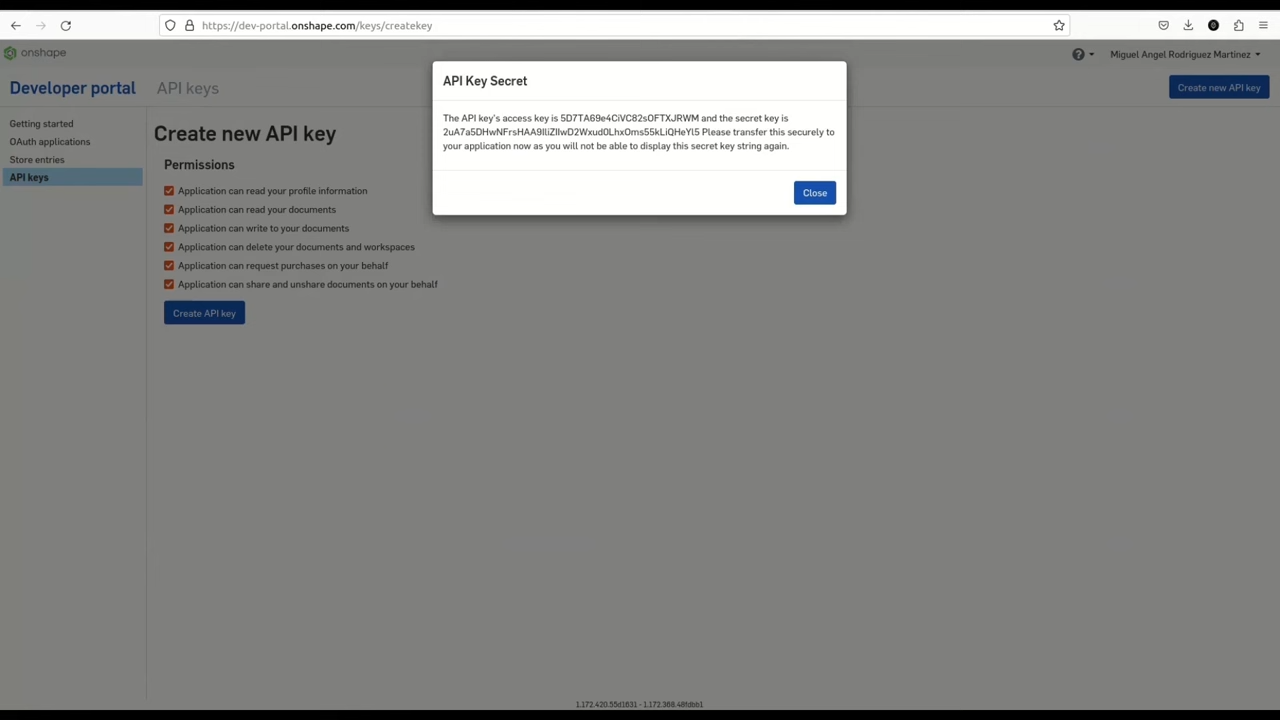
Add the OnShapeKeys to the `keys. sh` file
How to Export a 3D Robot Model to ROS2 – Onshape CAD to URDF
mkdir -pv ~/ros2_ws
cd ~/ros2_ws
touch keys.sh
export ONSHAPE_API=https://cad.onshape.com
export ONSHAPE_ACCESS_KEY=5D7TA69e4CiVC82sOFTXJRWM
export ONSHAPE_SECRET_KEY=2uA7a5DHwNFrsHAA9IliZIIwD2Wxud0LhxOms55kLiQHeYl5
It is worth mentioning that if you want to use the Code Editor, also known as IDE (Integrated Development Environment), you just have to open it as indicated in the image below:
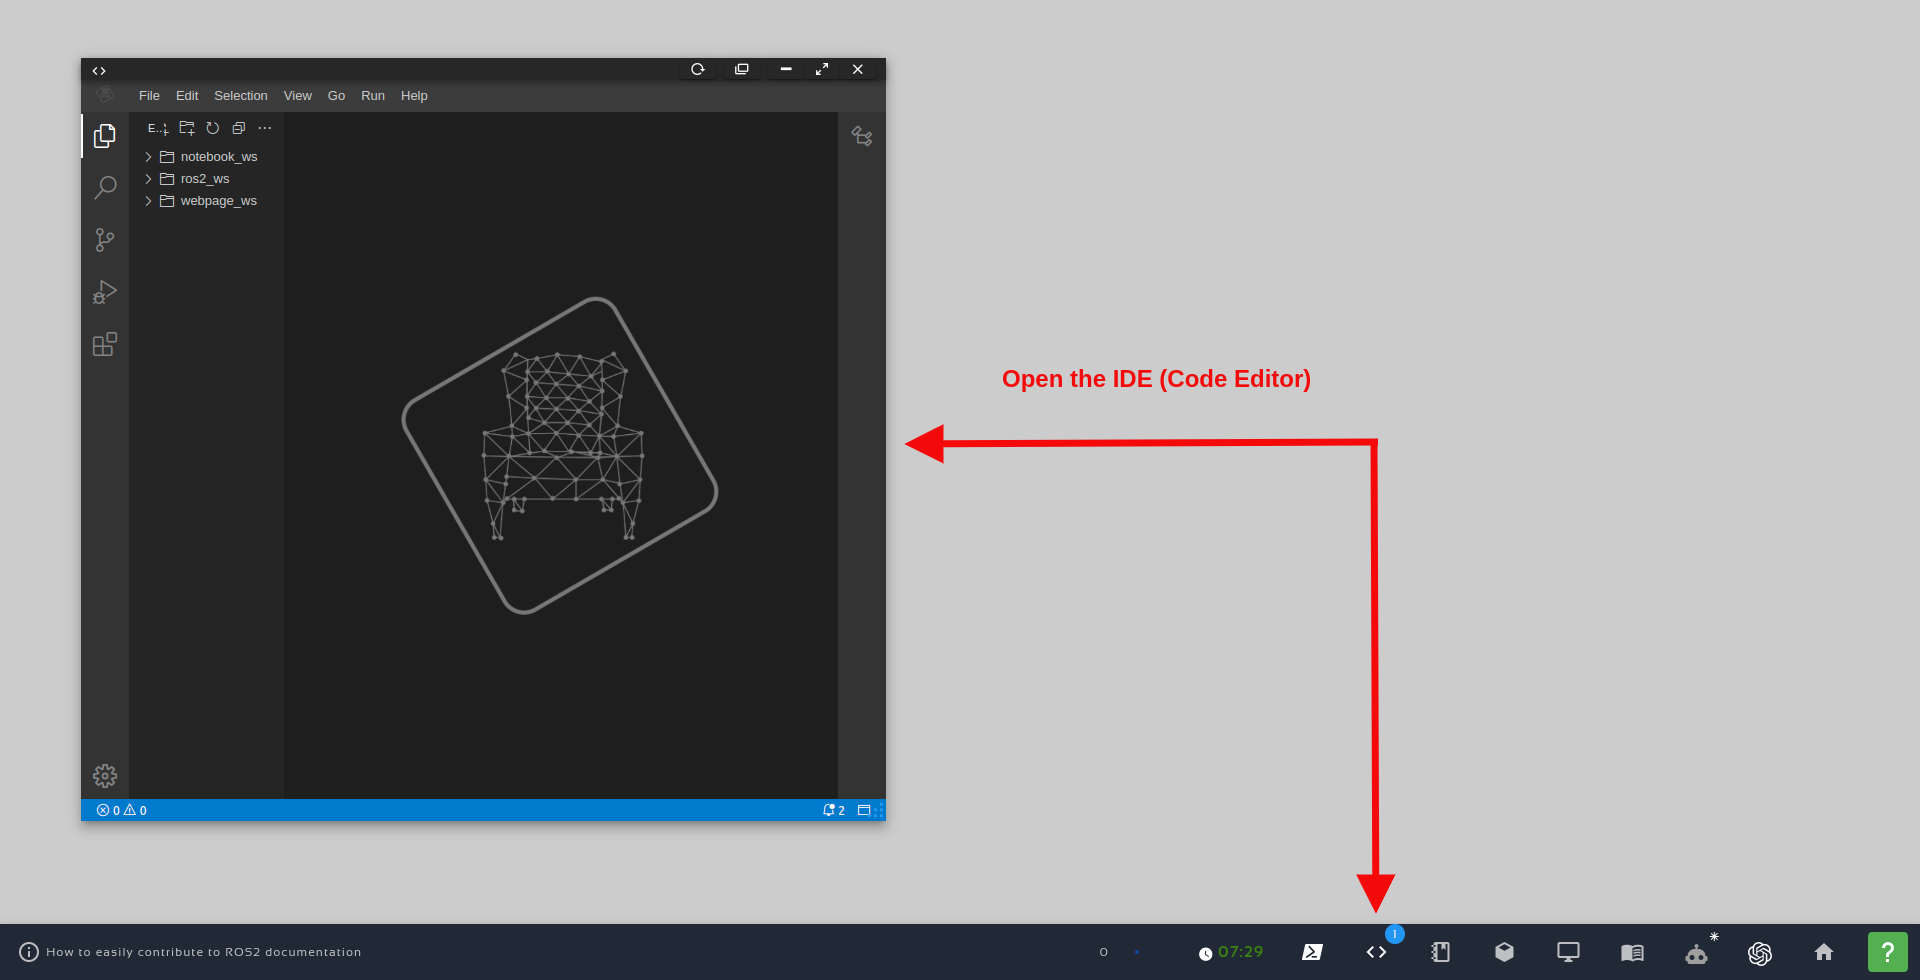
Open the IDE – Code Editor
cd ~/ros2_ws
source keys.sh
echo $ONSHAPE_API

echo $ONSHAPE_ACCESS_KEY

echo $ONSHAPE_SECRET_KEY
Creating a ROS2 package where our URDF will be exported to
If you are using the rosject that we shared at the beginning of this post, the ROS2 package is already created.
We are going to write here the steps for creating the package, just in case you want to do the project from scratch yourself.
This is how the package was created. We first enter the src folder of the ros2_ws (ROS2 Workspace):.
cd ~/ros2_ws/src
ros2 pkg create --build-type ament_cmake quadruped_description --dependencies urdf xacro
cd quadruped_description
mkdir quadruped
touch quadruped/config.json
mkdir launch rviz
{
  "documentId": "33b91de06ddc91b068fcf725",
  "outputFormat": "urdf",
  "packageName": "quadruped_description/quadruped",
  "robotName": "quadruped_robot",
  "assemblyName": "quadruped_v1"
}
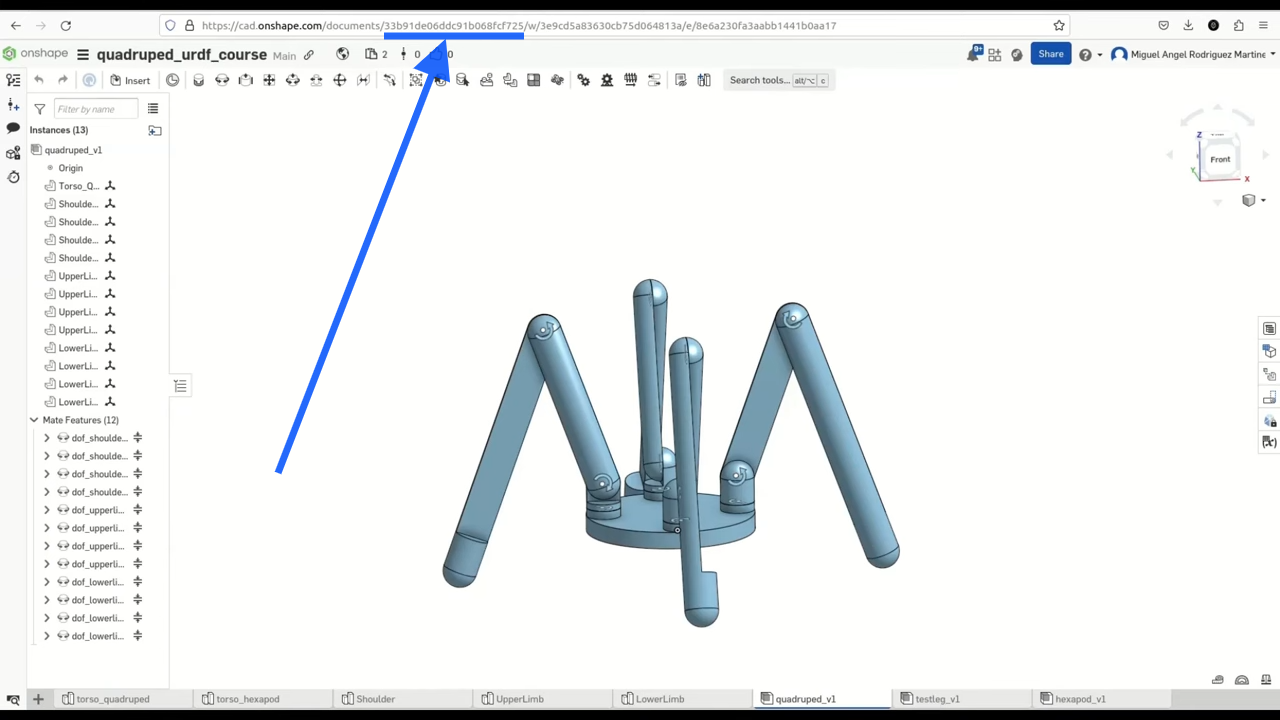
OnShape Document ID – ROS2
{
"documentId": "33b91de06ddc91b068fcf725",
"outputFormat": "urdf",
"packageName": "quadruped_description/quadruped",
"robotName": "quadruped_robot",
"assemblyName": "quadruped_v1"
}
Prepare our CMakeLists.txt to export the folders we just created
The next thing we need is to modify our ~/ros2_ws/src/quadruped_description/CMakeLists.txt file so that the folders that we just created can be “installed” when we build our package.
The final content of that quadruped_description/CMakeLists.txt file is:
cmake_minimum_required(VERSION 3.8)
project(quadruped_description)

if(CMAKE_COMPILER_IS_GNUCXX OR CMAKE_CXX_COMPILER_ID MATCHES "Clang")
  add_compile_options(-Wall -Wextra -Wpedantic)
endif()

# find dependencies
find_package(ament_cmake REQUIRED)
find_package(urdf REQUIRED)
find_package(xacro REQUIRED)

if(BUILD_TESTING)
  find_package(ament_lint_auto REQUIRED)
  ament_lint_auto_find_test_dependencies()
endif()

install(
  DIRECTORY
    rviz
    launch
        quadruped
  DESTINATION
    share/${PROJECT_NAME}/
)

ament_package()
Finally, run onshape-to-robot command
Ok, now the time has come to finally run the command that converts our model from OnShape to URDF.
For that, let’s first enter to the right folder:
cd ~/ros2_ws/src/quadruped_description
onshape-to-robot quadruped
<?xml version="1.0"?>
Creating .launch and .rviz files to be able to see our model in RViz.
These are the commands we used to create the launch files:
cd ~/ros2_ws/src/quadruped_description

touch launch/quadruped.launch.py

touch launch/start_rviz.launch.py

touch rviz/quadruped.rviz
Seeing our robot with ROS2
To see our robot model in ROS2, we first need to build our workspace:
cd ~/ros2_ws/
source install/setup.bash
colcon build --packages-select quadruped_description
source install/setup.bash
cd ~/ros2_ws/

source install/setup.bash

ros2 launch quadruped_description quadruped.launch.py
cd ~/ros2_ws/

source install/setup.bash

ros2 launch quadruped_description start_rviz.launch.py
cd ~/ros2_ws/

source install/setup.bash

ros2 run joint_state_publisher_gui joint_state_publisher_gui
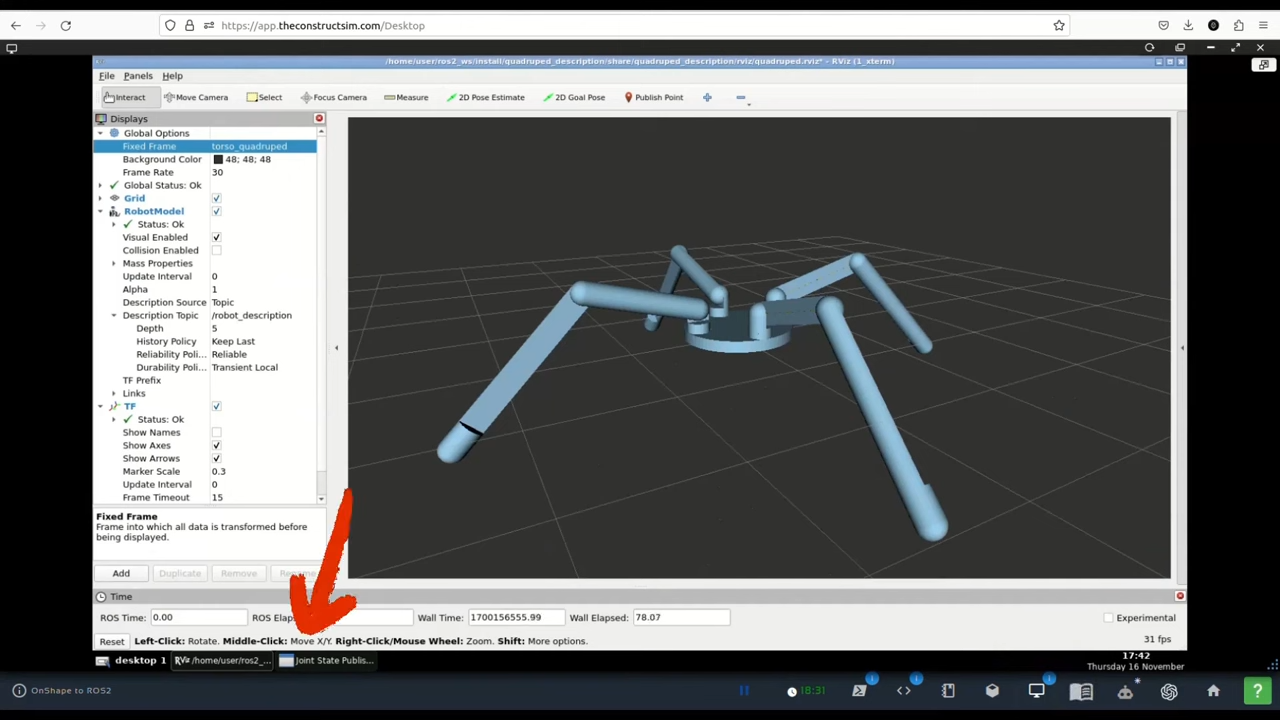
Joint State Publisher – Export a 3D Robot Model to ROS2 – Onshape CAD to URDF
Congratulations. You have now learned how to export a 3D model from OnShape to URDF.
If you want to learn more about URDF, have a look at the course below:
- URDF for Robot Modeling in ROS2: https://app.theconstructsim.com/courses/83/
We hope this post was really helpful to you. If you want a live version of this post with more details, please check the video in the next section.
Youtube video
So this is the post for today. Remember that we have the live version of this post on YouTube. If you liked the content, please consider subscribing to our YouTube channel. We are publishing new content ~every day.
Keep pushing your ROS Learning.
Related Courses & Training
If you want to learn more about ROS and ROS2, we recommend the following courses:
-
- ROS2 Basics in 5 Days Humble (Python): https://app.theconstructsim.com/Course/132
- ROS2 Basics in 5 Days Humble (C++): https://app.theconstructsim.com/Course/133
- Open-RMF / Fleet Management Training: https://www.theconstruct.ai/robot-fleet-management-ros2-open-rmf-training/

Get ROS2 Industrial Ready- Hands-On Training by The Construct cover.png
 2026 Brochure Header - 1")

0 Comments