

What we are going to learn
- Learn how to combine a Publisher, a Subscriber, and a Service in the same ROS2 Node to detect objects in a scene
List of resources used in this post
- Use this rosject: https://app.theconstructsim.com/l/5c13606c/
- The Construct: https://app.theconstructsim.com/
- ROS2 Courses –▸
- ROS2 Basics in 5 Days (Python): https://app.theconstructsim.com/Course/132
- ROS2 Basics in 5 Days (C++): https://app.theconstructsim.com/Course/133
- Apple Detector: https://shrishailsgajbhar.github.io/post/OpenCV-Apple-detection-counting
- Banana Detector: https://github.com/noorkhokhar99/Open-CV-Banana-Detection
Overview
ROS2 (Robot Operating System version 2) is becoming the de facto standard “framework” for programming robots.
In this post, we are going to learn how to combine Publisher, Subscriber, and Service in ROS2 to detect bananas and apples in an image.
ROS Inside!

ROS Inside
Before anything else, if you want to use the logo above on your own robot or computer, feel free to download it, print it, and attach it to your robot. It is really free. Find it in the link below:
Opening the rosject
In order to follow this tutorial, we need to have ROS2 installed in our system, and ideally a ros2_ws (ROS2 Workspace). To make your life easier, we have already prepared a rosject for that: https://app.theconstructsim.com/l/5c13606c/.
Just by copying the rosject (clicking the link above), you will have a setup already prepared for you.
After the rosject has been successfully copied to your own area, you should see a Run button. Just click that button to launch the rosject (below you have a rosject example).

Combining Publisher, Subscriber & Service in ROS2 Single Node – Run rosject (example of the RUN button)
After pressing the Run button, you should have the rosject loaded. Now, let’s head to the next section to get some real practice.
Modifying existing files
In order to interact with ROS2, we need a terminal.
Let’s open a terminal by clicking the Open a new terminal button.
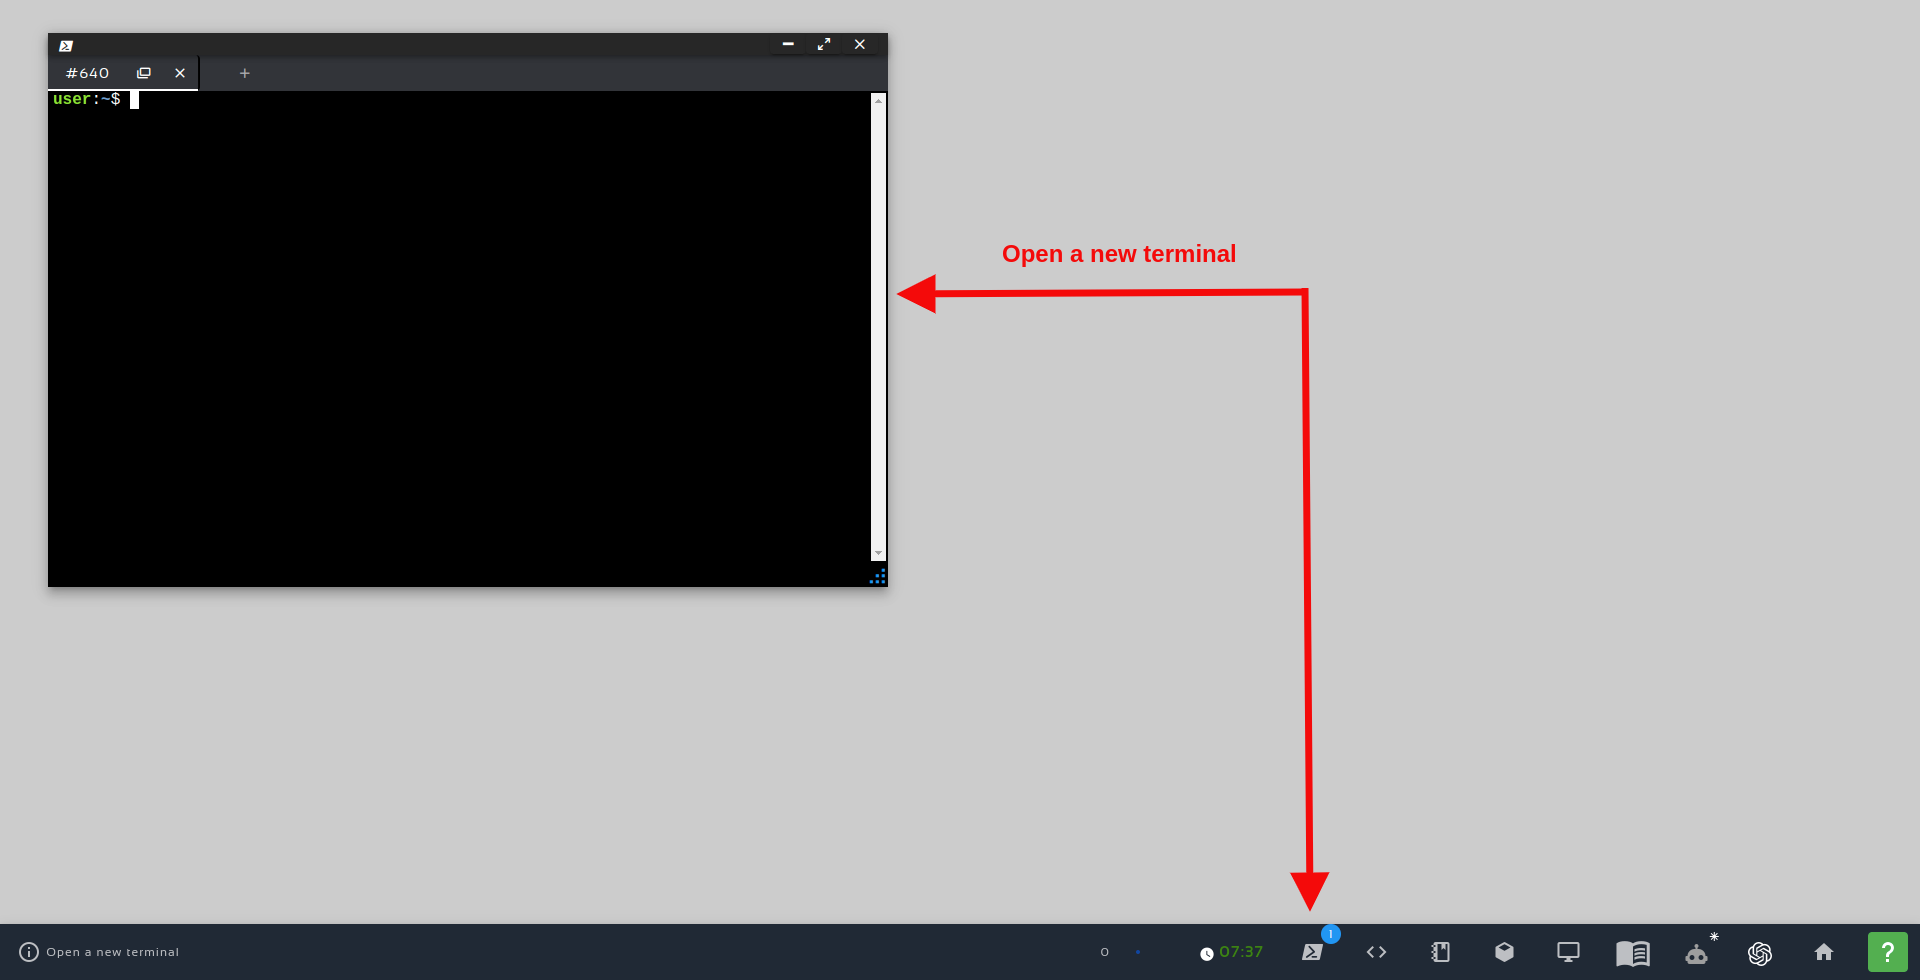
Open a new Terminal
In this rosject we cloned the https://bitbucket.org/theconstructcore/fruit_detector and placed it inside the ~/ros2_ws/src folder. You can see its content with the following command in the terminal:
ls ~/ros2_ws/src/fruit_detector/
custom_interfaces pub_sub_srv_ros2_pkg_example
cat ~/ros2_ws/src/fruit_detector/pub_sub_srv_ros2_pkg_example/scripts/pubsubserv_example.py
If you want to use the Code Editor, also known as IDE (Integrated Development Environment), you just have to open it as indicated in the image below:
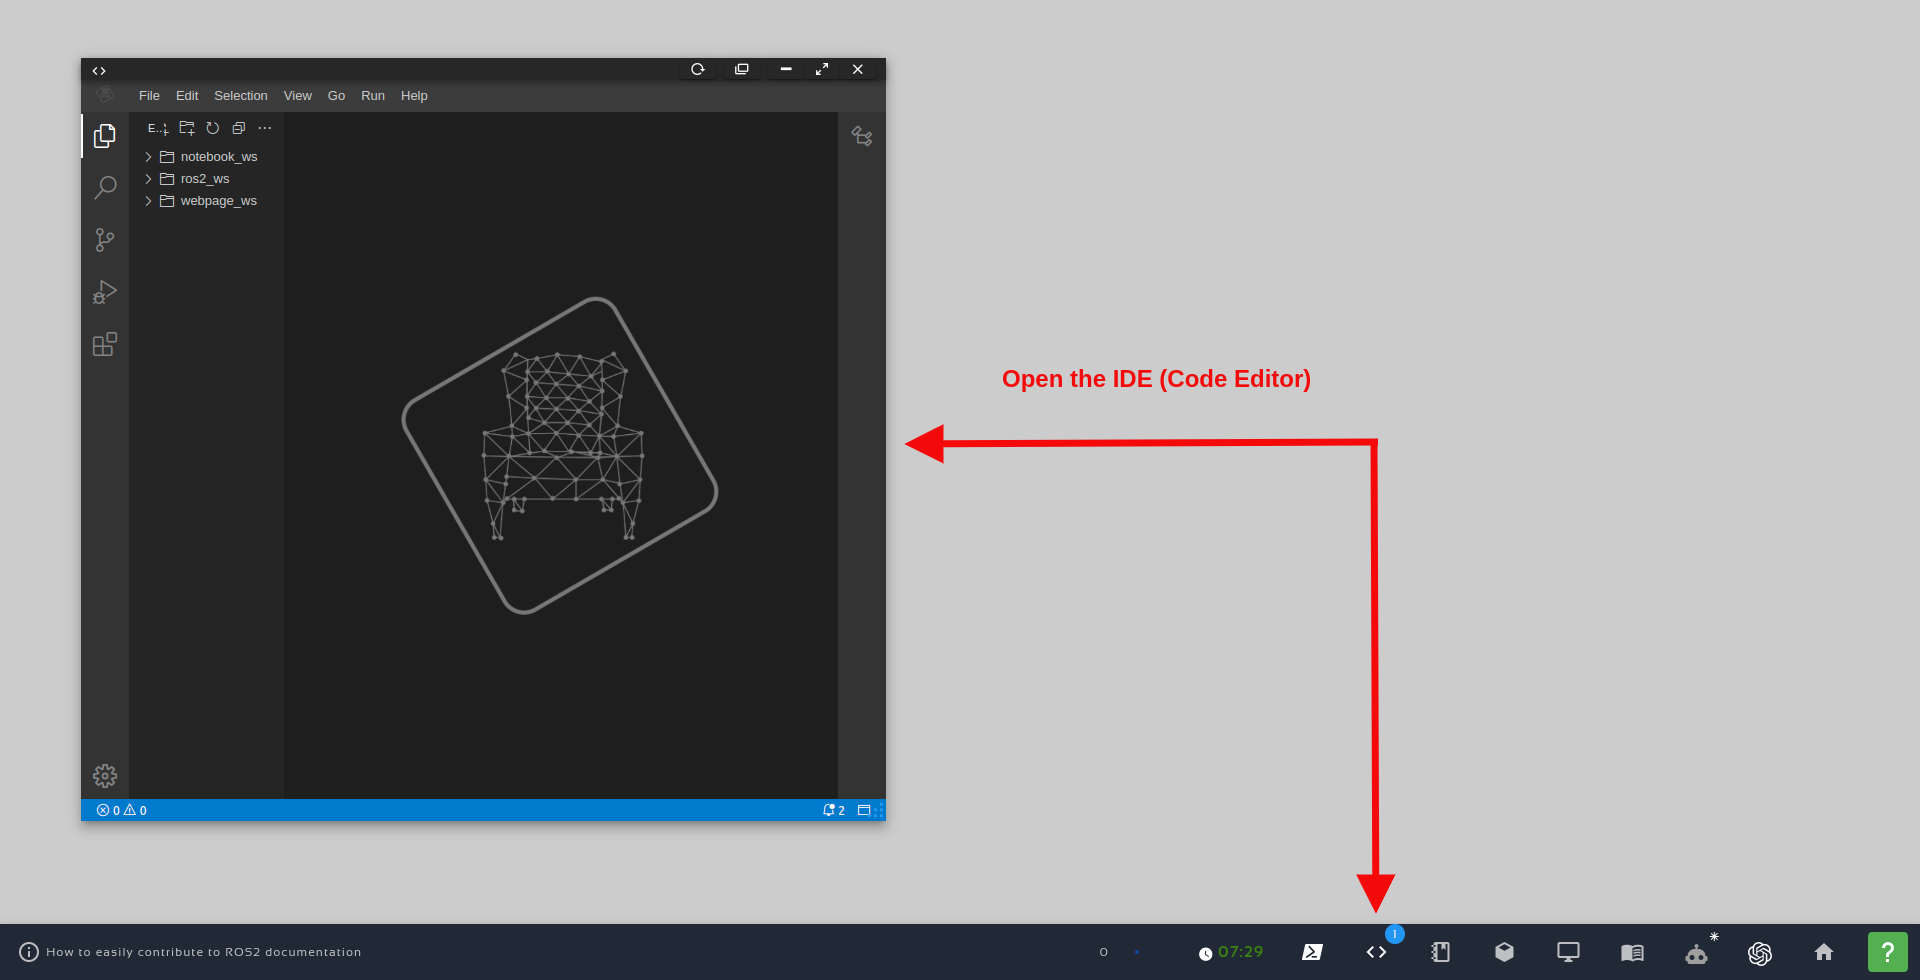
Open the IDE – Code Editor
#! /usr/bin/env python3
import rclpy
from rclpy.node import Node
from sensor_msgs.msg import Image
from custom_interfaces.srv import StringServiceMessage
import os
import cv2
from cv_bridge import CvBridge
import ament_index_python.packages as ament_index

class CombineNode(Node):

    def __init__(self, dummy=True):
        super().__init__('combine_node')

        self._dummy= dummy

        self.pkg_path = self.get_package_path("pub_sub_srv_ros2_pkg_example")
        self.scripts_path = os.path.join(self.pkg_path,"scripts")
        cascade_file_path = os.path.join(self.scripts_path,'haarbanana.xml')

        self.banana_cascade = cv2.CascadeClassifier(cascade_file_path)


        self.bridge = CvBridge()

        self.publisher = self.create_publisher(Image, 'image_detected_fruit', 10)
        self.subscription = self.create_subscription(
            Image, '/box_bot_1/box_bot_1_camera/image_raw', self.image_callback, 10)

        self.string_service = self.create_service(
            StringServiceMessage, 'detect_fruit_service', self.string_service_callback)


        self.get_logger().info(f'READY CombineNode')


    def get_package_path(self, package_name):
        try:
            package_share_directory = ament_index.get_package_share_directory(package_name)
            return package_share_directory
        except Exception as e:
            print(f"Error: {e}")
            return None


    def image_callback(self, msg):
        self.get_logger().info('Received an image.')
        self.current_image = msg


    def string_service_callback(self, request, response):
        # Handle the string service request
        self.get_logger().info(f'Received string service request: {request.detect}')


        if request.detect == "apple":
            if self._dummy:
                # Generate and publish an image related to apple detections
                apple_image = self.generate_apple_detection_image()
                self.publish_image(apple_image)
            else:
                self.detect_and_publish_apple()
        elif request.detect == "banana":
            if self._dummy:
                # Generate and publish an image related to banana detections
                banana_image = self.generate_banana_detection_image()
                self.publish_image(banana_image)
            else:
                self.detect_and_publish_banana()
        else:
            # If no specific request
            unknown_image = self.generate_unknown_detection_image()
            self.publish_image(unknown_image)

        # Respond with success and a message
        response.success = True
        response.message = f'Received and processed: {request.detect}'
        return response

    def generate_unknown_detection_image(self):

        self.apple_img_path = os.path.join(self.scripts_path,'unknown.png')
        self.get_logger().warning("Unknown path="+str(self.apple_img_path))
        # Replace this with your actual image processing logic
        # In this example, we create a simple red circle on a black image
        image = cv2.imread(self.apple_img_path)  # Replace with your image path
        if image is None:
            self.get_logger().error("Failed to load the unknown image.")
        else:
            self.get_logger().warning("SUCCESS to load the unknown image.")
        return self.bridge.cv2_to_imgmsg(image, encoding="bgr8")


    def generate_apple_detection_image(self):

        self.apple_img_path = os.path.join(self.scripts_path,'apple.png')
        self.get_logger().warning("Apple path="+str(self.apple_img_path))
        # Replace this with your actual image processing logic
        # In this example, we create a simple red circle on a black image
        image = cv2.imread(self.apple_img_path)  # Replace with your image path
        if image is None:
            self.get_logger().error("Failed to load the apple image.")
        else:
            self.get_logger().warning("SUCCESS to load the apple image.")
        return self.bridge.cv2_to_imgmsg(image, encoding="bgr8")

    def generate_banana_detection_image(self):
        self.banana_img_path = os.path.join(self.scripts_path,'banana.png')
        self.get_logger().warning("Banana path="+str(self.banana_img_path))
        # Replace this with your actual image processing logic
        # In this example, we create a simple yellow circle on a black image
        image = cv2.imread(self.banana_img_path)  # Replace with your image path
        if image is None:
            self.get_logger().error("Failed to load the banana image.")
        else:
            self.get_logger().warning("SUCCESS to load the banana image.")
        return self.bridge.cv2_to_imgmsg(image, encoding="bgr8")

    def publish_image(self, image_msg):
        if image_msg is not None:
            self.publisher.publish(image_msg)


    def detect_and_publish_apple(self):
        if self.current_image is not None:
            frame = self.bridge.imgmsg_to_cv2(self.current_image, desired_encoding="bgr8")

            # Your apple detection code here (from approach_2.py)
            # HIGH=====
            # (0.0, 238.935, 255.0)
            # LOW=====
            # (1.8, 255.0, 66.045)


            low_apple_raw = (0.0, 80.0, 80.0)
            high_apple_raw = (20.0, 255.0, 255.0)

            image_hsv = cv2.cvtColor(frame, cv2.COLOR_BGR2HSV)

            mask = cv2.inRange(image_hsv, low_apple_raw, high_apple_raw)

            cnts, _ = cv2.findContours(mask.copy(), cv2.RETR_EXTERNAL,
                                    cv2.CHAIN_APPROX_SIMPLE)
            c_num = 0
            radius = 10
            for i, c in enumerate(cnts):
                ((x, y), r) = cv2.minEnclosingCircle(c)
                if r > radius:
                    print("OK="+str(r))
                    c_num += 1
                    cv2.circle(frame, (int(x), int(y)), int(r), (0, 255, 0), 2)
                    cv2.putText(frame, "#{}".format(c_num), (int(x) - 10, int(y)),
                                cv2.FONT_HERSHEY_SIMPLEX, 0.6, (255, 0, 0), 2)
                else:
                    print(r)


            # Publish the detected image as a ROS 2 Image message
            image_msg = self.bridge.cv2_to_imgmsg(frame, encoding="bgr8")
            self.publish_image(image_msg)

        else:
            self.get_logger().error("Image NOT found")


    def detect_and_publish_banana(self):
        self.get_logger().warning("detect_and_publish_banana Start")
        if self.current_image is not None:
            self.get_logger().warning("Image found")
            frame = self.bridge.imgmsg_to_cv2(self.current_image, desired_encoding="bgr8")
            gray = cv2.cvtColor(frame, cv2.COLOR_BGR2GRAY)

            bananas = self.banana_cascade.detectMultiScale(
                gray, scaleFactor=1.1, minNeighbors=5, minSize=(30, 30), flags=cv2.CASCADE_SCALE_IMAGE)

            for (x, y, w, h) in bananas:
                cv2.rectangle(frame, (x, y), (x+w, y+h), (0, 255, 0), 3)
                cv2.putText(frame, 'Banana', (x-10, y-10),
                            cv2.FONT_HERSHEY_SIMPLEX, 1, (0, 255, 0))

            # Publish the detected image as a ROS 2 Image message
            self.get_logger().warning("BananaDetection Image Publishing...")
            image_msg = self.bridge.cv2_to_imgmsg(frame, encoding="bgr8")
            self.publish_image(image_msg)
            self.get_logger().warning("BananaDetection Image Publishing...DONE")
        else:
            self.get_logger().error("Image NOT found")


def main(args=None):
    rclpy.init(args=args)
    node = CombineNode(dummy=False)
    rclpy.spin(node)
    node.destroy_node()
    rclpy.shutdown()

if __name__ == '__main__':
    main()
~/ros2_ws/src/fruit_detector/pub_sub_srv_ros2_pkg_example/CMakeLists.txt
cmake_minimum_required(VERSION 3.8)
project(pub_sub_srv_ros2_pkg_example)

if(CMAKE_COMPILER_IS_GNUCXX OR CMAKE_CXX_COMPILER_ID MATCHES "Clang")
  add_compile_options(-Wall -Wextra -Wpedantic)
endif()

find_package(ament_cmake REQUIRED)
find_package(sensor_msgs REQUIRED)
find_package(std_srvs REQUIRED)
find_package(custom_interfaces REQUIRED)


if(BUILD_TESTING)
  find_package(ament_lint_auto REQUIRED)
  set(ament_cmake_copyright_FOUND TRUE)
  set(ament_cmake_cpplint_FOUND TRUE)
  ament_lint_auto_find_test_dependencies()
endif()

# We add it to be able to use other modules of the scripts folder
install(DIRECTORY
  scripts
  rviz
  DESTINATION share/${PROJECT_NAME}
)

install(PROGRAMS
	scripts/example1_dummy.py
  	scripts/example1.py
	scripts/example1_main.py
	scripts/pubsubserv_example.py
  DESTINATION lib/${PROJECT_NAME}
)

ament_package()
cd ~/ros2_ws/

source install/setup.bash
colcon build --packages-select pub_sub_srv_ros2_pkg_example
After the package is compiled, we could run that python script using the following command:
cd ~/ros2_ws

source install/setup.bash

ros2 run pub_sub_srv_ros2_pkg_example pubsubserv_example.py
$ ros2 node list

/combine_node
Launching the simulation
ros2 launch box_bot_gazebo garden_main.launch.xml
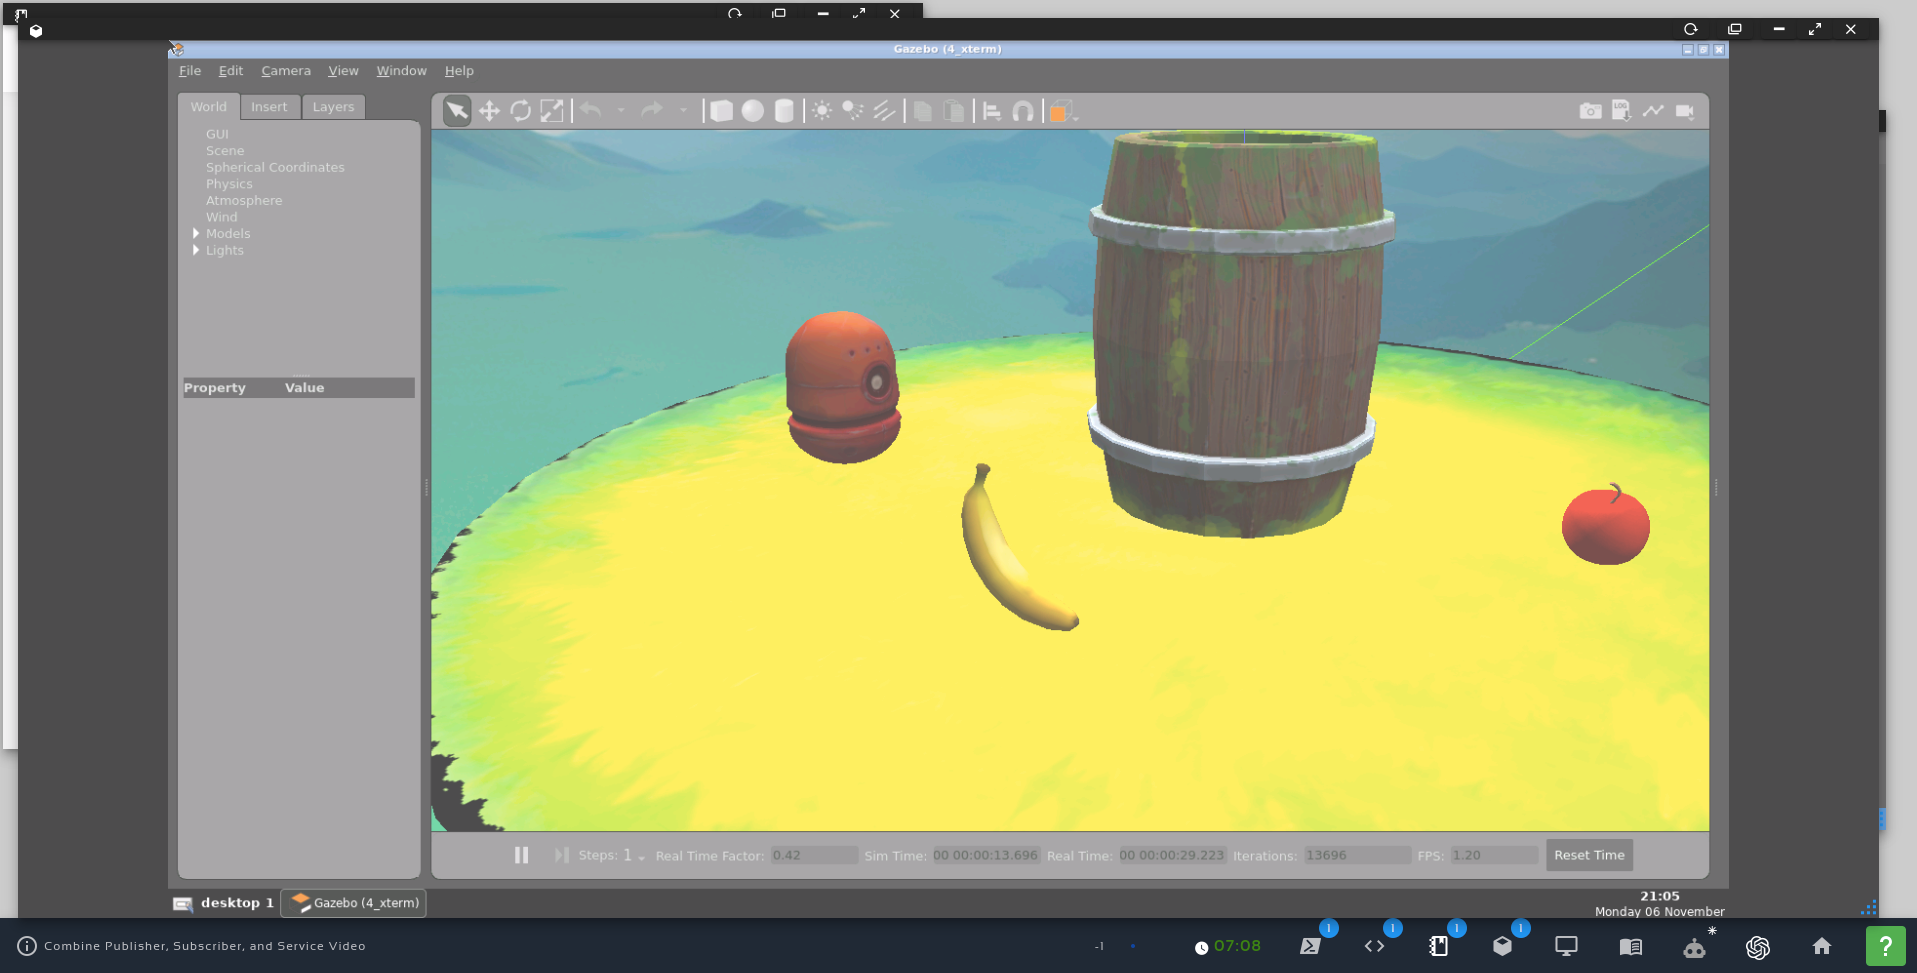
Combine Publisher, Subscriber & Service in ROS2 Single Node – Simulation
...
[INFO] [1699306370.709477898] [combine_node]: Received an image.
[INFO] [1699306373.374917545] [combine_node]: Received an image.
[INFO] [1699306376.390623360] [combine_node]: Received an image.
[INFO] [1699306379.277906884] [combine_node]: Received an image
...
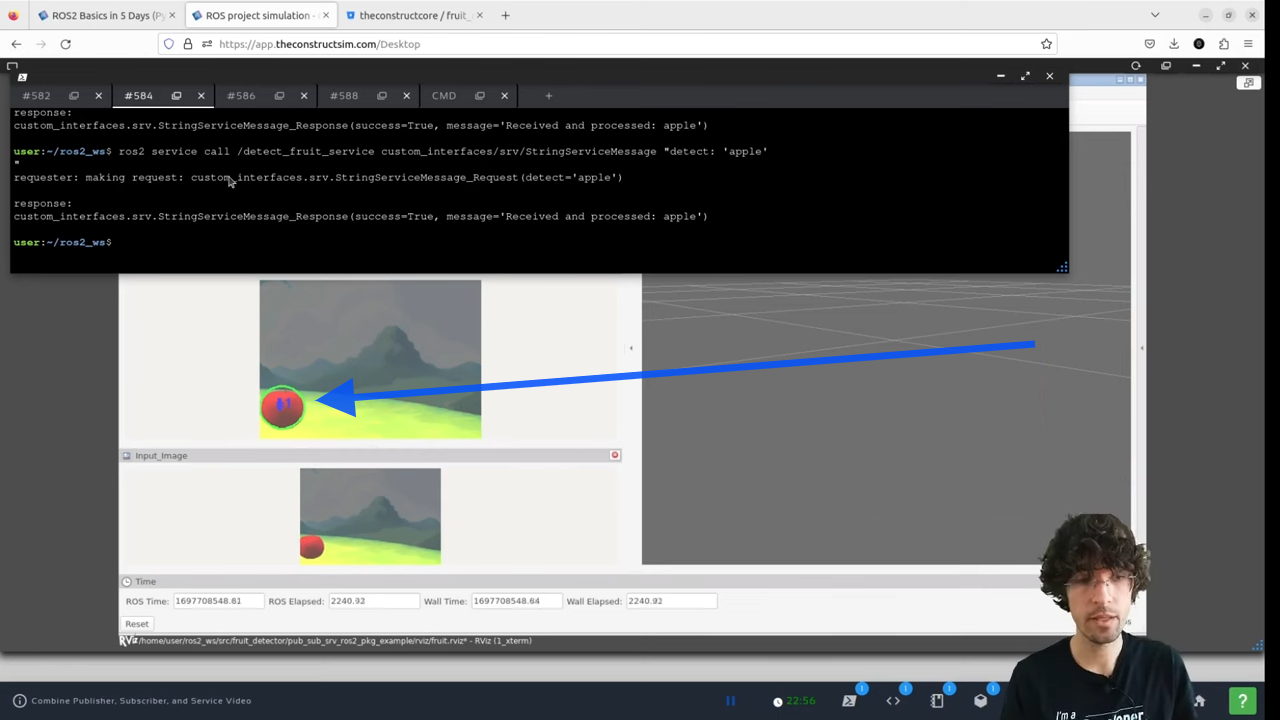
See what the robot sees through rviz2
rviz2 --display-config ~/ros2_ws/src/fruit_detector/pub_sub_srv_ros2_pkg_example/rviz/fruit.rviz
self.subscription = self.create_subscription( Image, '/box_bot_1/box_bot_1_camera/image_raw', self.image_callback, 10)
def image_callback(self, msg):
    self.get_logger().info('Received an image.')
    self.current_image = msg
    def __init__(self, dummy=True):
        super().__init__('combine_node')

        # ...
        self.string_service = self.create_service(
            StringServiceMessage, 'detect_fruit_service', self.string_service_callback)

    def string_service_callback(self, request, response):
        # Handle the string service request
        self.get_logger().info(f'Received string service request: {request.detect}')


        if request.detect == "apple":
            if self._dummy:
                # Generate and publish an image related to apple detections
                apple_image = self.generate_apple_detection_image()
                self.publish_image(apple_image)
            else:
                self.detect_and_publish_apple()
        elif request.detect == "banana":
            if self._dummy:
                # Generate and publish an image related to banana detections
                banana_image = self.generate_banana_detection_image()
                self.publish_image(banana_image)
            else:
                self.detect_and_publish_banana()
        else:
            # If no specific request
            unknown_image = self.generate_unknown_detection_image()
            self.publish_image(unknown_image)

        # Respond with success and a message
        response.success = True
        response.message = f'Received and processed: {request.detect}'
        return response
...
[INFO] [1699306370.709477898] [combine_node]: Received an image.
[INFO] [1699306373.374917545] [combine_node]: Received an image.
[INFO] [1699306376.390623360] [combine_node]: Received an image.
[INFO] [1699306379.277906884] [combine_node]: Received an image
...
ros2 service list
You should see a huge number of services, and among them, you should be able to find the following one, that we created:
/detect_fruit_service
ros2 service call /detect_fruit_service custom_interfaces/srv/StringServiceMessage "detect: 'apple'"
ros2 service call /detect_fruit_service custom_interfaces/srv/StringServiceMessage "detect: 'banana'"
ros2 service call /detect_fruit_service custom_interfaces/srv/StringServiceMessage "detect: 'strawberry'"
requester: making request: custom_interfaces.srv.StringServiceMessage_Request(detect='banana')

response: custom_interfaces.srv.StringServiceMessage_Response(success=True, message='Received and processed: banana')
BananaDetection Image Publishing...
ROS2 – Combine Publisher, Subscriber, and Service with Practical Robot Examples – Part 2
Congratulations. Now you know how to combine different ROS2 pieces in a single node.
We hope this post was really helpful to you. If you want a live version of this post with more details, please check the video in the next section.
Youtube video
So this is the post for today. Remember that we have the live version of this post on YouTube. If you liked the content, please consider subscribing to our YouTube channel. We are publishing new content ~every day.
Keep pushing your ROS Learning.
Related Courses & Training
If you want to learn more about ROS and ROS2, we recommend the following courses:
-
- ROS2 Basics in 5 Days Humble (Python): https://app.theconstructsim.com/Course/132
- ROS2 Basics in 5 Days Humble (C++): https://app.theconstructsim.com/Course/133
- Open-RMF / Fleet Management Training: https://www.theconstruct.ai/robot-fleet-management-ros2-open-rmf-training/

Get ROS2 Industrial Ready- Hands-On Training by The Construct cover.png
 2026 Brochure Header - 1")

0 Comments